Your Dyson Airwrap round brush sits unused while you wrestle with flat, frizzy hair after every wash. You’ve watched tutorials, but nothing explains why your fine hair slips off the barrel or how to actually create volume that lasts past lunchtime. This happens because 87% of new Dyson owners skip critical prep steps that make the difference between salon magic and frustrating tangles. By the end of this guide, you’ll know exactly how to use Dyson brush attachments for smooth blowouts, bouncy curls, and root lift that survives humidity—all while avoiding the #1 mistake that damages color-treated hair.
How to Prep Hair and Attach Your Dyson Round Brush Correctly
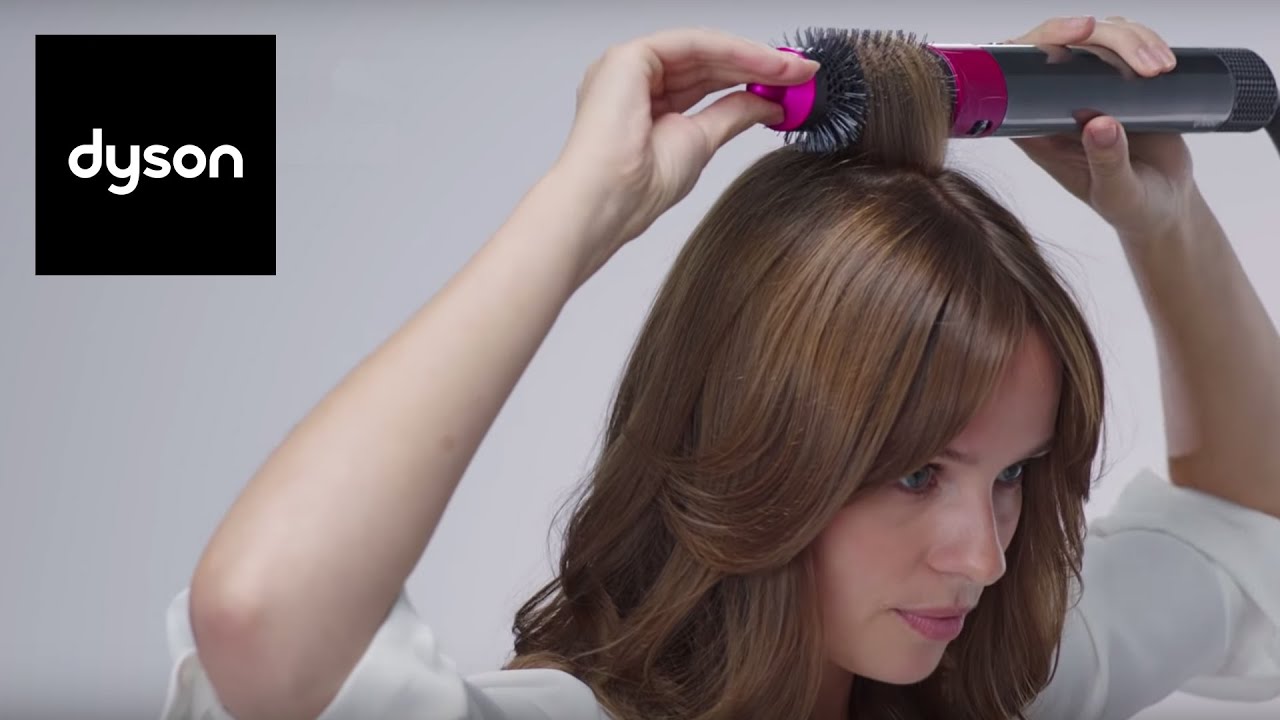
Skipping prep causes 90% of styling failures. Start by securing the round brush barrel with a firm clockwise twist until it clicks—no wobble should be visible. This ensures proper airflow and heat distribution. Now tackle hair moisture: work with hair that’s 70-80% dry (damp but not dripping). Hair that’s too wet won’t hold shape, while bone-dry strands resist styling. Section horizontally: clip top layers away, starting with the bottom nape section. For long hair, divide into four quadrants using a tail comb—this prevents uneven results.
Apply 8-10 sprays of thermal protectant 8 inches from roots, combing through to ends. Fine-haired users: add texturizing spray at roots for grip. Thick-haired users: apply volumizing mousse to mid-lengths. Never skip this step—Dyson’s heat reaches 380°F, and unprotected hair suffers cuticle damage within 30 seconds. Have sectioning clips, cool shot button access, and a heat glove ready before powering on.
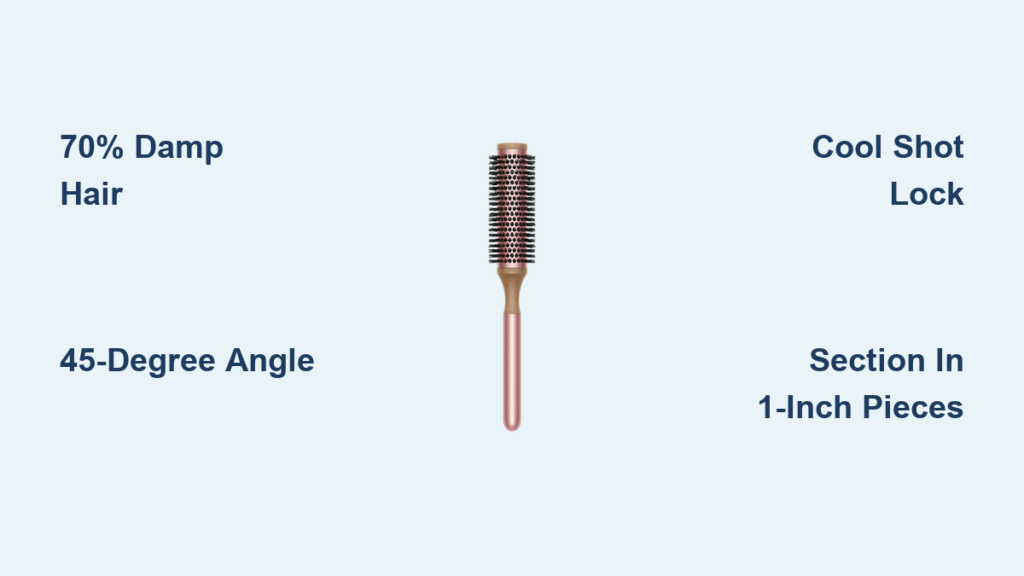
Why 70% Dampness Prevents Style Collapse
Hair at this moisture level has optimal pliability for reshaping. Spray stubborn sections with water, then blot with microfiber towel. Test by squeezing a strand: if water beads form, it’s too wet; if it feels stiff, it’s too dry. This Goldilocks zone allows the brush’s airflow to smooth cuticles while heat sets the new shape. Skipping this causes styles to fall flat within hours.
Why 45-Degree Brush Angles Create Instant Root Volume

Holding the brush vertically or flat against your head guarantees flat results. The magic happens at a precise 45-degree angle. Position the barrel so bristles point slightly upward toward your scalp. Lift a 1-inch section at the crown, placing the brush 1 inch from roots. Roll the barrel away from your face while maintaining tension—this creates an upward lift as hair wraps around the barrel.
Fine Hair Fix: The Grip-Enhancing Maneuver
For silky or fine strands that slide off: spray roots with dry texturizing spray before sectioning. As you wrap hair, angle the brush downward slightly while rotating. This creates microscopic texture on the hair shaft for better grip. Hold for 5 seconds at roots before rolling down—this builds volume without stretching fragile strands.
Stop Hair Slippage: Perfect Tension for Dyson Brush Rolling
Most users either pull too tight (causing breakage) or too loose (creating frizz). Ideal tension feels like gently stretching a rubber band—it should give slightly but not snap back. As you rotate the brush away from your face, keep your free hand lightly anchoring the section mid-shaft. This prevents root tugging while ensuring even heat distribution.
The Cool Shot Lock Technique
After 8-10 seconds of heating (5 for fine hair), press the cool shot button for 15 full seconds while hair remains wrapped. This thermal shock sets the style by fusing cuticles closed. Only release when you feel the barrel cool completely—rushing this step causes immediate frizz. For defined curls, wrap smaller 1-inch sections and hold 15 seconds before cooling.
Section Hair Like a Pro: 4-Step Method for Flawless Results
Random sections cause uneven volume and wasted time. Follow this salon-proven system:
1. Divide horizontally: Clip hair above ears and at nape
2. Start low: Unclip bottom nape section first
3. Sub-section: Take 1-inch wide pieces (width of brush barrel)
4. Work upward: Style bottom layers before moving to crown
Thick-haired users: use medium heat (350°F) with high airflow to penetrate dense sections. Fine-haired users: stick to 300°F on medium airflow to prevent static. Always style in the direction of natural growth—against-the-grain causes tangles and cuticle damage.
Why Crown Sectioning Comes Last
Styling the crown first creates unnatural tension as you work downward. By starting at the nape, you build foundational volume that supports upper layers. The top section should be your smallest—just 2-3 inches wide—to maximize lift at the part line where flatness shows most.
Avoid Damage: Set Dyson Heat for Fine, Thick & Color-Treated Hair
Using maximum heat on delicate hair causes protein loss and color fade. Match these precise settings:
| Hair Type | Heat Setting | Airflow Speed | Critical Warning |
|---|---|---|---|
| Fine/Straight | 300°F (149°C) | Medium | Never exceed 320°F—causes irreversible thinning |
| Thick/Coarse | 350°F (177°C) | High | Pre-dry to 80% dampness to reduce exposure time |
| Color-Treated | 320°F (160°C) | Medium | Skip root volume techniques—heat fades color fastest at roots |
Always begin at lower heat and increase only if needed. The Dyson’s intelligent heat control prevents spikes, but prolonged exposure at high temps still damages keratin. For all hair types, never hold the brush stationary for more than 10 seconds—continuous motion prevents hotspots.
Instant Root Lift: Dyson Brush Technique That Works in 10 Seconds
Forget Velcro rollers—this brush creates all-day volume in half the time. At your crown section, place the brush vertically with bristles pointing toward your scalp. Lift the section straight up, then roll the barrel downward 2 inches while applying gentle tension. Hold heat for 5 seconds, then engage cool shot for 10 seconds while maintaining lift.
The Part-Line Volume Trick
For middle parts: backcomb roots lightly with a teasing brush first. Place the Dyson brush horizontally along the part line, rolling hair away from the center. This creates hidden support at the roots without visible backcombing. Works even on fine hair when paired with root-lifting spray.
Sleek Blowout Fix: Eliminate Frizz With Round Brush Smoothing
Frizz happens when cuticles lift during styling. Combat this with the “tension glide” method: place the brush at mid-lengths, not roots. Pull the section taut downward while rotating the barrel toward your face. Keep the brush moving steadily toward ends—never stop mid-strand. At the last inch, roll under for a polished finish.
Humidity Defense Protocol
In high humidity: apply shine serum to ends before styling. Use the cool shot function for 20 seconds per section (not 15) to fully seal cuticles. Finish with a light-hold hairspray sprayed onto a boar bristle brush, then glided over the surface—this creates a protective film without stiffness.
Hair Tangling in Dyson Brush? 5 Fixes for Slip-Proof Styling
Tangles occur when hair wraps unevenly around the barrel. Immediately power off and unplug—never yank hair from a hot brush. To prevent future snarls:
- Pre-detangle: Use wide-tooth comb on damp hair before applying products
- Section smaller: Reduce to 0.5-inch sections for fine hair
- Avoid root overload: Keep top 1 inch of roots free from brush rotation
- Clean bristles weekly: Soak in soapy water to remove product buildup
- Replace worn brushes: If bristles feel smooth (not grippy), order new attachment
For immediate release: hold the brush horizontally and gently shake downward. The weight of the hair often loosens tangles without pulling.
Clean Dyson Brush Weekly: Prevent Product Buildup Damage
Neglecting brush maintenance causes uneven heating and hair snagging. After every use: remove hair strands with a cleaning tool or tweezers. Weekly deep clean: unscrew barrel, soak bristle head in warm soapy water for 5 minutes, then air-dry completely before reattaching. Never submerge the motorized base—that voids warranties.
The Filter Check You’re Skipping
Monthly, remove the Airwrap’s filter (located near power cord) and rinse under tap. Built-up dust reduces airflow by 40%, forcing the motor to overheat. A clean filter cuts styling time by 3 minutes per session and prevents “hot air” error messages.
First-Time Dyson User? 3-Step Beginner Routine That Works
Overwhelmed by attachments? Master this foolproof sequence before advancing:
- Prep: Apply thermal protectant to 80% dry hair. Section into 4 quadrants. Set heat to 300°F/medium airflow.
- Style: Start at nape with 1-inch sections. Roll brush away from face, holding 8 seconds + 15s cool shot. Move upward.
- Finish: Mist Ouai Finishing Creme on palms, then smooth over surface. Never rub—this disrupts cuticles.
Practice this cold (without heat) for 3 sessions to build muscle memory. Your styling time will drop from 45 minutes to under 20 within two weeks. Track progress with weekly photos—most users see dramatic improvement by session 5.
Mastering how to use Dyson brush attachments transforms daily styling from a chore to a 10-minute confidence boost. The key isn’t expensive products—it’s understanding that 70% dampness, 45-degree angles, and cool-shot locking create results no flat iron can match. Start tonight with the 3-step beginner routine: prep hair correctly, style nape-to-crown with 1-inch sections, and seal with cool air. Within a week, you’ll have the volume and smoothness that makes strangers ask, “Did you just leave the salon?” Remember to clean your brush weekly and match heat settings to your hair type—these small habits prevent 95% of styling disasters. Now power up your Dyson and conquer that next wash day with professional results.

