Your Dyson vacuum’s suction power has suddenly dropped, and you’ve traced the problem to a clogged root cyclone assembly. Before you call for professional help or consider replacing your expensive vacuum, learning how to open Dyson root cyclone components could save you hundreds of dollars in repair costs. The root cyclone is the heart of your Dyson’s filtration system, and regular maintenance keeps your vacuum performing like new. This guide shows you exactly how to safely access and clean your Dyson’s root cyclone assembly in under 30 minutes with basic tools you likely already own.
Essential Tools for Opening Dyson Root Cyclone Assembly
Gather These Critical Tools Before Starting
You’ll need these specific tools to avoid damaging your vacuum’s delicate components:
– Small flathead screwdriver (precision type, 1.5mm)
– Phillips #1 screwdriver for some models
– Microfiber cloth to protect surfaces
– Small container for screws (if applicable)
– Bright work light to see hidden clips
– Compressed air can for cleaning (optional but recommended)
Pro Tip: Lay down a clean towel on your work surface to prevent scratching plastic components. Avoid using metal tools that could chip or crack the cyclone assembly. If your model has screws instead of clips (common on older V6-V8 models), keep them organized in labeled containers to avoid reassembly confusion.
Step-by-Step Process to Access Your Dyson Root Cyclone

Immediate Safety Steps Before Disassembly
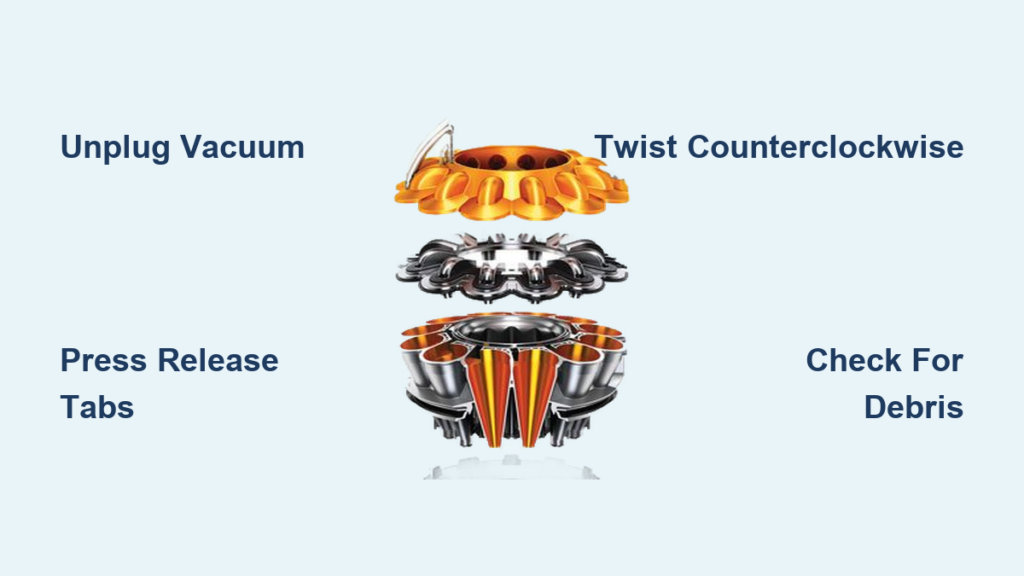
Unplug your vacuum and remove the battery if you have a cordless model. This critical safety step prevents accidental activation during disassembly – a common mistake that could cause serious injury. Wait 10 minutes for electrical components to fully discharge. For corded models, ensure the plug is completely removed from the wall outlet, not just the vacuum end.
Removing the Bin and Filter Assembly Properly
-
Locate your model’s bin release mechanism – this differs by model:
– V7-V11 models: Press the orange bin release button on the handle
– Ball models: Press the bin release lever near the cleaner head
– Older cylinder models: Twist the bin counterclockwise -
Hold the bin over a trash can and press the bin empty button to release debris
-
Remove the post-motor filter by pressing its release tabs and lifting straight out
Visual Cue: Look for red indicators on release mechanisms – Dyson uses this color consistently across models to mark critical disassembly points. If you’re struggling to find the release, check for small arrows molded into the plastic near potential release points.
Accessing the Root Cyclone Assembly on Your Specific Model
Why Your Cyclone Assembly Won’t Release (And How to Fix It)
Many users force the cyclone assembly when it won’t budge, causing expensive damage. Instead:
- Lay your vacuum on its side with the cyclone assembly facing up
- Locate the two release tabs (usually red) on opposite sides of the cyclone
- Press both tabs simultaneously while twisting the cyclone counterclockwise
- If stiff, warm the area gently with a hairdryer for 30 seconds to expand the plastic slightly
Common Mistake: Trying to lift the cyclone straight up without twisting first. The cyclone assembly uses a bayonet mount system that requires both downward pressure and twisting motion to release.
Opening the Root Cyclone Housing Without Damage
How to Separate Stuck Cyclone Components Safely
Once removed from the vacuum body:
- Place the cyclone assembly on a clean surface with the bin attachment side down
- Locate the seam between the cyclone cone and main housing (about 1/3 of the way up)
- Insert your flathead screwdriver into the seam at the bottom
- Gently twist the screwdriver to create a small gap (don’t pry aggressively)
- Work your way around the circumference, creating small gaps at multiple points
- Once loose, use your thumbs to press evenly around the seam while twisting
Warning: Never insert tools more than 1/8 inch to avoid puncturing internal filters. If you encounter significant resistance, stop immediately – some newer models (V12, V15) have hidden screws that must be removed first.
Thorough Cleaning and Maintenance Procedures
Complete Internal Cleaning After Opening Root Cyclone

With the cyclone housing open:
- Remove visible debris with your fingers (wear gloves if handling pet hair)
- Use a soft brush (an old toothbrush works well) to clean between cyclone cones
- Rinse the clear bin liner with warm water (never use soap on filters)
- Inspect the fine mesh filter for tears – hold it up to light to check
- Use compressed air to blow out dust from between cyclone cones
Time-Saver: Create a cleaning station with multiple containers – one for soaking filters, one for rinsed components, and one for dry parts ready for reassembly.
Proper Reassembly Sequence for Optimal Performance
- Ensure all components are completely dry (24 hours minimum for filters)
- Align the cyclone cones with the mounting posts inside the housing
- Press the two halves together starting at the top and working downward
- Listen for the distinct “click” that confirms proper seating at multiple points
- Check for even gaps around the entire seam – any misalignment indicates improper assembly
Expert Note: If the cyclone housing doesn’t close completely, check for debris in the sealing grooves. A single hair or thread can prevent proper closure and cause suction loss.
Troubleshooting Common Root Cyclone Problems

Why Your Dyson Root Cyclone Won’t Open After Multiple Attempts
If you’ve followed the steps but the cyclone remains stuck:
- Check for hidden screws: Some models (V8 Absolute) have small screws under rubber feet
- Apply penetrating oil: Let a small drop of silicone lubricant sit at the seam for 5 minutes
- Use the towel twist method: Place a towel over the cyclone and twist firmly counterclockwise
- Temperature trick: Place the assembly in the freezer for 20 minutes to contract the plastic slightly
Critical Warning: Never use excessive force – broken tabs on the cyclone assembly require expensive replacement parts and can void your warranty.
Post-Reassembly Suction Problems and Fixes
After successfully opening and cleaning your root cyclone, check these common issues:
- Reduced suction: Verify the cyclone cones are properly aligned in their slots
- Strange noises: Check for small objects trapped between cones
- Leaks during use: Ensure all seals are properly seated and undamaged
- Filter not fitting: Confirm you’re using the correct filter for your model
Maintenance Schedule for Long-Term Performance
How Often to Open and Clean Your Dyson Root Cyclone
Your cleaning frequency depends on usage patterns:
- Standard homes (no pets): Open and clean every 3 months
- Pet owners: Open and clean every 4-6 weeks
- Construction or renovation environments: Clean weekly
- After vacuuming fine powders: Clean immediately to prevent clogs
Pro Maintenance Tip: Set calendar reminders for cyclone cleaning based on your usage pattern. Each cleaning session takes just 15-20 minutes but prevents costly repairs down the line.
When to Seek Professional Help
While opening your Dyson root cyclone is generally straightforward, contact Dyson support if:
- You notice cracks in the cyclone housing after opening
- The motor runs but no air moves through the cyclone
- You’ve followed all steps but suction remains weak
- Your model is under warranty (opening may void coverage)
Important Note: Newer Dyson models (V12, V15) have more complex cyclone assemblies with additional sensors. If you’re uncomfortable with the disassembly process, watch Dyson’s official YouTube tutorials for your specific model before proceeding.
Regular maintenance of your Dyson’s root cyclone assembly not only restores suction power but extends your vacuum’s lifespan by years. By following these precise steps, you’ve gained the confidence to handle what was once considered a professional-only repair task. Remember that proper reassembly is just as critical as the cleaning process itself – take your time to ensure each component clicks securely into place. With your root cyclone now clean and properly reassembled, your Dyson should perform like new, saving you the cost of unnecessary repairs or replacement. Keep this guide handy for your next maintenance session, and enjoy the powerful suction your Dyson was designed to deliver.

