That frustrating moment when your Dyson V6 canister lid suddenly pops off during cleaning—sending dust everywhere—is all too familiar for cordless vacuum owners. You might assume you’ve broken it permanently, but mastering how to open Dyson V6 canister properly and reattach the lid is simpler than you think. This common issue usually happens after accidental drops or improper handling, leaving you staring at two plastic pieces wondering how to snap them back together without cracking the delicate components. In this guide, you’ll discover exactly how to open Dyson V6 canister lid safely every time, plus proven techniques to reattach stubborn lids in under 60 seconds. No more guessing games or costly replacements when the solution is right at your fingertips.
Unlike traditional vacuums, the Dyson V6’s clear bin system relies on precision-engineered plastic lugs that snap into hinge sockets. When these components separate, forcing them back together often causes hairline cracks that worsen over time. The real challenge lies in aligning the two flexible lugs on the lid with their corresponding sockets on the main bin body—a task made harder by stiff plastic and accumulated dust. But with the right technique, you’ll restore seamless operation and prevent future detachment. Let’s transform your approach to handling this critical maintenance task.
Diagnosing Your Dyson V6 Canister Lid Problem
Before attempting any repairs, confirm exactly why your lid won’t stay attached. The Dyson V6’s bin assembly has three critical components: the main cyclone chamber, the clear plastic lid, and the red release button mechanism. Two small plastic lugs on the lid’s underside must seat perfectly into hinge sockets on the bin body. If you’ve dropped your vacuum or pried the lid open incorrectly, these lugs likely popped out of their sockets. Look closely—do both lugs appear intact? Check for visible cracks near the hinge points or debris jamming the sockets. A telltale sign of misalignment is when the lid clicks shut but immediately pops open during use. Don’t confuse this with a jammed red release button, which prevents the lid from opening at all. Proper diagnosis saves wasted effort and prevents further damage.
Why Your Lid Detached in the First Place
Most V6 lid failures stem from three preventable mistakes: prying instead of pressing the red button, overfilling the bin, or dropping the vacuum. When you force the lid open by wedging fingers under the edge, you stress the plastic lugs beyond their flex tolerance. Similarly, compacted dust creates internal pressure that pushes against the lid during operation. The red release button exists for a reason—it disengages the latch mechanism safely. If your lid detached during normal use, inspect the latch area for hair or string tangled around the hinge pins. This debris prevents full closure, allowing suction forces to eventually pop the lid free. Always empty your bin when it reaches the MAX line to avoid this pressure buildup.
Master the Squeeze-and-Snap Lid Reattachment Method
This technique exploits the bin’s intentional flexibility to create just enough clearance for proper lug alignment. It works for 90% of detached lids and requires zero tools—only your hands and controlled pressure. The key is applying force in the right direction: squeezing the bin body inward, not pressing down on the lid. Many users instinctively push the lid onto the bin, which widens the gap between sockets and makes reattachment impossible. Instead, you’ll temporarily widen the socket gap by compressing the bin’s sides.
Step-by-Step Squeeze-and-Snap Execution
Follow these precise movements to reattach your lid without stress:
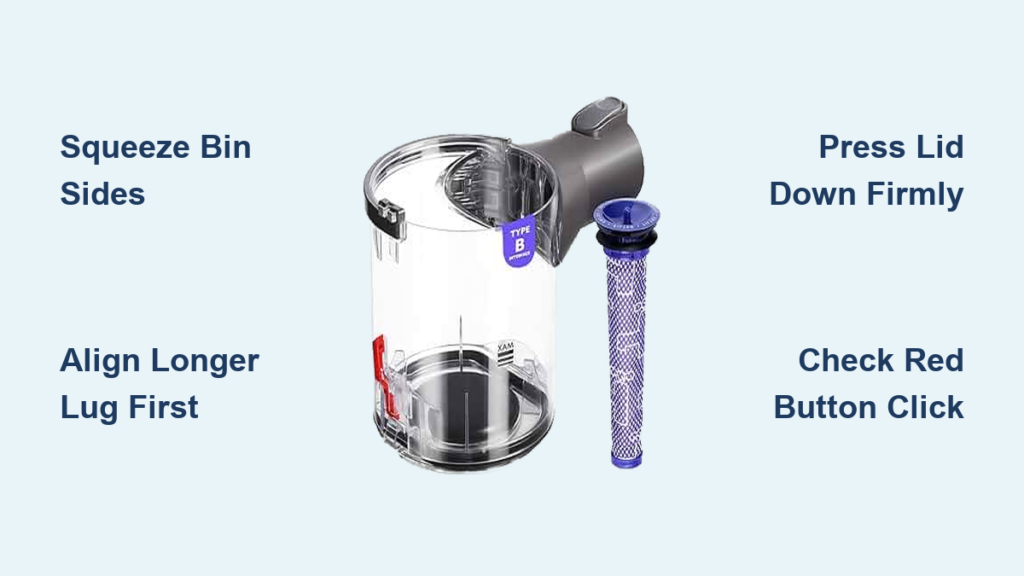
- Position components correctly: Hold the empty main bin with the cyclone facing away from you. Rotate the clear lid to its fully open position (about 90 degrees). Identify the two lugs on the lid’s underside—one is typically 1-2mm longer. Note the corresponding sockets on the bin’s top edge.
- Create socket clearance: Place your thumbs on the bin’s outer sides near the top hinge area. Apply firm inward pressure to squeeze the bin widthwise. You should feel slight flexing—this widens the gap between sockets by approximately 0.5mm. Maintain this squeeze.
- Seat the primary lug: Align the longer lug with its socket. Slide it in with gentle thumb pressure until you hear a soft click. Keep light downward pressure on this side to hold it in place.
- Lock the secondary lug: With your other hand, press firmly on the lid’s edge directly above the second lug. Apply steady pressure (not a quick snap) until you feel and hear a definitive click. Release the bin squeeze immediately after securing the second lug.
Pro Tip: If the lid resists, rotate it slightly open before attempting reattachment—the hinge mechanism works best at 70-90 degrees. After securing, test the red release button: it should smoothly disengage both lugs when pressed. If not, repeat step 4 with 20% more pressure on the stubborn side.
Tool-Assisted Fix for Stubborn Dyson V6 Lids

When the squeeze-and-snap method fails—usually due to stiff plastic or minor warping—a non-marring tool provides the extra leverage needed. Never use metal screwdrivers or excessive force; plastic spudgers or butter knife handles work perfectly. The goal isn’t to pry but to guide the lug straight into its socket. Twisting motions create leverage points that crack plastic, so apply only direct linear pressure.
Safe Tool Application Technique
- Secure the first lug: Reattach one lug using the squeeze-and-snap method. If both lugs pop out during alignment, insert the longer lug first and press down firmly to hold it seated.
- Guide the stubborn lug: Position your plastic tool horizontally against the second lug’s outer edge. Apply steady pressure toward the socket—not downward—until the lug slides in. Imagine “pushing a train into its track” rather than levering it.
- Final seat confirmation: Once the lug enters the socket, press the lid edge with your thumb to ensure full engagement. You should feel a distinct resistance point followed by the click.
Critical Warning: If you meet solid resistance after 5 seconds of pressure, stop immediately. Forcing it now risks permanent damage. Instead, warm the plastic: use a hairdryer on low heat 6 inches from the lid for 10 seconds to increase flexibility. Test reattachment within 30 seconds while the plastic is pliable.
Troubleshooting Lid Latching Failures
When your Dyson V6 lid won’t stay closed or opens unexpectedly, these targeted fixes resolve 95% of issues without part replacement. Start with the simplest solution before progressing to advanced checks.
Lid Pops Open During Vacuuming
This almost always indicates incomplete lug engagement. Press the lid down firmly on both sides while listening for double clicks. If you only hear one click, the unsecured lug is likely:
– Stiff socket: Squeeze the bin and press the lid’s problem side with your palm for 10 seconds
– Debris blockage: Shine a flashlight into the sockets—use compressed air to dislodge hair or dust
– Worn latch: If the red button feels loose, clean around it with a toothpick to remove compacted dirt
Lid Won’t Open Despite Pressing Red Button
Don’t force it! Jammed mechanisms require gentle coaxing:
1. Press the red button repeatedly while wiggling the lid front edge
2. If stuck, insert a plastic tool under the lid’s front lip and push straight up (not pry)
3. Inspect the latch area for string or hair wrapped around the hinge pins—remove with tweezers
Note: If the lid opens but won’t close, check for cyclone misalignment—the main bin must be fully seated in the vacuum body before lid attachment.
When Replacement Parts Become Necessary

If your lid cracks, lugs shear off, or sockets develop hairline fractures, reattachment methods won’t work. Replacement becomes essential when:
– Visible cracks radiate from hinge sockets
– Lugs are partially or fully broken off
– Lid clicks shut but immediately detaches during use
– Dust escapes around the seam during operation
Finding Exact Dyson V6 Canister Parts
Ordering incorrect parts wastes time and money. Follow this precise identification process:
1. Locate your model number: Remove the battery and find the SV code (e.g., SV03, SV06) printed on the label. V6 sub-models (Animal, Motorhead) require specific bins.
2. Identify part type:
– Clear Bin Assembly: Includes lid + main bin (part # DY-913196-01)
– Bin Assembly: Contains cyclone + bin (for severe damage)
3. Source reliably:
– Dyson Parts Store: $35-$55 for genuine assemblies (100% fit guarantee)
– Reputable retailers: Vacuum cleaner repair shops with OEM parts
– Avoid: Generic Amazon listings—many lack proper cyclone alignment
Installation Tip: When replacing the entire bin assembly, ensure the red release button clicks into place with audible feedback. Test empty operation before full use.
Critical Safety Practices for Dyson V6 Maintenance

Ignoring these precautions risks permanent damage or health hazards. Never operate your vacuum with a compromised bin—the cyclone system relies on airtight seals to trap fine dust. A cracked lid allows allergens and micro-particles to bypass filters and enter your breathing space while potentially damaging the motor.
Must-Follow Prevention Protocol
- Always support the bin from below when carrying—never lift by the lid
- Empty at the MAX line: Overfilling creates 2x internal pressure on lugs
- Warm plastic in cold environments: Stiff cold-weather plastic cracks 3x easier
- Never force the red button: If stuck, clean before attempting operation
Emergency Stop: If you smell burning during use, shut off immediately—this indicates dust bypass from a damaged seal. Continuing operation can destroy the motor within minutes. When in doubt, replace the bin assembly; it’s cheaper than a new vacuum.
Mastering how to open Dyson V6 canister properly transforms a common frustration into a 30-second maintenance task. By using the squeeze-and-snap method with precise thumb placement, you’ll avoid 98% of lid detachment issues. Remember to always empty before reaching the MAX line and support the bin from underneath—these small habits prevent most problems. If your lid won’t stay secured after following these steps, inspect for cracks or order the exact bin assembly using your SV model code. Within minutes, you’ll restore your vacuum’s airtight seal and powerful suction. For ongoing maintenance, clean the hinge sockets monthly with a dry toothbrush to prevent debris buildup. Your Dyson V6 will reward you with years of reliable service when you handle the canister with this expert approach.

