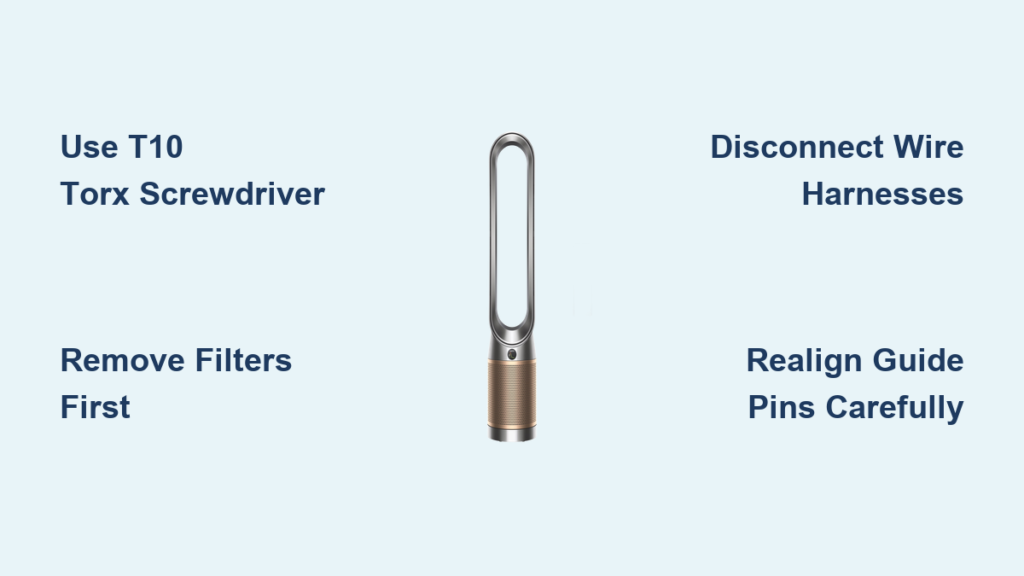
Your Dyson TP09 won’t fit in your suitcase, and your flight leaves in 12 hours. You’ve tried twisting the top section like older models—but nothing moves. Panic sets in as you realize this isn’t a simple snap-off design. Don’t force it. The TP09’s top fan assembly requires precise disassembly using specific tools, and skipping steps risks exposing fragile electronics. This guide reveals the exact method to safely open your Dyson air purifier for travel or maintenance—using only the T10 Torx screwdriver hiding under your filters. You’ll avoid costly mistakes like stripped screws or damaged PCB boards that turn a $500 purifier into landfill.
Within 6 minutes, you’ll detach the air multiplier loop without voiding your warranty. Most owners miss the four critical screws concealed beneath the filter housing—a single overlooked fastener causes rattling during transport or improper reassembly. Follow these steps exactly, and you’ll protect sensitive components while fitting your purifier into tight spaces.
TP09 Top Section Won’t Twist? Here’s Why and How to Fix It
Unlike older Dyson models with twist-off mechanisms, the TP09 top section is permanently secured with internal fasteners. Forcing rotation cracks the plastic housing—a repair costing $150+ at authorized service centers. The solution lies underneath the HEPA filter compartment where four T10 Torx screws anchor the air multiplier to the base.
Why Your Screwdriver Isn’t Working (And the Exact Tool You Need)
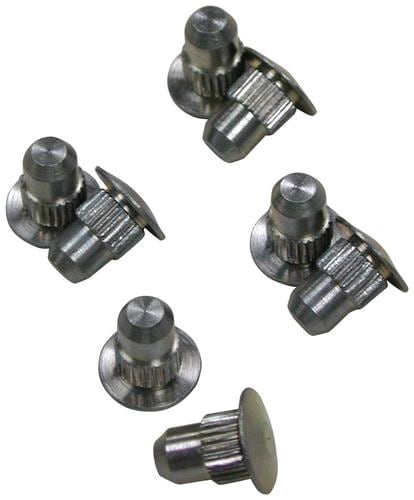
Standard Phillips or flathead screwdrivers damage TP09 screws immediately. You require a T10 Torx security bit—not a standard Torx. The difference? Security Torx has a pin in the center preventing accidental removal. Most hardware stores sell $8 multi-bits including T10 security. Using the wrong tool strips screw heads, making disassembly impossible without professional help.
Critical visual check: Turn your purifier upside down. Inside the base near the filter housing, look for four star-shaped screws with a tiny dot in the center. If you see smooth circles, you’re using the wrong bit.
Step-by-Step: Accessing the Hidden Screws in 90 Seconds
-
Remove both filters completely
Slide out the HEPA and carbon filters first—screws sit directly beneath where filters rest. Skipping this blocks your view and risks filter damage. -
Flip the purifier onto a soft towel
Place it upside down on a microfiber cloth. Hard surfaces scratch the base; fabric prevents slips during screw removal. -
Locate the four T10 screws under the filter housing
Peer inside the base cavity. Screws sit flush against the plastic near the air multiplier’s inner ring. On early TP09 units, a thin plastic cover hides them—gently pry it with fingernails.
⚠️ Pro Tip: Place a small magnet on the work surface. T10 screws are 5mm long—easily lost but impossible to replace with generic hardware. Lose one, and the top section wobbles during reassembly.
Removing the Air Multiplier Without Damaging Electronics
With screws out, the top section still won’t lift off. Two hidden wire connections tether it to the base—a step 90% of online tutorials omit. Forcing separation severs these cables, requiring $200+ circuit board repairs.
How to Safely Disconnect Wires (Photo Your Connections First!)

-
Lift the air multiplier 1 inch straight up
Don’t yank—raise it just enough to see two white wire harnesses clipped near the rear. -
Snap a photo before disconnecting
Use your phone to document connector positions. Reversed connections cause error lights or fan failure. -
Press the release tab on each harness
Slide a fingernail under the black plastic tab and push toward the cable. A soft click means it’s released. Never pull cables by the wires.
🛑 Critical Warning: “Be super careful as the PCB and other parts will be exposed once the loop is off,” warns a verified TP09 owner. Exposed circuit boards attract static electricity—touch a metal faucet before handling to ground yourself.
Cleaning Exposed Components in 3 Minutes
With the air multiplier removed, you see the impeller and internal housing. Never spray liquids near electronics. Instead:
– Use a dry microfiber cloth wrapped around a chopstick to wipe dust from fan blades
– Blast debris from the base cavity with electronics-safe compressed air (held 6+ inches away)
– Skip the HEPA filter compartment—reinstall filters after reassembly to prevent loose fibers
Reassembly Mistakes That Break Your TP09 Permanently
Most owners think “screws in = done.” But misalignment during reassembly causes three critical failures:
Why Your Top Section Won’t Snap Flush (The Alignment Trick)
The air multiplier must seat perfectly over two plastic guide pins inside the base. If it sits crooked:
1. Place one hand on the front of the loop, the other on the back
2. Lower it in a slow rocking motion—not straight down
3. Listen for twin clicks as it locks onto pins
Forcing it creates stress cracks in the housing. Test fit before inserting screws—no resistance should occur.
How Overtightening Strips TP09 Screws (The 1-Inch Rule)
T10 screws thread into plastic—not metal. Over-tightening cracks the housing, making reassembly impossible. Follow this:
– Insert screws by hand until they stop naturally
– Give one-quarter turn with the screwdriver—no more
– If resistance starts before 1 inch of thread is visible, back off immediately
💡 Time-Saver: Apply a tiny drop of threadlocker (Loctite 222) to screws only if traveling frequently. Prevents loosening during transit without risking over-tightening.
Troubleshooting: When Your TP09 Won’t Power On After Reassembly
If the unit stays dark after reassembly, 95% of cases involve one issue:
The Hidden Wire Connection That Causes “Dead Unit” Panic
The white harness near the rear has a secondary safety lock. After clipping it in:
1. Press down firmly on the black plastic tab until it clicks twice
2. Wiggle the connector—it shouldn’t move if secured properly
3. Check the front harness (near the air quality sensor) for full insertion
Do this now: Power on the unit before reinstalling filters. If it works, filters were blocking the sensor during testing.
Why You Should Never Skip the Filter Reinstall Step
Travelers often leave filters out to save space—but this triggers automatic shutdowns. Dyson’s sensors detect missing filters as “fault conditions” after 30 seconds of operation. Always:
– Reinsert both filters before powering on
– Ensure the carbon filter’s tab slots into the HEPA frame
– Press down firmly until you hear a snap
Final Checklist Before Transporting Your Disassembled TP09
Packing a disassembled purifier for flights requires extra precautions:
-
Wrap screws separately
Tape them inside a plastic baggie—never loose in luggage (airport X-rays flag metal objects) -
Pad the air multiplier cavity
Stuff the base opening with soft clothing to prevent dust ingress during travel -
Secure the top section
Place it upside down in your suitcase with socks filling the loop to maintain shape -
Reassemble within 24 hours
Prolonged exposure to humidity corrodes internal contacts—reconnect wires ASAP
Opening your Dyson air purifier isn’t complicated—but one missed step risks $300 in repairs. By using the correct T10 security bit, photographing wire connections, and respecting the plastic housing’s limits, you’ll disassemble and reassemble your TP09 safely for travel or cleaning. Remember: if the top section resists movement, hidden screws or wires are still attached—never force it. Keep this guide bookmarked for your next maintenance session, and your purifier will deliver clean air for years without costly service calls.
Pro Maintenance Tip: Perform this disassembly quarterly for deep cleaning. Dust buildup inside the base reduces airflow by 40%—a 5-minute clean restores peak performance. Always unplug the unit 24 hours before reassembly to let internal capacitors discharge fully.

