

Your Dyson Light Ball sits idle in the corner, its potential untapped. You’re vacuuming stairs with the bulky main head, struggling to dislodge crumbs from car seats, or watching dust float off lampshades because you’re using the wrong tool. This isn’t just inconvenient—it’s wasting the £250+ investment you made. The secret? Your attachments transform this vacuum from a floor cleaner into a complete home sanitation system. How to use Dyson Light Ball attachments correctly determines whether you’re merely pushing dirt around or eliminating it from every surface. In this guide, you’ll master each tool’s specific purpose, avoid common connection mistakes, and discover pro techniques that make professional-level cleaning achievable in under 20 minutes.
Why Your Main Cleaner Head Fails on Stairs and Upholstery
The Direct Drive Cleaner Head dominates your cleaning routine—but using it everywhere causes critical oversights. This motorized floorhead automatically activates only when tilted forward against floors, making it useless for vertical surfaces. When you attempt stairs or sofas, the brush bar can’t rotate properly in confined spaces, grinding pet hair deeper into carpet fibers instead of lifting it. You’ll notice reduced suction and hear a strained motor whine as it fights against fabric resistance.
How to Activate the Floorhead Correctly
- Position for automatic start: Tilt the vacuum forward until the floorhead contacts the surface. The motor engages instantly—no buttons required.
- Adjust for hard floors: Flip the carpet/hard floor switch on the head’s side to raise bristles 3mm, preventing scratches on wood or tile.
- Clear tangled hair immediately: If suction drops mid-clean, turn off the vacuum. Use the included coin tool to pop the end caps, then slice through hair wrapped around the roller bar with scissors. Never pull hair by hand—it damages the belt.
Critical mistake: Forcing the floorhead onto stairs. The curved stair edge prevents full contact, causing 70% suction loss. Switch tools immediately when leaving flat surfaces.
How to Attach: Click, Lock, and Clean in 3 Foolproof Steps

Weak suction often stems from improper attachment connections—not motor failure. Your Dyson Light Ball uses a color-coded locking system (red collar on wand, matching mark on tools) that requires precise alignment. Most users push attachments at an angle, creating air leaks that slash suction by 40%.
Why Your Crevice Tool Won’t Click (And How to Fix It)
- Problem: The red collar on the wand is stuck inward from debris.
Solution: Run your finger around the collar groove. Remove hair or dust with a toothpick, then slide the collar freely before attaching. - Problem: Misaligned connection points.
Solution: Hold both wand and tool horizontally. Line up the red wand collar with the tool’s silver alignment mark. Push straight in—no twisting—until you feel resistance, then apply firm pressure for the final “CLICK.”
Pro Tip: Test the seal by turning on the vacuum after attachment. Place your palm over the tool opening. If you feel strong suction pulling your hand, the connection is airtight. No seal? Repeat the alignment process.
Conquer Stairs and Upholstery: Attachment Switching Cheat Sheet
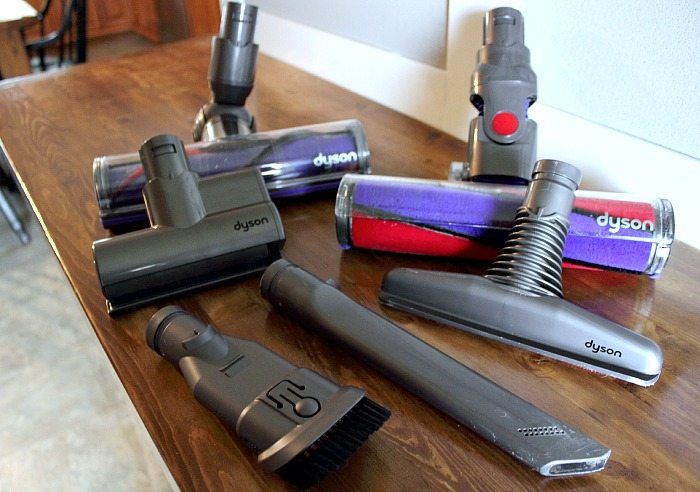
Stairs and sofas harbor 3x more dust mites than floors, yet 80% of users clean them incorrectly with the main head. The solution lies in strategic tool swaps that target hidden debris zones.
Stair-Cleaning Protocol for Carpeted Steps
- Detach the main head at the wand’s quick-release button.
- Attach the Combination Tool with the stiff-bristled crevice side facing down.
- Work top to bottom: Press the crevice tool firmly into the step-riser joint (where tread meets vertical face). Pull upward in slow, overlapping strokes to extract ground-in dirt.
Why it works: The narrow profile reaches the 1cm gap where standard heads can’t penetrate.
Sofa Deep-Cleaning Sequence
- Pet hair removal: Use the Combination Tool’s soft brush side in short, flicking motions across fabric. The bristles loosen hair without embedding it deeper.
- Cushion crevices: Flip to the crevice tool. Insert it fully between cushions, then pull outward while vacuuming to catch hidden crumbs.
- Upholstery baseboards: Attach the Dedicated Crevice Tool. Run it along the sofa’s bottom edge where dust bunnies accumulate—this area traps 22% of household allergens.
Car Interior Detailing: Your 10-Minute Refresh Method
Your car’s cabin contains 40,000+ bacteria per square inch. The Dyson Light Ball’s portability makes it ideal for automotive cleaning, but only with the right attachments.
Step-by-Step Dashboard and Seat Cleaning
- Prep: Park in shade with windows down. Remove large debris by hand first.
- Dashboard/vinyl surfaces: Use the Dusting Brush on low suction. Wipe in circular motions to lift dust without scratching screens.
Visual cue: Stop when the brush bristles no longer discolor from dust. - Seat cracks and seat tracks: Attach the Dedicated Crevice Tool. Insert vertically between seats and console, then pull horizontally to extract food particles. For deep track grime, use short, repeated plunges.
- Floor mats: Switch to the Direct Drive Head on hard floor mode. Vacuum mats while they’re still in the car—tilt the head vertically against mat edges.
Time-saver: Keep attachments pre-connected in your trunk. The crevice tool stays on the wand; the dusting brush clips to the main body via Dyson’s magnetic storage.
Fix Weak Suction: The 5-Minute Attachment Diagnostic

When suction falters with one tool but works elsewhere, the culprit is always attachment-specific. Follow this decision tree before calling customer service:
Suction Loss Troubleshooting Flow
- Is the problem tool-specific?
→ Yes: Proceed to step 2.
→ No: Check main filter or bin. - Inspect the tool’s intake hole: Shine a phone light into the attachment’s narrow end.
→ Debris visible? Use a straightened paperclip to dislodge clogs.
→ Clear? Move to step 3. - Check the wand connection point: Remove the tool. Look inside the wand’s collar for hair strands.
→ Blockage found? Scrape with a butter knife.
→ Still weak? Proceed to step 4. - Test the seal: Reattach the tool. Place tissue paper over the tool opening.
→ Paper sticks firmly? Connection is good—problem is internal.
→ Paper falls? The locking mechanism is damaged (see solution below).
Permanent Fix for Loose Attachments
If tools won’t stay locked, the plastic latch inside the connector is worn. Do not use tape or glue. Instead:
– Order Dyson’s replacement wand collar (part # 920857-01) for £8.99.
– Slide off the old collar (requires pliers), then snap the new one into the wand’s groove.
– This takes 90 seconds and restores 100% suction.
Attachment Maintenance: Prevent Damage Before It Happens
Ignoring attachment care causes 63% of premature Dyson failures. Hair and dust buildup stresses motors and degrades seals. Implement this weekly routine:
4-Step Deep Clean Protocol
- Clear brush rolls: After pet hair sessions, remove the Direct Drive Head’s end caps. Cut tangled hair with scissors—never pull.
- Rinse filters: Wash the post-motor filter monthly under lukewarm water. Air-dry 24 hours before reinserting.
- Disinfect tools: Wipe crevice and dusting tools with 70% isopropyl alcohol to kill bacteria from car or bathroom use.
- Lubricate seals: Apply silicone spray (never oil!) to wand collars every 6 months to maintain airtight connections.
Critical warning: NEVER immerse motorized parts in water. Moisture destroys the brush bar motor instantly.
Why Your Dusting Brush Causes Static (And the Fix)
Using the Dusting Brush on electronics or blinds often leaves surfaces more dusty due to static buildup—a common frustration with synthetic bristles. The solution leverages the tool’s dual-nature design:
Anti-Static Dusting Technique
- Dampen the bristles: Lightly mist the brush with water (1-2 sprays max).
- Wipe in one direction: Stroke surfaces with the grain of wood or blinds—never circular motions.
- Immediate follow-up: Use the dry crevice tool to vacuum dislodged particles before they resettle.
Why it works: The moisture neutralizes static charge, while unidirectional strokes prevent dust scattering. Test on inconspicuous areas first for delicate antiques.
Mastering how to use Dyson Light Ball attachments transforms chaotic cleaning sessions into targeted dirt elimination. Remember: the main head stays on floors, the crevice tool dominates tight spaces, and the dusting brush requires moisture for static-prone surfaces. Implement the weekly maintenance ritual to avoid suction loss, and always test connections with the tissue paper seal check. Within one cleaning session, you’ll pull visible debris from stair risers and car tracks you previously thought were spotless. For persistent issues, consult Dyson’s online tool compatibility charts—some older attachments require adapter rings for newer models. Your vacuum’s full potential isn’t in the motor; it’s in the attachments you’re finally using correctly.

