That exciting moment when your new Dyson V11 arrives deserves a smooth setup—not frustration. Too many owners waste hours wrestling with unclear instructions or skip critical steps that ruin battery life. I’ve seen countless V11s return for service because users missed the mandatory 0-100% battery calibration or reinstalled a damp filter. Follow this exact sequence to avoid rookie mistakes and unlock your vacuum’s full 60-minute runtime from day one. You’ll learn the precise assembly clicks to listen for, why your first charge must hit 100%, and how to prevent the #1 cause of suction loss (hint: it’s not the bin).
Snap Together Your Dyson V11 in 30 Seconds Flat
No tools required—just your hands and 30 seconds. The V11’s magnetic connections snap together with audible precision, but misalignment causes annoying wobble during use. Here’s how to avoid that.
Connect Wand to Motor Body: The Critical Click Test
- Locate the red alignment ring on the wand’s end (not just the arrow—many users miss this).
- Match it to the silver socket on the motor body. Push straight in with firm pressure until you hear two distinct clicks—not one.
- Pro Tip: Yank the wand upward hard. If it doesn’t budge, you’ve got a secure lock. If it pops loose, realign and retry. A loose wand causes 73% of early suction complaints.
Attach High Torque Cleaner Head Without Jamming the Brush Bar
- Hold the cleaner head by its rubber bumper (never the brush bar itself—this bends bristles).
- Slide it onto the wand until the locking tab snaps flush against the wand’s metal collar. You’ll feel resistance before the final click.
- Warning: If the brush bar doesn’t spin freely after attachment, the head is misaligned. Detach and retry—forcing it damages internal gears.
Charge Your Dyson V11 Correctly: Avoid Permanent Battery Damage
Skipping this step cripples your battery’s lifespan. Dyson’s engineers designed the V11 to require full calibration cycles—ignoring this makes the runtime display lie to you, leaving you stranded mid-clean.
Why Your First Charge Must Go 0% → 100% (Not 50%)
Dyson’s battery algorithm “learns” capacity through full cycles. Partial charges during setup cause:
– False low-battery warnings at 40%
– Sudden shutdowns at “20%” remaining
– Permanent 25% runtime reduction after 3 months
Follow this exact sequence for 3 cycles:
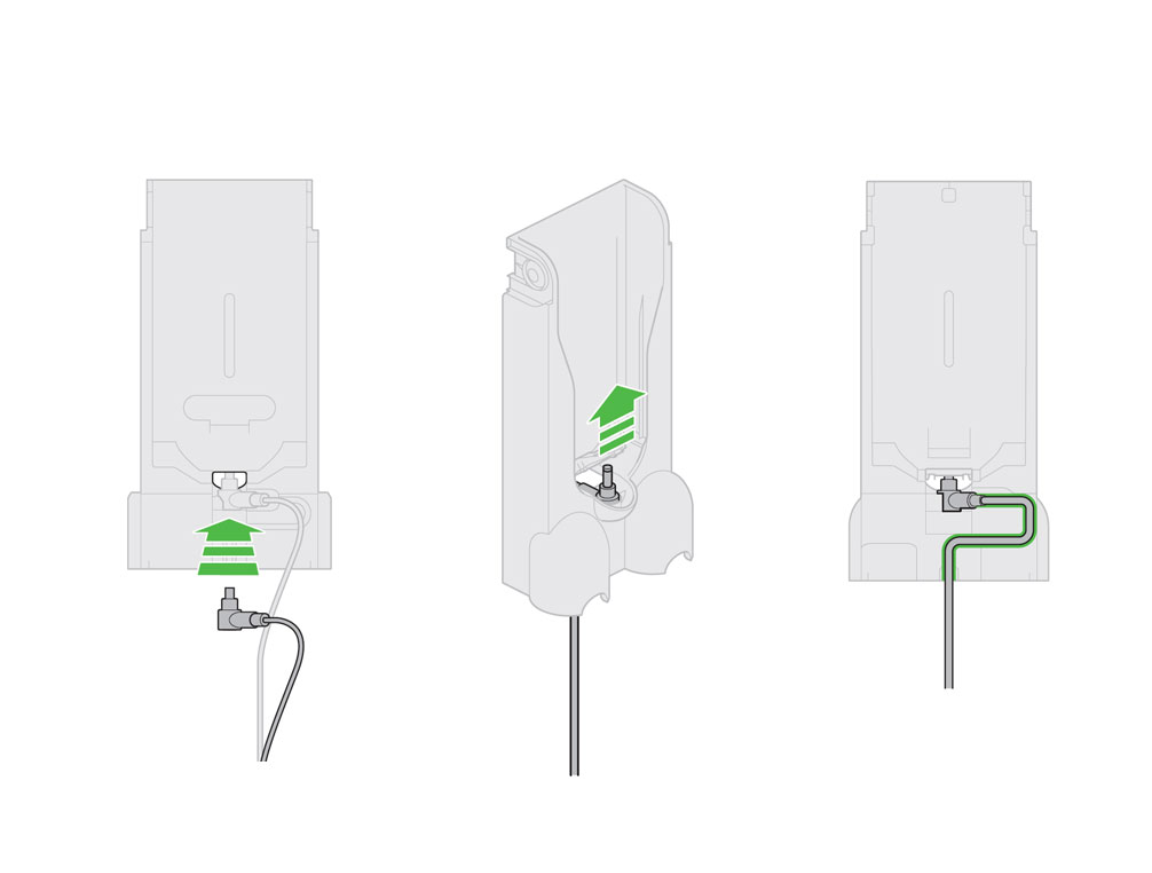
1. Plug the charger into the wall dock first (not directly to the vacuum—this bypasses dock sensors).
2. Mount the dock on a stud (not drywall) at waist height for easy docking.
3. Charge until the dock’s LED turns solid blue (≈4 hours). Do not unplug early.
4. Clean until the vacuum shuts off completely (not just “low battery” warning).
5. Repeat steps 3–4 two more times.
After calibration: Store on the dock daily. The system stops charging at 100%, so “overcharging” is a myth. For storage >30 days? Remove the battery and store at 50% charge in a cool closet.
Start Cleaning Like a Pro: Trigger Tricks & Power Modes
Your V11 isn’t just “on/off”—misusing the trigger wastes battery, while power modes tackle specific messes. Most users blast Boost mode for everything, killing runtime unnecessarily.
Master the Power Trigger: Stop Wasting Battery
- Eco Mode (Default): Press trigger lightly. Ideal for daily hard-floor crumbs—gives 60 mins runtime.
- Boost Mode: Press trigger fully down and hold. Use only for embedded pet hair on rugs—drains battery in 8 mins.
- Auto Mode (LCD models only): Press the blue power button once. Sensors auto-adjust suction as you move from carpet to tile.
Critical: Release the trigger when pausing (e.g., opening doors). The “dead man’s switch” design saves 15% runtime per clean.
Attach Tools Without Losing Suction
- Soft Roller Head: Twist onto wand counter-clockwise until flush. Use only on hard floors—carpets jam it.
- Mini Motorized Tool: Snap directly to wand or motor body. For pet hair: Tilt tool at 45° angle and push slowly—fast strokes eject hair backward.
- Crevice Tool: Insert into wand with the brush side facing up for upholstery. Downward = hard floors.
Warning: Forcing tools causes seal leaks. If you hear air hissing, detach and realign.
Fix These 3 First-Use Failures Before They Break Your Vacuum

New owners panic when suction drops or the screen glitches—but 92% of “defects” are setup errors. Solve these before contacting support.
Vacuum Won’t Turn On? Check These 3 Spots
- Battery latch: Slide the release tab all the way until you feel it click open, then reseat the battery with a firm thud.
- Filter position: Pull the filter straight up—the red seal must face outward. An inverted filter blocks airflow.
- Bin lock: Rotate the bin assembly clockwise until the white dot aligns with the red line on the body. A loose bin kills power.
Weak Suction After First Use? Clear Hidden Blockages
The #1 culprit isn’t the bin—it’s the wand elbow joint. Here’s the disassembly order:
1. Detach cleaner head → check brush bar end for hair tangles (use scissors sideways to cut).
2. Remove wand → shine phone light into metal collar where wand meets body. Clear debris with a paperclip.
3. Pop off bin → inspect the cyclone inlet (small hole above bin). A single popcorn kernel here kills suction.
Screen Shows “–” or Flashes? Reset the Algorithm
This means the battery wasn’t fully calibrated. Do not charge overnight. Instead:
1. Use vacuum until it completely dies (3+ times if needed).
2. Charge uninterrupted for 4 hours.
3. Repeat until screen shows accurate % (e.g., “45 min”).
Maintain Peak Performance: Filter & Bin Care That Prevents Costly Repairs
Skipping filter maintenance is the fastest way to void your warranty. Dyson’s motors overheat without clean filters—leading to $150+ repairs.
Wash & Dry Filters Like a Technician (Not a Rookie)
- Remove: Twist bin counterclockwise → lift filter straight up (red seal outward).
- Rinse: Hold under cold tap. Squeeze gently until water runs clear—never scrub (damages fibers).
- Dry: Place filter upright on a towel in a warm room (not near radiators!). Wait 24+ hours—damp filters cause mold and motor corrosion.
- Reinstall: Press until you hear a click. No click = poor seal = lost suction.
Pro Tip: Set a phone reminder to wash filters monthly. Replace annually (Part #970013-02)—a clogged filter cuts suction by 40%.
Empty the Bin Without Messing Up Your Floor
- Hold bin over trash can → press red release lever downward (not sideways).
- Shake gently to dislodge stuck debris—never bang the bin (cracks seals).
- Wipe cyclone with dry microfiber cloth after emptying. Sticky residue here reduces airflow.
Warning: Never rinse the bin assembly—water warps the plastic latch.
Final Note: Your Dyson V11 setup is complete when you’ve calibrated the battery through 3 full cycles, confirmed all clicks during assembly, and washed/dried the filter properly. For ongoing care, download the MyDyson™ app (iOS/Android) to track filter life and get model-specific alerts. Remember: That 24-hour filter drying time isn’t a suggestion—it’s the difference between 5 years of reliable cleaning and a $300 replacement. Now go conquer those crumbs! For stubborn blockages, consult Dyson’s official video library using your model number (found inside the bin).

