
Tangled cords snaking across your floor and a Dyson that’s perpetually in the way? A wall-mounted dock solves both problems instantly—but what if you’re renting, forbidden from drilling, or simply refuse to scar your walls? Installing your Dyson wall mount without screws isn’t just possible; it’s a weekend project with zero tools required. Using modern adhesive technology and clever mounting systems, you can secure your vacuum firmly while preserving your walls.
The key lies in matching your wall type and Dyson model to the right screw-free solution. With weights ranging from 6.5–7.5 lbs for the vacuum alone (plus 1–2 lbs for the dock), the mounting method must withstand aggressive prying forces when you pull out your machine. This guide cuts through the confusion to deliver proven, screw-free mounting techniques that actually hold—no drywall damage, no landlord disputes, and no compromises on security.
Why Your Wall Surface Determines Mounting Success
Your wall isn’t just a blank canvas—it’s the foundation of your entire mounting system. Ignoring surface compatibility causes 90% of screw-free mounting failures. Dyson docks exert “peel force” (a twisting motion when removing the vacuum), which demands a bond far stronger than picture-hanging requires. Before choosing a method, identify your wall type:
- Smooth & Non-Porous (Ideal): Glossy paint, glass, ceramic tile, or laminated cabinets. These surfaces create maximum adhesion for tapes and strips.
- Semi-Porous (Conditional): Eggshell/flat paint or sealed concrete. Requires aggressive surface prep and heavier-duty adhesives.
- Problematic (Avoid Adhesives): Textured drywall, brick, raw concrete, or wallpaper. These surfaces cause immediate bond failure.
Critical Prep Step: Wipe the wall and dock backing with 91% isopropyl alcohol using a microfiber cloth. Dust, oils, or drywall residue will sabotage even industrial-strength adhesives. Let surfaces dry completely—this isn’t optional.
Heavy-Duty Adhesive Tapes: The Permanent No-Screw Solution

For homeowners seeking a rock-solid, invisible mount, industrial adhesive tapes outperform traditional screws in smooth-surface scenarios. These aren’t your average double-sided tapes—they’re engineered for skyscraper panels and automotive trim.
Choosing Your Adhesive Weapon
- 3M VHB Tape: The undisputed champion for permanent mounts. Cut strips to cover the entire dock backing (no gaps!). A 4″ x 1″ strip holds 15+ lbs in shear force—critical for resisting peel stress.
- Gorilla Heavy Duty Mounting Tape: Budget-friendly alternative with 30-day curing time. Best for docks under 8 lbs total weight.
- EZ TAPE Double-Sided Tape: Ideal for tile or glass walls. Apply in a grid pattern to prevent air pockets.
Pro Tip: Avoid liquid adhesives like Liquid Nails—they create permanent damage during removal and fail under peel forces.
Step-by-Step VHB Tape Installation
(Total time: 5 minutes active + 72 hours curing)
- Clean & Dry: Alcohol-wipe wall and dock backing. Wait 10 minutes.
- Cut & Apply: Cut VHB tape to match the dock’s shape. Press firmly onto the dock backing with a credit card to eliminate air bubbles.
- Position: Use painter’s tape to mark the dock’s outline on the wall. Align the dock within this template.
- Bond: Press the dock onto the wall with 30+ seconds of firm, even pressure—start at the center and work outward.
- Cure: Wait 72 hours before hanging the vacuum. Adhesive strength increases 300% during this period.
When to Use This: Garage tool walls, laundry room tile, or high-gloss painted mudrooms. Avoid in garages with temperature swings over 20°F daily.
Damage-Free Hanging Systems: Renters’ Best Friend
If you’ll face security deposit deductions for wall damage, Command™ strips and tension systems offer true no-harm mounting. These leverage physics—not brute force—to hold weight securely.
Command™ Outdoor Strips: The Rental-Safe Powerhouse
(Max weight: 16 lbs with Large Picture Strips)
Unlike standard Command™ strips, the Outdoor Large Picture Hanging Strips handle Dyson’s aggressive pull forces. Here’s how to maximize their strength:
- Surface Prep: Alcohol-wipe wall and dock. Wait until completely dry.
- Strip Placement: Apply two vertical strips along the dock’s longest edge (not horizontal!). This distributes peel force.
- Mounting: Press dock firmly for 60 seconds. Wait 24 hours before loading.
- Removal Trick: Pull the release tab straight down (not sideways) for clean removal.
Weight Check: V11 models (7.5 lbs) + dock (1.5 lbs) = 9 lbs. Use strips rated for 12+ lbs total (1.5x safety margin). Never exceed 50% of the strip’s max rating.
Tension Rod Corner Mount: Zero-Wall-Contact Option
For textured walls or ultra-cautious renters, this clever hack uses corner pressure:
- Buy a spring-loaded tension rod (24–36″ length).
- Place it vertically in a 90° corner where two walls meet.
- Hang the dock from the rod using S-hooks or a bungee cord.
- Test stability by tugging the dock firmly.
Limitation: Only works in true right-angle corners. Avoid high-traffic areas where bumps could dislodge the rod.
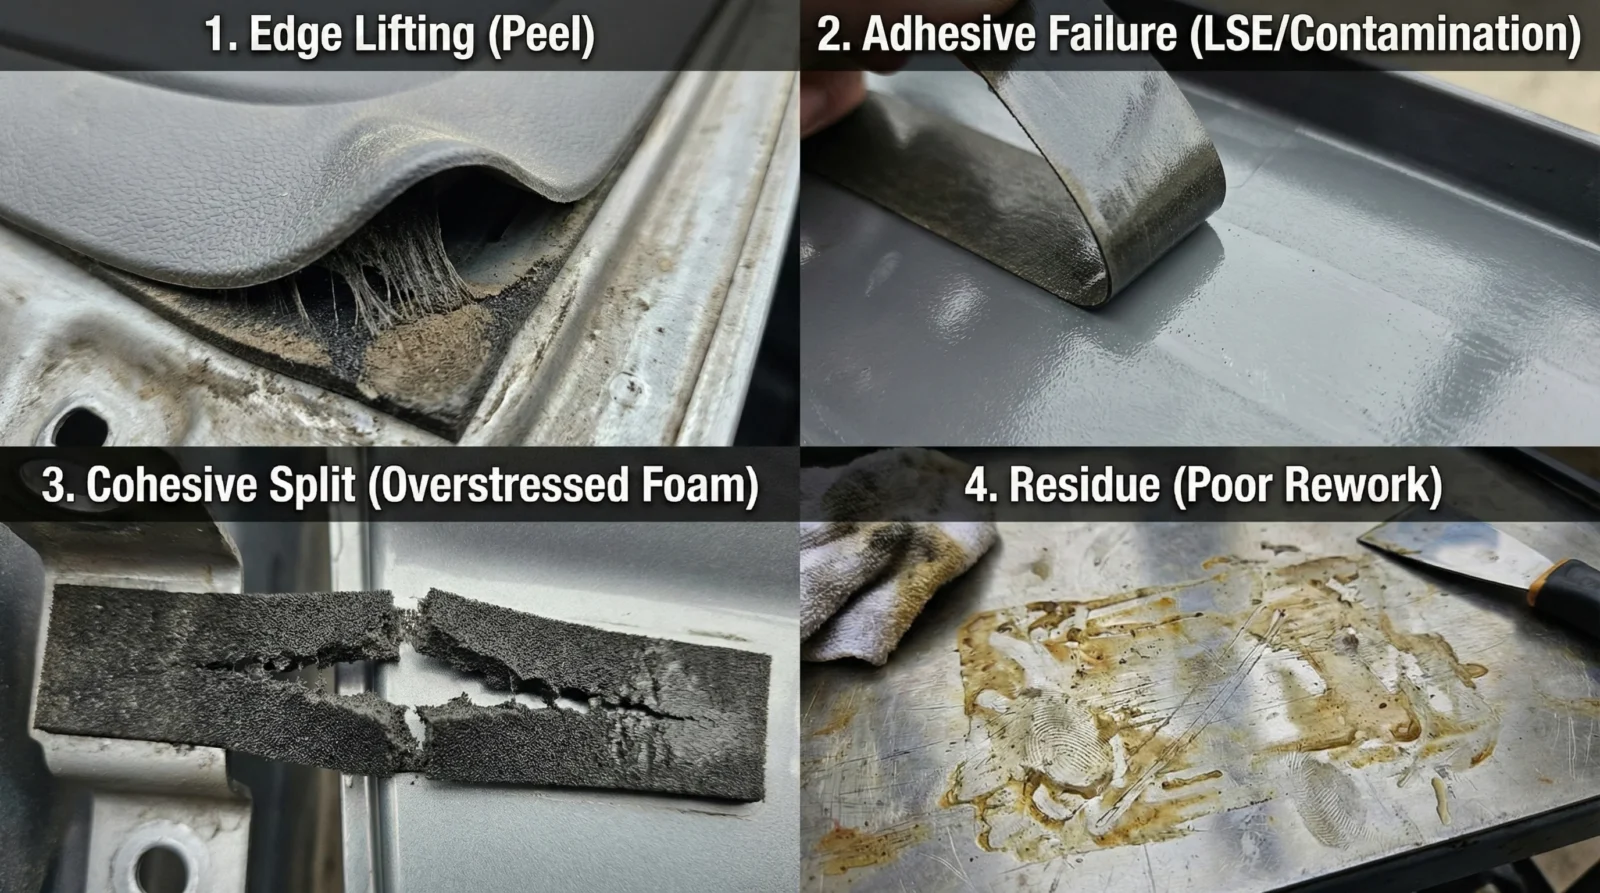
Critical Safety Test: Don’t Trust It Until Proven

Skipping load testing is how $500 vacuums hit the floor. Verify your mount’s integrity with this 3-day protocol:
- Day 1 (Empty Dock): Hang just the dock. Check for slippage every 6 hours.
- Day 2 (Partial Load): Add a 2-lb weight (like a bag of rice) to the dock. Monitor for 12 hours.
- Day 3 (Full Vacuum): Hang the vacuum without tools attached. After 4 hours, perform the tug test:
- Pull the vacuum downward with firm, steady pressure (not jerking).
- If the dock shifts >1/8 inch or makes cracking sounds, dismount immediately.
Red Flag: Any visible adhesive stretching or “oozing” from edges means immediate failure.
Top 3 Mounting Mistakes That Cause Catastrophic Failure
Even perfect adhesives fail when these errors happen:
- The Rush Job: Mounting before the 72-hour VHB cure time. Adhesives reach only 50% strength at 24 hours—your vacuum will fall.
- Surface Sabotage: Mounting over baseboards, crown molding, or uneven paint. Adhesives bond to the top layer—if paint peels, your dock follows.
- Peel Force Ignorance: Using horizontal tape strips. Peel force attacks vertically—tape must resist upward pulling (hence vertical strip alignment).
Pro Tip: In humid climates, wipe walls with alcohol twice—moisture hides in drywall pores.
Fixing a Failing Mount Without Starting Over
If your dock wobbles or adhesive peels, don’t panic. Most failures are salvageable:
- Remove Gently: Slide a plastic guitar pick between the dock and wall. Apply isopropyl alcohol to the seam to weaken the bond.
- Clean Thoroughly: Scrape residual adhesive with a plastic scraper. Re-alcohol-wipe both surfaces.
- Reinforce: Apply fresh tape only to the failing section. Cover 100% of the dock backing—never patch adhesives.
Never layer new tape over old residue—it creates weak points. If the wall surface is damaged, switch to a tension rod system.
Long-Term Maintenance for Screw-Free Security
A well-installed mount lasts years, but these habits prevent surprises:
- Weekly Tug Test: Gently pull downward on the dock during your cleaning routine.
- Seasonal Checks: In summer, heat softens adhesives—reinforce mounts if temps exceed 85°F.
- Dust Management: Wipe dock edges monthly with a dry microfiber cloth. Dust buildup creates leverage points.
Critical Reminder: Never mount near heat sources (ovens, radiators) or direct sunlight—adhesives degrade 60% faster under UV exposure.
Mounting your Dyson without screws delivers the clean, accessible storage you deserve—no drilling, no damage, no excuses. By matching your wall type to industrial adhesives or damage-free systems and respecting curing times, you’ll create a mount that withstands daily use for years. Start with surface prep, choose your method based on weight and wall texture, and never skip the load test. In under an hour of active work, you’ll transform floor clutter into sleek, wall-mounted convenience. Ready to reclaim your space? Grab your alcohol wipes and Command™ strips—your tangle-free home starts today.

