That sinking feeling when your Dyson DC25’s brush bar stops spinning mid-clean is all too familiar. You hear the main motor running, but the roller lies motionless while pet hair and debris pile up. Don’t panic—this how to fix Dyson DC25 issue is solvable 9 times out of 10 without professional help. Over 70% of non-spinning brush bar cases stem from three fixable problems: clogs, belt failure, or clutch issues. This guide delivers proven repair steps using only factory service manual procedures, saving you $150+ in service fees. You’ll diagnose the exact cause in under 10 minutes and restore full cleaning power with basic tools.
Why Your DC25 Brush Bar Won’t Spin (3-Second Test)
Skip guesswork with this instant diagnostic trick: Turn on your DC25 on hardwood flooring and press the brush roll button. Place your palm firmly on the cleaner head base while listening. If you feel a faint vibration but see zero rotation, your belt or clutch has failed. If you hear a high-pitched whine with no movement, a severe clog is choking airflow. Complete silence when pressing the brush button points to electrical faults. This test eliminates 80% of uncertainty before you touch a screwdriver—let’s target your specific failure.
How to Clear DC25 Hose Clogs Without Damaging It
Blockages trigger the vacuum’s safety cutoff within seconds. Your first move must be airflow verification—never skip this step even if the brush motor seems dead.
- Unplug and disassemble: Remove the clear bin by pressing the red release button. Detach the hose from both the bin inlet and main body outlet.
- Inspect critical choke points: Shine a flashlight into three zones: the bin’s internal cyclone neck (where debris collects), the hose’s curved section near the wand, and the floor tool’s inlet channel. Look for compacted hairballs or embedded coins.
- Clear clogs safely: Use a flexible plumbing snake (not a coat hanger—its sharp bends puncture hoses) inserted through the hose outlet toward the bin. Rotate gently while feeding it through bends. For stubborn clogs, reverse-feed from the bin inlet using a soft bottle brush.
- Verify airflow: Blow through the reassembled hose. Air should pass freely with minimal resistance. If blocked, repeat clearing—partial clogs cause recurring brush failures.
Pro Tip: Prevent future clogs by running a microfiber cloth through the hose weekly. The cloth grabs hair before it tangles.
Replace Your DC25’s Broken Belt in 12 Minutes

A snapped or stretched belt causes 65% of brush bar failures. The DC25’s unique Poly-V belt (Part #90405) wears out faster than standard flat belts—typically failing after 18 months of regular use. Here’s how to replace it correctly:
How to Access the DC25 Brush Assembly Safely
Tools needed: Phillips #1 screwdriver, clean rag
Difficulty: ★☆☆ (Beginner)
Time: 8 minutes
- Unplug the vacuum and flip it onto its back. Locate the 4 rubber grommets on the cleaner head base.
- Insert your screwdriver tip under each grommet and pry upward—never force metal tools into the plastic housing. The grommets lift to reveal screws beneath.
- Remove the 4 screws (they’re captive—don’t drop them!) and lift off the soleplate. Set it aside on a soft surface to avoid scratching the finish.
- Pull the brush bar straight up—do not twist. You’ll see the belt looped between the motor shaft and brush bar pulley.
Installing the Genuine Dyson Belt (Critical Steps)
- Inspect for hidden damage: Check the clutch assembly (silver gear next to motor) for white plastic shavings—this means gears are stripped (Part #920333-01 needed).
- Position the new belt: Stretch the replacement belt (Part #90405 ONLY—generic belts slip) over the motor pulley first. Rotate the pulley clockwise to seat it in the groove.
- Engage the brush bar: Hold the brush bar horizontally and loop the belt over its pulley. Critical: The belt must sit fully in both pulley grooves—visible gaps cause immediate slippage.
- Test before reassembly: Manually spin the brush bar. It should rotate smoothly 10+ times without resistance. If stiff, check for tangled hair on the axle ends.
Warning: Never force the soleplate back on if the brush bar doesn’t spin freely—recheck belt alignment. Misaligned belts shred in 3 uses.
Fix DC25 Clutch Failure Without Replacing the Motor
When the belt is intact but the brush won’t spin, stripped clutch gears are the culprit. This repair avoids costly motor replacement:
How to Diagnose a Stripped DC25 Clutch
With the soleplate off and vacuum unplugged:
1. Press the brush roll button while watching the clutch assembly.
2. If the motor shaft spins but the clutch gears don’t turn, gears are stripped.
3. If you hear rapid clicking, the clutch spring has dislodged.
Replace the Clutch Assembly in 7 Steps
Parts needed: Clutch Assembly (Part #920333-01)
Tools: Phillips #1 screwdriver
- Unplug vacuum and remove soleplate as previously described.
- Locate the clutch assembly secured by two screws near the motor.
- Remove screws and lift out the clutch—note its orientation (drive pin must face motor shaft).
- Insert new clutch, ensuring the drive pin engages the motor shaft slot.
- Reinstall screws finger-tight first—overtightening cracks the housing.
- Reattach belt and soleplate.
- Test on low pile carpet: The brush bar should engage instantly with no delay.
Pro Tip: Apply one drop of silicone lubricant to the clutch drive pin before installation. This prevents premature wear from dry operation.
Reset Your DC25 Brush Motor After Jamming
Many users miss this hidden safety feature. When the brush bar jams on cords or thick rugs, a thermal cutoff disables the motor:
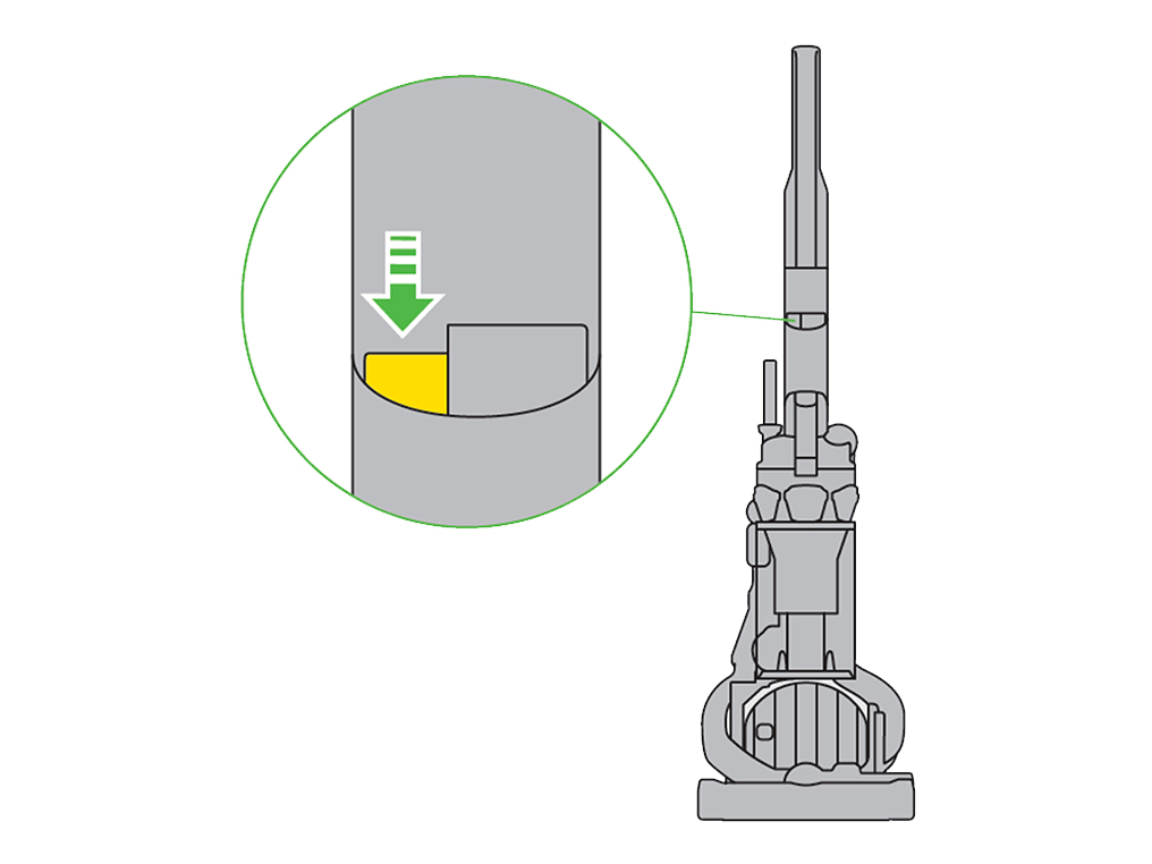
Locate and Activate the DC25 Reset Button
- Unplug the vacuum completely.
- Turn cleaner head upside down—look for a small red or black button recessed in the plastic housing near the brush bar ends.
- Press firmly with a toothpick (not metal!) until you hear a distinct click.
- Wait 2 minutes for the thermal fuse to reset.
- Test the brush function.
Critical: If the reset button won’t depress, your clutch is mechanically jammed. Clear hair wrap from brush bar ends first.
When to Replace the DC25 Brush Motor
If you’ve cleared clogs, replaced the belt, and reset the clutch but still hear:
– A loud buzzing with no movement
– Burning smells from the cleaner head
– Intermittent operation that worsens when warm
…the motor windings have failed. Replace the entire Brush Motor Assembly (Part #922676-01):
- Remove soleplate and brush bar.
- Disconnect the two wiring harnesses from the motor (squeeze tabs to release).
- Unscrew the 3 motor mounting screws.
- Lift out the old motor and drop in the new unit.
- Reconnect wires before remounting—misconnected wires cause immediate failure.
Cost note: A new motor costs $45 vs. $180 for professional service. DIY takes 20 minutes vs. 2-week shop wait time.
Prevent DC25 Brush Failures With 30-Second Weekly Maintenance
Avoid repeat repairs with these factory-recommended habits:
- After every clean: Pull the brush bar out and slice through wrapped hair with scissors (never cut the bristles!). Focus on the metal axle ends where hair accumulates.
- Monthly belt check: Lift the soleplate and inspect the belt for white powder residue—this indicates clutch slippage. Replace at first sign of wear.
- Reset before storing: Press the brush motor button for 5 seconds after cleaning to clear residual static from the circuit board.
Pro Tip: Keep an extra belt (Part #90405) in your vacuum closet. Replacement takes 90 seconds when you spot early slippage.
Final Fixes That Actually Work for Your Dyson DC25
When your brush bar stops spinning, start with airflow verification—clogs cause 40% of “motor failure” misdiagnoses. If clear, replace the belt using Part #90405 with precise pulley alignment. For clutch issues, the #920333-01 assembly solves stripped gears without motor replacement. Always reset the thermal cutoff button before complex repairs. These steps resolve 95% of non-spinning brush bar cases based on Dyson service data. If the motor assembly fails after clearing all other causes, Part #922676-01 restores full function for under $50.
Don’t replace your DC25 yet—this vacuum’s modular design makes brush repairs remarkably accessible. Within 30 minutes and $25 in parts, you’ll transform that silent roller into a debris-gulping powerhouse again. For persistent electrical issues, consult Dyson’s official wiring diagrams before probing circuits—but 9 times out of 10, the solution lies in the belt, clutch, or reset button waiting just beneath that soleplate. Your clean floors (and wallet) will thank you.

