

Your Dyson DC50 hose suddenly losing suction or refusing to detach can derail your entire cleaning routine. When that flexible tube—which you rely on for stairs, upholstery, and tight corners—stops functioning, you’re left wrestling with a vacuum that feels crippled. This isn’t just inconvenient; a compromised hose forces debris back into your air or strains the motor, potentially causing permanent damage. You’ll discover exactly why your Dyson DC50 hose not working issue occurs and get actionable fixes—from clearing hidden blockages to replacing fractured components—so you can restore full cleaning power without costly service calls.
Why Your Dyson DC50 Hose Loses Suction or Won’t Detach
Start by pinpointing the exact failure mode before grabbing tools. A non-functional hose typically reveals itself through four distinct symptoms that dictate your next move. Ignoring these clues wastes time on unnecessary repairs.
Listen for Suction Changes at the Hose Nozzle
Turn on your DC50 with the hose attached to a tool like the crevice nozzle. If you hear a high-pitched whine but feel weak airflow, you likely have a partial blockage restricting airflow. Complete silence at the nozzle—while the main motor runs—indicates a total obstruction or disconnected hose. Always unplug the vacuum first to avoid accidental activation during inspection.
Inspect the Hose for Visible Damage or Kinks
Run your hands along the entire hose length, checking for:
– Cracks or splits near the plastic connectors (common at flex points)
– Deep kinks that collapse the internal wire coil
– Holes from accidental vacuuming of sharp objects
Even minor surface cracks cause air leaks that cripple suction. Shine a flashlight through the hose—if light doesn’t pass through uniformly, internal damage exists.
Verify Proper Attachment at Both Ends
Forcefully wiggle the hose where it connects to the wand and main vacuum body. If it moves more than 1/8 inch without resistance, the locking mechanism failed. A properly seated hose clicks audibly when pushed in. Also, check for debris trapped in the socket—hair or carpet fibers can prevent full engagement, creating suction leaks.
Clearing Blockages in Your DC50 Hose and Wand Assembly
Blockages cause 80% of Dyson DC50 hose not working cases. Debris like coins, hair tangles, or pet toys lodge in three critical zones: the hose itself, the wand channel, or the cyclone shroud.
Locating Common Clog Points in the DC50 System
Remove the wand from the hose and hold both vertically. Drop a small marble through each section—if it stops moving, that’s your clog zone. For the cyclone shroud: detach the bin and look up through the lower shroud opening. Blockages here often mimic hose failures since air can’t reach the hose inlet.
Safely Removing Debris from the Hose Interior
Never use sharp objects—they puncture the hose lining. Instead:
1. Straighten the hose fully on a flat surface
2. Insert a flexible bottle brush or straightened coat hanger (with bent tip)
3. Gently rotate while pushing toward the obstruction
4. For stubborn clogs, reverse-vacuum with a shop vac at the nozzle end
If you hear the motor pitch change while vacuuming, stop immediately—continued operation risks motor burnout.
Checking the Ball Mechanism and Cyclone for Blockages
With the hose detached, activate the DC50 and place your hand over the main unit’s hose port. Weak suction here indicates a cyclone or ball obstruction. Remove the ball mechanism (twist counterclockwise) and clear debris from the intake holes. Reassemble before testing hose suction again.
Fixing a DC50 Hose That Won’t Detach from the Vacuum Body
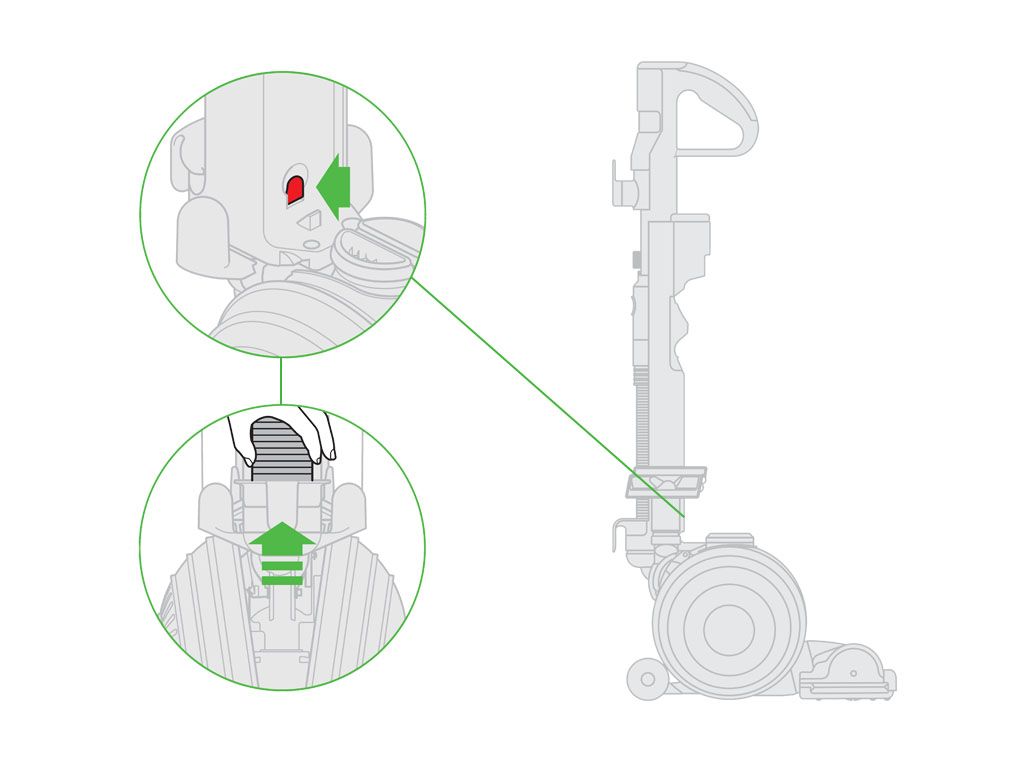
When the hose refuses to release from the main unit, forcing it cracks plastic housings. This often stems from misaligned latches or hair buildup in the release mechanism.
Releasing a Stubborn Hose Connection at the Main Unit
Locate the red release lever near the hose port. Pull it fully while simultaneously pressing the hose’s release tab (a small rectangular button). If stuck:
– Gently twist the hose 5 degrees left/right while pulling straight out
– Insert a plastic spudger (or credit card) beside the hose to dislodge debris
– Never yank vertically—this breaks internal clips
Troubleshooting a Non-Clicking Hose Lock Mechanism
If the hose won’t reattach securely, inspect the white plastic collar inside the port. Hair wrapped around it prevents full insertion. Use tweezers to remove fibers, then push the collar inward—it should spring back. When reconnecting, press firmly until you hear a distinct click. No click? The collar may be broken, requiring replacement.
Repairing a Stuck Hose Connection at the Cleaner Head

Hoses jammed at the cleaner head prevent tool changes, limiting your DC50’s versatility. This usually happens when debris jams the twist-lock mechanism.
Freeing a Hose Jammed in the Cleaner Head Assembly
Press the cleaner head’s release button while twisting the hose clockwise 15 degrees. If unresponsive:
1. Lay the cleaner head flat with the hose pointing up
2. Insert a narrow flathead screwdriver into the seam between hose and head
3. Gently pry while rotating the hose counterclockwise
4. Vacuum any visible hair from the locking groove afterward
Clearing Debris from the Cleaner Head Release Mechanism
Remove the cleaner head soleplate (two screws underneath). Use a toothpick to clear hair from the spring-loaded latch inside the housing. Reassemble before testing—this prevents future “stuck hose” emergencies during deep cleans.
Securing a Loose or Detached DC50 Hose Fitting
Internal hose disconnections cause sudden suction loss. The hose often detaches from its internal plastic nipple inside the main unit—a common DC50 flaw.
Reattaching a Hose That Popped Off Internally
After unplugging the vacuum:
1. Recline the DC50 using the red lever
2. Locate the hose assembly inside the main housing
3. Pull the loose hose end toward you until the nipple is visible
4. Push the hose firmly onto the nipple until it seats fully
A properly reattached hose won’t wiggle when tugged.
Testing for Air Leaks After Reconnection
With the vacuum running, hold your hand near all hose connections. Hissing indicates leaks. Apply soapy water to suspected areas—bubbles form where air escapes. For minor leaks, wrap the joint with plumber’s tape before reinserting.
Step-by-Step Guide to Installing a New DC50 Hose Part
When cracks or broken connectors make repairs impossible, replacement is essential. The DC50 hose assembly (part # 904634-01) integrates with the carry handle—requiring careful disassembly.
Removing the Old Hose Assembly Safely
- Unplug the vacuum and recline it fully
- Remove two Phillips screws securing the carry handle
- Lift the handle to expose the hose mounting plate
- Unscrew the four screws holding the hose assembly
- Disconnect any wiring harnesses (photograph connections first)
Installing the New Hose Without Damaging Components
Align the new hose assembly with mounting holes, ensuring the wiring harness routes correctly. Hand-tighten all screws before final tightening to avoid stripping plastic. Test-fit the carry handle before securing it—misalignment stresses the hose.
Reassembling Your Dyson DC50 for Full Operation
Reattach the carry handle with its two screws, then verify:
– The hose rotates freely at all connection points
– The release lever operates smoothly
– No wires are pinched under components
Power on and test suction at maximum setting before regular use.
When to Avoid DIY Repair on Your Dyson DC50 Hose
Stop immediately if:
– The vacuum won’t power on after hose work (indicating electrical damage)
– You spot cracks in the main vacuum body or ball mechanism
– The motor emits burning smells during testing
These require factory-certified technicians—attempting further fixes risks fire hazards or voiding warranties.
Preventing Future Hose Failures on Your DC50 Vacuum
Daily Practices to Extend Your DC50 Hose Lifespan
Never wrap the hose tightly around the wand—this kinks the wire coil. Instead, loosely coil it in S-shapes. Avoid vacuuming large objects (coins, paper clips) by pre-inspecting floors. For pet hair, use the anti-tangle turbine tool to reduce strain on the hose.
Monthly Maintenance Checks for Hose Integrity
Once monthly:
1. Detach all hose sections and inspect for micro-tears
2. Flush the wand with warm water (dry completely before reassembly)
3. Lubricate release mechanisms with silicone spray
4. Check cyclone shroud for hidden debris buildup
This 5-minute routine prevents 90% of future hose failures.
Essential Tools and Replacement Parts for DC50 Hose Repairs
Must-Have Tools for Every DC50 Hose Fix
- Phillips #1 screwdriver (for handle and hose assembly screws)
- Plastic spudger (prevents housing scratches during disassembly)
- Flexible bottle brush (clears deep hose clogs safely)
- Flashlight with magnifier (finds hair trapped in latches)
Where to Find Genuine Dyson DC50 Hose Parts
Always use Dyson OEM parts—counterfeit hoses lack proper wire reinforcement. Search for part # 904634-01 on Dyson’s official parts site or authorized retailers like Vacuum Direct. Verify compatibility using your DC50’s serial number (found on the bin release button).
Restoring your Dyson DC50 hose functionality takes under 30 minutes for most issues—no technician needed. By addressing blockages immediately, inspecting for damage after each use, and replacing worn components proactively, you’ll avoid recurring Dyson DC50 hose not working frustrations. Remember: a hose that clicks securely, shows no cracks, and delivers full suction at the nozzle means your DC50 operates at peak efficiency. Keep this guide handy for quick reference during your next cleaning emergency, and your vacuum will reward you with years of reliable service.

