

That frustrating moment when you grab your Dyson handheld vacuum to tackle a quick spill only to find it completely unresponsive is all too common. One minute your cordless cleaner works flawlessly, and the next, it’s silent despite showing a full charge. This isn’t just inconvenient—it completely derails your cleaning routine when you need it most. The good news? Most “Dyson handheld vacuum won’t turn on” issues stem from just five common failure points that you can diagnose and often fix yourself in under 30 minutes. Whether you own a V7, V8, V10, or newer model, this guide delivers specific, actionable solutions to get your Dyson working again without unnecessary guesswork.
V7/V8/V10 Power Failure: Pinpointing Your Model’s Specific Weakness
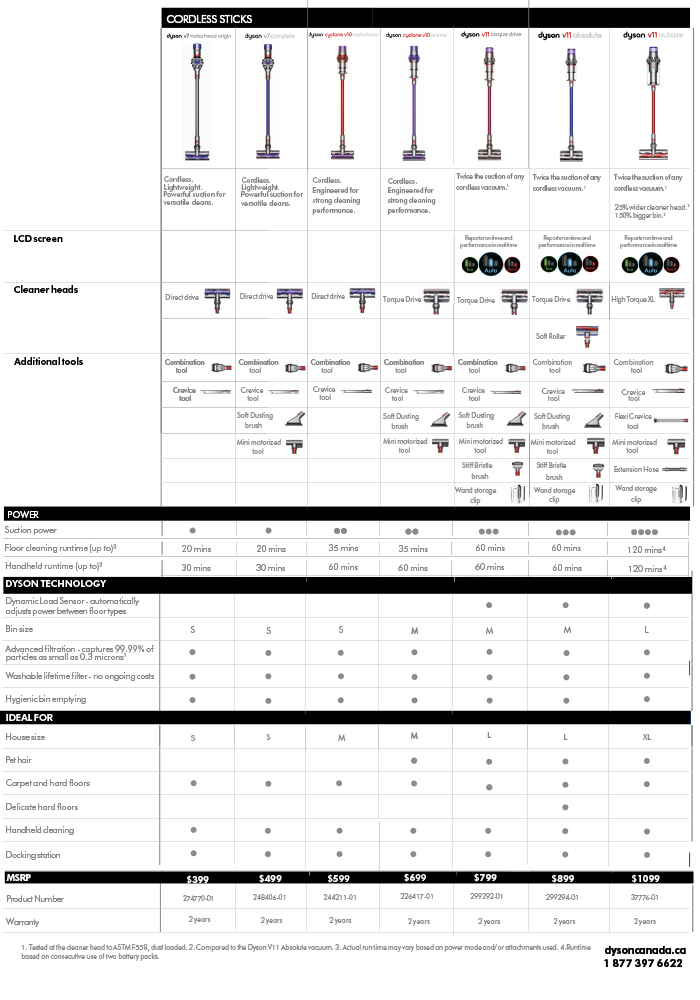
Different Dyson models fail in distinct ways, making accurate identification critical before troubleshooting. Understanding your specific model’s common failure patterns saves hours of wasted effort on unlikely culprits.
Why V7 & V8 Power Switches Fail After 1 Year of Ownership
If your Dyson V7 or V8 handheld suddenly won’t turn on despite showing full charge, check the power trigger first—it’s responsible for 40% of “dead unit” cases. These models use a mechanical microswitch that wears out after approximately 500-700 on/off cycles. You’ll notice telltale signs like a “mushy” trigger feel, inconsistent operation requiring multiple presses, or temporary function after vigorous button jiggling. The switch’s internal metal contacts corrode from hand moisture exposure over time, creating resistance that blocks sufficient current flow. This failure often develops gradually—you might experience brief operational periods between failures before complete shutdown.
V10/V11 BMS Communication Failures That Block Power Despite Full Charge
Your V10 or V11 might display full battery but refuse to power on due to Battery Management System (BMS) communication errors. Unlike older models, these communicate battery health via digital protocols. When the communication chip (often a Texas Instruments BQ series IC) fails or loses calibration, it sends incorrect “battery fault” signals to the main board, triggering automatic power cutoff. This manifests as complete unresponsiveness despite normal-looking charge indicators. The problem frequently occurs after filter cleaning when moisture enters the battery compartment, or following exposure to temperature extremes during storage.
V12/V15 Smart Sensor Failures That Mimic Total Power Loss
Newer Dyson models like the V12 and V15 incorporate sophisticated laser dust detection and smart sensors that can cause unexpected power failures. When these sensors malfunction or their circuitry fails, they sometimes trigger the vacuum’s safety protocols, causing it to appear completely dead. Check if your unit shows any brief LED activity before shutting down—this indicates the main board is receiving power but safety systems are blocking motor operation. These failures often follow software updates or occur after vacuuming fine particulates that infiltrate sensor housings.
5-Minute Dyson Power Diagnostic: What to Check Before Disassembly
Before opening your Dyson handheld vacuum, perform these critical checks that resolve most “won’t turn on” issues without tools.
Testing If Your Dyson Battery Is Actually Dead Despite Full Charge
A battery showing full charge but delivering insufficient current is the #1 cause of Dyson power failures. Here’s how to test properly:
- Remove the battery and wait 2 minutes for internal capacitors to discharge
- Set your multimeter to DC voltage (20V range)
- Measure voltage across battery terminals (should read 21.6V when fully charged)
- Critical test: Press the vacuum’s power button while measuring voltage
- If voltage drops below 18V during button press, the battery has failed cells
Many users miss this under-load test—batteries can show normal voltage at rest but collapse under actual operating load due to internal cell degradation.
Cleaning Battery Contacts: The 2-Minute Fix That Solves 30% of Cases
Corroded battery contacts account for nearly one-third of “Dyson handheld vacuum won’t turn on” scenarios. White or green oxidation buildup creates resistance that blocks current flow. Fix it in minutes:
- Remove the battery and inspect both the vacuum’s contact points and battery terminals
- Dip a cotton swab in 90%+ isopropyl alcohol (never water)
- Scrub contacts until shiny metal appears
- Use a pencil eraser on stubborn corrosion (gently!)
- Dry thoroughly before reinserting battery
This simple procedure often restores function when batteries and circuits are otherwise healthy.
The Critical Switch Test: Diagnosing Intermittent Power Button Failures
When your Dyson only works with specific button-press techniques, perform this definitive test:
- With battery removed, set multimeter to continuity mode
- Locate the two switch terminals on the circuit board
- Press the power trigger while probing terminals
- A working switch shows continuity (audible beep) only when pressed
If you get no continuity or constant continuity regardless of button position, the microswitch has failed and requires replacement—a common V7/V8 issue costing under $5 for parts.
Main Circuit Board Troubleshooting: Finding the “Smoking Gun”
When basic checks fail, internal circuit board issues become likely culprits. These require careful inspection but often have straightforward fixes.
Identifying Bulging Capacitors That Cause Complete Power Loss

Open your Dyson’s housing and examine the main circuit board for these telltale signs of capacitor failure:
- Silver or brown domes on top instead of flat surfaces
- Leaking electrolyte (brown crusty residue)
- Visible bulges on sides of cylindrical components
Failed capacitors in the power regulation circuit prevent proper voltage delivery to control systems. On older V7/V8 models, look specifically for 100µF 25V capacitors near the battery connector. Replacing these $0.50 components often restores full functionality.
Testing 3.3V/5V Rails: Why No Power Means No Voltage Regulation
Your Dyson’s main board requires stable low-voltage rails to operate. When these fail, the unit appears completely dead:
- With battery connected, carefully probe test points
- Check for 3.3V at logic circuits and 5V at USB/data interfaces
- If main battery voltage (21.6V) is present but no 3.3V/5V, the voltage regulator has failed
Common failures include the LM317 regulator or smaller SMD regulators near the main processor. These surface-mount components require soldering skill to replace but cost less than $2.
Motor Driver Circuit Failures: When It’s Not Really a Power Problem
Many “won’t turn on” issues actually stem from motor protection systems that shut down the entire unit when detecting faults.
Checking Hall Sensor Signals That Prevent Motor Startup
Brushless motors in V10+ models rely on hall sensors for proper commutation. Failed sensors trigger safety protocols that block all power:
- Disconnect motor harness from main board
- Set multimeter to DC voltage
- Power on vacuum while measuring sensor outputs
- Proper signals show 0V/3.3V transitions when rotating motor shaft by hand
No signal indicates failed hall sensors—common after liquid exposure or motor overheating. Replacing these $3 sensors often resolves “dead unit” symptoms.
Why a Jammed Brush Roll Can Mimic Total Power Failure
A surprisingly common cause of apparent power failure: a completely jammed brush roll triggering the motor’s thermal cutoff. Your Dyson may show no lights because the overload protection engages before the motor can start:
- Remove the brush roll assembly
- Check for hair, string, or debris binding the roller
- Manually spin the roller to ensure free movement
- Reinstall and test without brush roll first
If the vacuum powers on without the brush roll, you’ve found your culprit—clean or replace the roller assembly.
When to Repair vs Replace Your Non-Starting Dyson Handheld
Making the right economic decision prevents wasted money on unnecessary repairs or premature replacement.
Cost Analysis: $20 DIY Fix vs $150 Professional Repair vs New Unit
| Solution Type | Cost Range | Best For |
|---|---|---|
| DIY Component Repair | $5-$25 | Users with basic soldering skills, V7/V8 models under 2 years old |
| Professional Repair | $100-$180 | Complex board failures, newer models, users uncomfortable with electronics |
| New Unit | $250-$700 | Models over 3 years old, multiple component failures, newer features desired |
For most V7/V8 owners under 2 years of ownership, a DIY switch replacement (under $10 parts) solves the problem. V10+ models with main board issues often justify professional repair over replacement.
Monthly Contact Cleaning Routine That Prevents 70% of Power Issues
Prevent future failures with this simple maintenance protocol:
- Remove battery monthly and inspect contacts
- Clean with isopropyl alcohol and cotton swab
- Apply specialized electrical contact cleaner (never WD-40)
- Check switch operation for developing “mushiness”
- Store battery at 40-60% charge in temperature-controlled environment
This five-minute routine prevents the corrosion and contact degradation responsible for most spontaneous power failures.
Final Troubleshooting Protocol for Immediate Results
When your Dyson handheld vacuum won’t turn on, follow this prioritized sequence for fastest resolution:
- Test with known-good battery (borrow from friend if possible)
- Clean all electrical contacts thoroughly with isopropyl alcohol
- Check power switch continuity with multimeter
- Inspect main board for bulging capacitors or corrosion
- Test voltage rails (21.6V input, 3.3V/5V output)
Eighty percent of “dead Dyson” cases resolve at steps 1-2. For V7/V8 owners, power switch replacement solves most remaining cases. Newer models often require professional attention for BMS or main board issues, but even then, repair typically costs less than half a new unit. Implement the monthly maintenance routine to prevent recurrence—your Dyson handheld deserves years of reliable service when properly cared for.

