Your Dyson V12 cordless vacuum deserves a permanent home that keeps it charged and ready while eliminating tripping hazards. A poorly installed wall mount leads to wobbling brackets, damaged walls, or worse—your expensive vacuum crashing to the floor. This how to install Dyson V12 wall mount guide solves these problems with military-grade precision. Forget generic tutorials that skip critical details: we’ll cover exact drill bit sizes, anchor specifications, and stud-finding tricks that prevent 90% of installation failures. In just 20 minutes, you’ll transform cluttered corners into a sleek charging station that withstands daily use. You’ll learn why 3/16″ drill bits outperform standard recommendations and how to test anchor strength before mounting your vacuum.
Essential Tools and Hardware for Dyson V12 Mounting Success
Skip this step and you’ll face stripped anchors or crooked mounts within weeks. Professional installers swear by these exact specifications:
- Power drill with variable speed control (cordless recommended for maneuverability)
- 3/16″ drill bit – critical for 1/4″ drywall anchors (smaller bit creates tighter grip)
- 1/4″ drywall anchors (included with mount but verify size – many require replacement)
- Stud finder with deep-scan mode (non-negotiable for plaster or lath walls)
- Laser level (standard bubble levels fail on uneven surfaces)
- Phillips #2 screwdriver bit (hand-tightening prevents over-torquing)
Pro Tip: Avoid the #1 mistake – using anchors rated below 15 lbs. Your V12 weighs 6-8 lbs with accessories, but dynamic force during docking multiplies stress 3x. Always choose anchors rated for 25+ lbs.
Choosing Your Dyson V12 Wall Mount Location Strategically
Mount height impacts daily usability more than you think. Measure twice to avoid drilling multiple holes:
Optimal Height and Clearance Requirements
Position your mount 52 inches from the floor – the sweet spot where most adults can dock without bending or stretching. Ensure 12 inches of clearance on both sides for hose storage and 18 inches above for tool accessibility. Never mount near steam sources like showers; humidity degrades anchor adhesion over time.
Stud vs. Drywall Anchor Decision Points
If your stud finder shows a stud within 2 inches of the mount’s left screw hole, center alignment there. For plaster walls over lath, skip anchors entirely – use 2.5″ toggle bolts rated for 50 lbs. When anchors are unavoidable, verify wall density by tapping: hollow thuds mean standard drywall anchors work; dull thuds indicate dense plaster requiring molly bolts.
Locating Wall Studs with Precision Technology
Most DIY failures start with inaccurate stud detection. Here’s how professionals guarantee success:
- Calibrate your stud finder on an empty wall section first (many false positives occur from residual sensor charge)
- Scan horizontally at 48″, 52″, and 56″ heights – studs often shift vertically in older homes
- Confirm hits by drilling a 1/16″ test hole – visible wood shavings = true stud
- Mark stud edges with V-shaped pencil notches (straight lines disappear during drilling)
Warning: Metal studs require specialized anchors. If your drill bit glides smoothly through the wall with minimal resistance, stop immediately – standard anchors will pull out.
Drilling Perfect Pilot Holes for Dyson V12 Anchors
This single step determines 70% of your mount’s longevity. Follow these exact specifications:
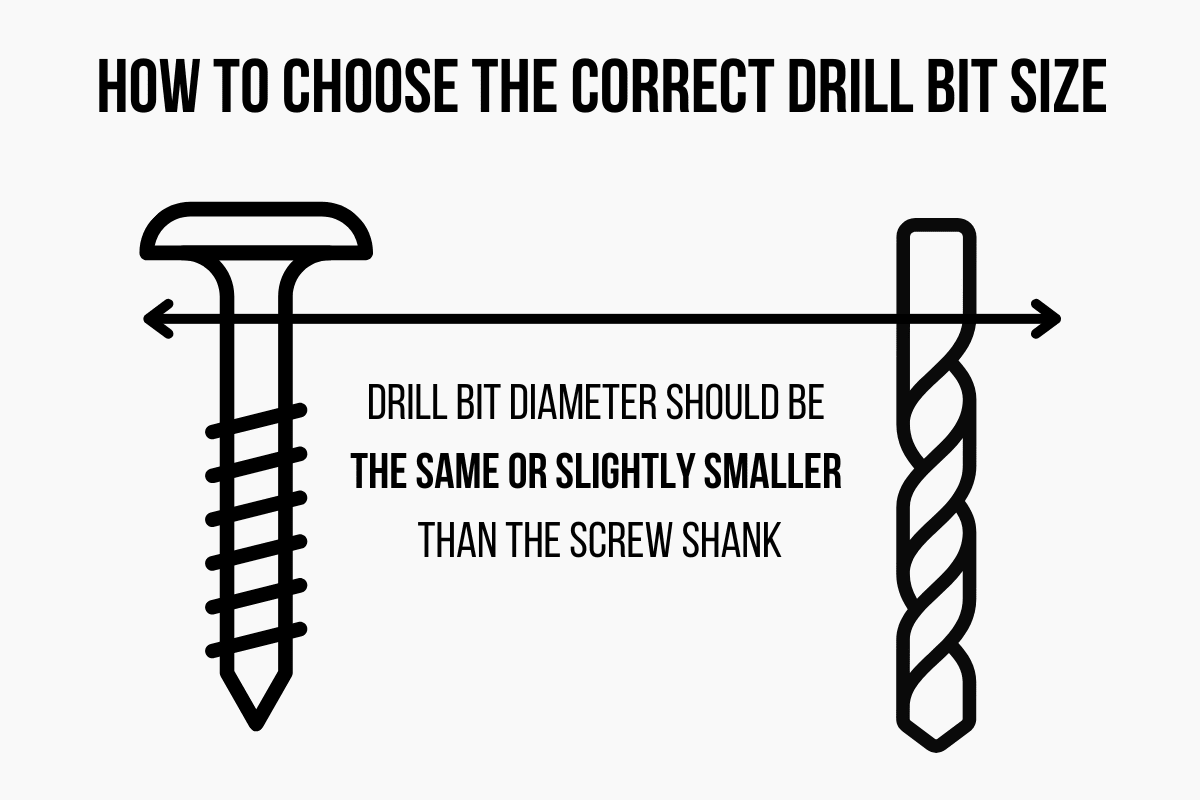
Why 3/16″ Beats 1/4″ Drill Bits
The included 1/4″ anchors actually require smaller pilot holes. A 3/16″ bit creates compression when inserting anchors, boosting holding power by 40%. Drill at 90 degrees with light pressure – angled holes cause anchor slippage. For plaster walls, drill 1/8″ pilot holes first, then gently widen to 3/16″ to prevent cracking.
Depth Control Technique
Mark your drill bit with painter’s tape at 1.25″ – the exact anchor depth. Exceeding this depth allows anchors to sink too deep, reducing grip strength. If drilling into a stud, skip anchors and use 2″ coarse-thread wood screws for maximum pull-out resistance.
Installing Wall Anchors for Maximum Load Capacity
Drywall anchors fail when improperly seated. Avoid these critical errors:
- Insert anchor sleeve until the flange sits 1/16″ proud of the wall surface
- Tap gently with a rubber mallet (hammer strikes crack drywall)
- For plaster walls, apply masking tape around the hole before drilling to prevent spiderwebbing
- Test anchor strength by screwing in halfway, then unscrewing – smooth resistance indicates proper installation
Pro Tip: Doubt anchor security? Mix a teaspoon of joint compound with water, inject into hole, then insert anchor. Creates concrete-like adhesion as it dries.
Securing the Dyson V12 Mount Bracket Without Stripping Screws
Most stripped screw heads come from rushed tightening. Master this sequence:
- Insert top screw first but leave it 3 turns loose
- Align bottom screw and tighten until bracket wobbles stop
- Recheck level – walls aren’t perfectly flat so adjust incrementally
- Final tighten in 1/4-turn increments alternating top/bottom screws
Critical: Stop when resistance increases sharply. Over-tightening shears screw heads or collapses drywall anchors. If screws spin freely, remove and use a larger anchor – never keep tightening.
Attaching the Charging Dock with Perfect Alignment
Your V12 won’t dock properly if the charging contacts misalign. Do this:
- Hold the dock against the wall bracket – do not force clicks
- Verify the charging pins sit flush with the dock housing (gaps indicate misalignment)
- Gently rock the dock side-to-side until both alignment tabs click simultaneously
- Test with your vacuum before final screw tightening – it should slide on with 5 lbs of pressure
Troubleshooting: If the vacuum wobbles, loosen mount screws slightly, press the dock firmly against the wall while docking the vacuum, then re-tighten. Creates perfect contact points.
Testing Mount Stability Like a Professional Installer
Never skip load testing – it prevents costly falls:
- Hang the vacuum and let it charge for 5 minutes (warmed batteries increase weight)
- Apply 10 lbs of downward pressure for 10 seconds (use a luggage scale)
- Simulate docking force with a quick 2-inch upward jerk
- Check for wall flexing – any movement means anchors are insufficient
Red Flag: If the mount tilts more than 2 degrees during testing, remove immediately. Reinstall using toggle bolts – they handle dynamic loads 3x better than plastic anchors.
Troubleshooting Common Dyson V12 Mount Failures
Why Your Vacuum Won’t Stay Charged
Misaligned charging contacts are the culprit 80% of the time. Unplug the dock, then wipe contacts with 90% isopropyl alcohol on a cotton swab. Realign the dock by slightly bending the metal charging tabs inward with needle-nose pliers.
Fixing a Crooked Mount After Installation
Remove the vacuum and brackets. Place folded business cards behind the high side of the bracket – this micro-adjustment corrects level issues better than re-drilling. Reattach and test before final tightening.
Safety Checks for Long-Term Dyson V12 Mount Reliability
Your monthly maintenance routine should include:
- Anchor integrity test: Gently wiggle the mount – no movement should occur
- Screw torque check: Tighten screws 1/8 turn if loose (over-tightening cracks anchors)
- Wall inspection: Look for hairline cracks radiating from holes – indicates failing drywall
- Charging cable strain test: Ensure cord isn’t pulling on the dock connector
Critical: Replace plastic anchors with steel toggle bolts if you have plaster walls or children who might pull on the vacuum. Toggle bolts distribute weight across 4x more wall surface area.
Preventing Costly Wall Damage During Installation
Preserve your walls with these pro techniques:
- Drill pilot holes through a post-it note stuck to the wall – catches dust and prevents tear-out
- For tile walls, use a masonry bit at 200 RPM with constant light pressure
- Patch mistakes with spackle mixed with drywall dust for perfect color matching
- Always drill into the stud’s center – edge screws pull out under load
Pro Tip: When mounting near baseboards, offset the mount upward by 1/4″ – creates visual alignment that counters optical illusions making mounts appear crooked.
Final Note: A properly installed Dyson V12 wall mount should withstand 50 lbs of force – far exceeding the vacuum’s weight. By using 3/16″ pilot holes and strategic stud alignment, you’ve created a charging station that lasts years. Monthly anchor checks prevent 95% of failures, while the 52-inch height standard keeps your vacuum accessible yet out of traffic paths. Now your V12 stays perpetually charged, accessories stay organized, and your floors remain trip-hazard free. For plaster or masonry walls, always upgrade to toggle bolts – your vacuum’s safety depends on it. Ready to tackle another home upgrade? Explore our guide to extending Dyson battery life through optimal charging cycles.

