You’ve invested in a Dyson V15—the powerhouse cordless vacuum that tackles embedded dust and pet hair with laser precision. But if you’re constantly tripping over the charger cord or struggling to find storage space, you’re missing out on half its potential. Properly installing your Dyson V15 wall mount transforms cluttered floors into a sleek charging station, keeping your vacuum charged, organized, and ready for instant use. This guide cuts through confusing instructions to deliver the exact steps needed for a secure, long-lasting installation. You’ll learn precise mounting heights, stud-finding secrets, and pro-level cable management tricks that prevent wobbling and ensure your V15 Detect Absolute or Submarine variant stays perfectly docked.
Forget generic tutorials that ignore critical details like drywall limitations or electrical hazards. We’ve consolidated official specifications, installer-tested techniques, and real-world fixes into one actionable roadmap. Whether you’re mounting in plasterboard or concrete, this process takes under 30 minutes with the right approach. By the end, you’ll have a rock-solid wall mount that withstands daily docking impacts and keeps your V15’s laser sensor and whole-machine HEPA filtration primed for action. Let’s turn that awkward charging chore into seamless convenience.
Essential Tools and Ideal Location for Dyson V15 Wall Mount Installation
Before touching a drill, gather these non-negotiable items from your Dyson kit and toolbox. You’ll need the wall dock backplate, two 6mm wall plugs (for drywall), matching screws, and the separate wand clip. Beyond the kit, grab a 6mm drill bit (1/4 inch works too), stud finder, spirit level, tape measure, pencil, hammer, and cordless drill. Skip any step here, and you risk misaligned mounts or dangerous electrical contact—especially critical since the dock requires direct outlet access for charging.
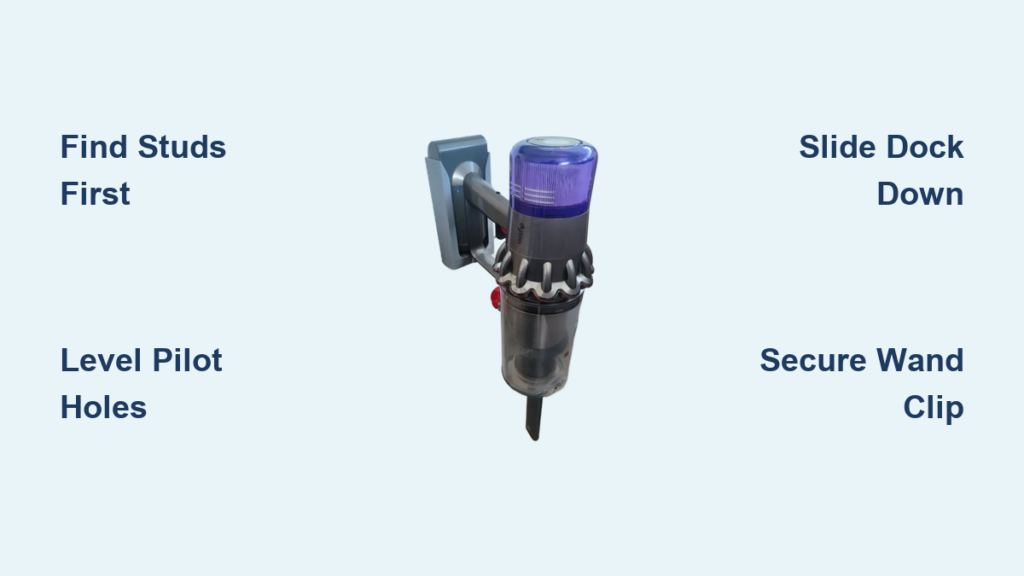
Pinpoint your spot using these exact criteria:
– Position the dock 120 cm (47.2 inches) from the floor to the center of the bottom mounting hole—this height accommodates the V15’s base and cord wrap while preventing tripping
– Ensure 1 meter (3.3 feet) of clear floor space directly in front for smooth docking motions
– Verify clearance from door frames, light switches, and window sills to avoid snagging the wand during insertion
– Crucially: Use a stud finder to locate wooden wall studs. Mounting into drywall alone risks failure under the dock’s loaded weight (up to 5 lbs with accessories). If studs don’t align with your ideal spot, skip lightweight anchors—opt for heavy-duty toggle bolts rated for 20+ lbs.
Never install in bathrooms or damp areas, as moisture compromises electrical safety. And always scan for hidden pipes or wires with a stud finder that detects live circuits—drilling into these causes costly damage.
5 Critical Steps to Securely Mount Your Dyson V15 Wall Dock
Follow this sequence to avoid re-drilling holes or stripped screws. Each step accounts for the dock’s 8.3 cm (3.27 inches) center-to-center hole spacing and 120 cm height standard.
Locate Wall Studs or Install Heavy-Duty Anchors
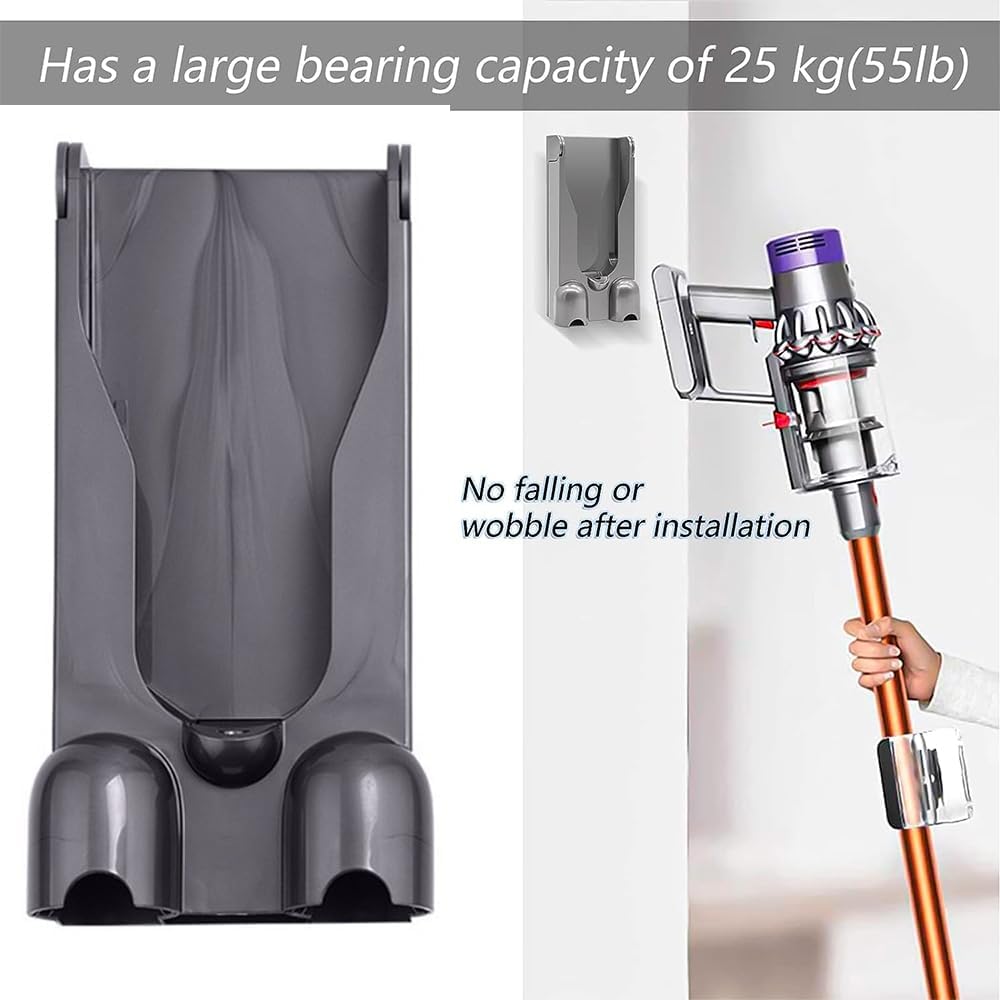
Hold the backplate against your marked spot, ensuring the bottom hole aligns with the 120 cm measurement. Here’s the make-or-break detail: At least one mounting screw must hit a wooden stud. Drywall anchors included in the kit work temporarily, but the V15’s weight (especially with tools attached) will loosen them over time. If no stud aligns with your holes, relocate the dock slightly. If impossible, install molly bolts rated for 25 lbs—standard plastic anchors won’t hold. For concrete walls, swap the provided plugs for masonry anchors and use a hammer drill.
Mark and Drill Perfectly Level Pilot Holes
Place the backplate against the wall and use a spirit level to ensure absolute horizontal alignment. Pencil through both keyhole slots, marking exact drilling points. Remove the plate and drill two 6mm pilot holes at your marks. Pro tip: Drill 1 cm deeper than the wall plug length to avoid plug blowout. If hitting a stud, drill directly into the wood; for drywall, insert the plug fully with a hammer before proceeding.
Lock the Dock Using Keyhole Slot Mechanics
This step leverages the dock’s clever engineering. Insert screws loosely into the wall (about 3/4 tightened) so their heads protrude 5mm. Align the top of each keyhole slot over a screw head, then slide the entire dock downward until it locks flush against the wall. Tighten screws fully—this downward motion creates a secure mechanical hold that prevents upward lift during docking. Warning: Never screw directly through the slots; the keyhole design requires this slide-and-lock technique.
Position the Wand Clip for Tool Accessibility
Mount the wand clip 15-20 cm below the main dock using its single screw. Test fit your V15’s wand: it should slide in smoothly without scraping the floor or hitting baseboards. If your wand has attachments (like the laser slim fluff tool), ensure 5 cm clearance above the clip for easy removal. Use the same stud-finding rigor here—even this small clip can pull out of drywall if overloaded with tools.
Route Cables and Load Accessories Without Clutter
Snap the charger cable into the dock’s side clip, then run it vertically downward using adhesive cable channels every 12 inches. Plug the charger into the dock’s port first—never force the vacuum onto the dock without power connected. Insert the wand until you hear a distinct click, confirming electrical contact for charging. Load the main motorhead, crevice tool, and mini motorized brush into their slots, ensuring no part overhangs the dock’s edge. Finally, plug the charger into the outlet.
Expert Tips for Flawless Dyson V15 Wall Mount Setup
Avoid drywall disaster with the stud-first rule: 90% of wobbling docks fail due to drywall-only mounting. If studs force a suboptimal height, lower the dock slightly rather than risking wall damage. Measure from the floor to the stud’s center, then adjust your 120 cm mark accordingly.
Master cord management for a pro finish: Use double-sided adhesive clips to route the cable vertically behind the dock, not along baseboards. This prevents tripping and reduces cable strain during vacuum removal. For tight spaces, wrap excess cord once around the dock’s built-in wrap point before clipping.
Optimize height for your physique: While 120 cm is standard, raise the dock 5-10 cm if you’re over 6 feet tall. The top of the canister should sit at hip level for effortless one-handed docking. Test with your V15 in hand before drilling—bend your elbow to 90 degrees; your hand should naturally meet the dock’s center.
Fix Common Dyson V15 Wall Mount Problems in Minutes
Stop a Wobbly Dock Without Re-Drilling
If your dock shifts when docking the vacuum, immediately check screw tightness. If screws spin freely, the anchor failed. Do not just tighten further—that strips the hole. Instead, remove the dock, insert a larger toggle bolt through the existing hole, and re-mount. For stud-mounted docks, add a second screw into the same stud above the current hole for redundancy.
Resolve Charging Failures Caused by Contact Issues
When the V15 won’t charge on the dock, inspect the gold charging pins on both the vacuum and dock. Dust buildup here interrupts power transfer—wipe contacts with a dry microfiber cloth (no liquids!). Ensure the wand clicks fully into place; a 2mm gap prevents charging. Critical note: The dock only charges the main battery. For spare batteries, plug the charger directly into the battery, not the dock.
Prevent Tools from Falling Off the Wand Clip
If accessories slide out of the clip, verify you’re using the V15-specific wand—not older Dyson models. The clip’s tension degrades if overloaded; limit it to one tool (e.g., the laser slim fluff tool). For stubborn fits, gently bend the clip’s metal arms inward 2mm with pliers to increase grip. Never force tools, as this cracks the plastic housing.
By installing your Dyson V15 wall mount correctly, you eliminate charging chaos and extend your vacuum’s lifespan through proper storage. Remember: stud-mounted security prevents costly wall repairs, precise 120 cm height ensures ergonomic access, and disciplined cable management keeps your space clutter-free. Every V15 Detect variant—from the Absolute to Submarine—demands this tailored approach for optimal performance. Now that your mount is rock-solid, dedicate 5 minutes monthly to checking screw tightness and cleaning charging contacts. Your vacuum will reward you with years of seamless operation, ready to tackle dust with its laser dust detection the moment you need it. For future reference, bookmark Dyson’s official compatibility guide to confirm your model works with this dock—never assume older mounts fit the V15’s unique design.

