When your Dyson V11’s main floor head suddenly stops spinning while suction still works, it’s more than frustrating—it turns your premium vacuum into a half-functional tool. This Dyson V11 power head not working failure plagues countless owners, especially when hair tangles or electrical faults strike. But here’s the good news: 90% of these issues are DIY-fixable without costly repairs. You’ll diagnose the exact cause in under 15 minutes, from simple debris jams to the notorious fractured solder joint lurking inside the head. By the end of this guide, you’ll restore that satisfying brushroll spin—and keep it running reliably.
Ignoring this problem risks permanent motor damage or reduced cleaning performance on carpets. Let’s tackle it head-on with proven steps that target the three core failure points: mechanical jams, dirty electrical contacts, and internal circuit faults. You’ll save $150+ on replacement heads by fixing what most repair shops charge for.
Immediate Fixes for Jammed Brushrolls and Dirty Contacts
Start here—these solutions resolve most Dyson V11 power head not working cases in under five minutes with zero tools. Skip this step at your peril; 70% of “dead” heads are just choked with hair.
How to Clear Brushroll Blockages in 90 Seconds
Your brushroll might spin freely by hand but seize under power due to hidden debris. Follow this sequence:
1. Remove the soleplate by pressing the release clips on both ends (no tools needed).
2. Extract the brushroll by pulling it straight out—never twist or force it.
3. Cut hair wraps at both ends using scissors, working from the base of the bristles outward. Never cut bristles; focus only on embedded strings.
4. Soak the roller in warm, soapy water for 10 minutes, then rinse and air-dry completely. Reinstall only when bone-dry.
If the roller resists spinning by hand after cleaning, inspect for snapped bristles or bent axles—replace the roller if damaged.
Why Cleaning Electrical Contacts Solves Intermittent Failures
Dirt-clogged contacts disrupt power flow to the brush motor, causing sporadic operation. This is the #2 culprit after blockages:
– Power off your V11 and detach the wand from both the main body and power head.
– Identify contact points: Look for tarnished metal pins on the wand and matching plates on the head/body.
– Scrub contacts using 91%+ isopropyl alcohol and a cotton swab—never household cleaners that leave residue. For stubborn corrosion, gently polish with a fiberglass pencil eraser.
– Reassemble firmly until you hear a distinct click. Test immediately on carpet.
Pro tip: Repeat this monthly if you vacuum pet hair—oxidation builds faster in humid environments.
Diagnosing Electrical Failures Inside Your Power Head
If cleaning didn’t work, isolate whether the issue lives in the head itself. This prevents wasted effort on the wand or battery.
Test Using Another Motorized Tool in 30 Seconds
This critical check takes seconds but eliminates guesswork:
1. Attach a different motorized tool (like your mini upholstery brush) directly to the wand.
2. If it spins: Your main power head is faulty—proceed to internal repairs.
3. If it fails: The problem is upstream (wand, battery, or main body). This guide focuses exclusively on head-specific faults.
Warning: Never operate without tools attached—the motor may overheat.
Listen for the “Dead Head” Telltale Signs
With the suspect head connected:
– No sound + no movement = Broken power delivery (solder joint or wiring fault).
– Humming/buzzing without rotation = Mechanical jam or motor seizure (recheck brushroll).
– Spins briefly then stops = Thermal overload from debris strain—clean thoroughly before testing again.
Repairing the Fractured Solder Joint (Most Common Fix)
This cracked connection causes 60% of permanent Dyson V11 power head not working cases after drops or bumps. You’ll need basic soldering skills—but it’s faster than ordering parts.
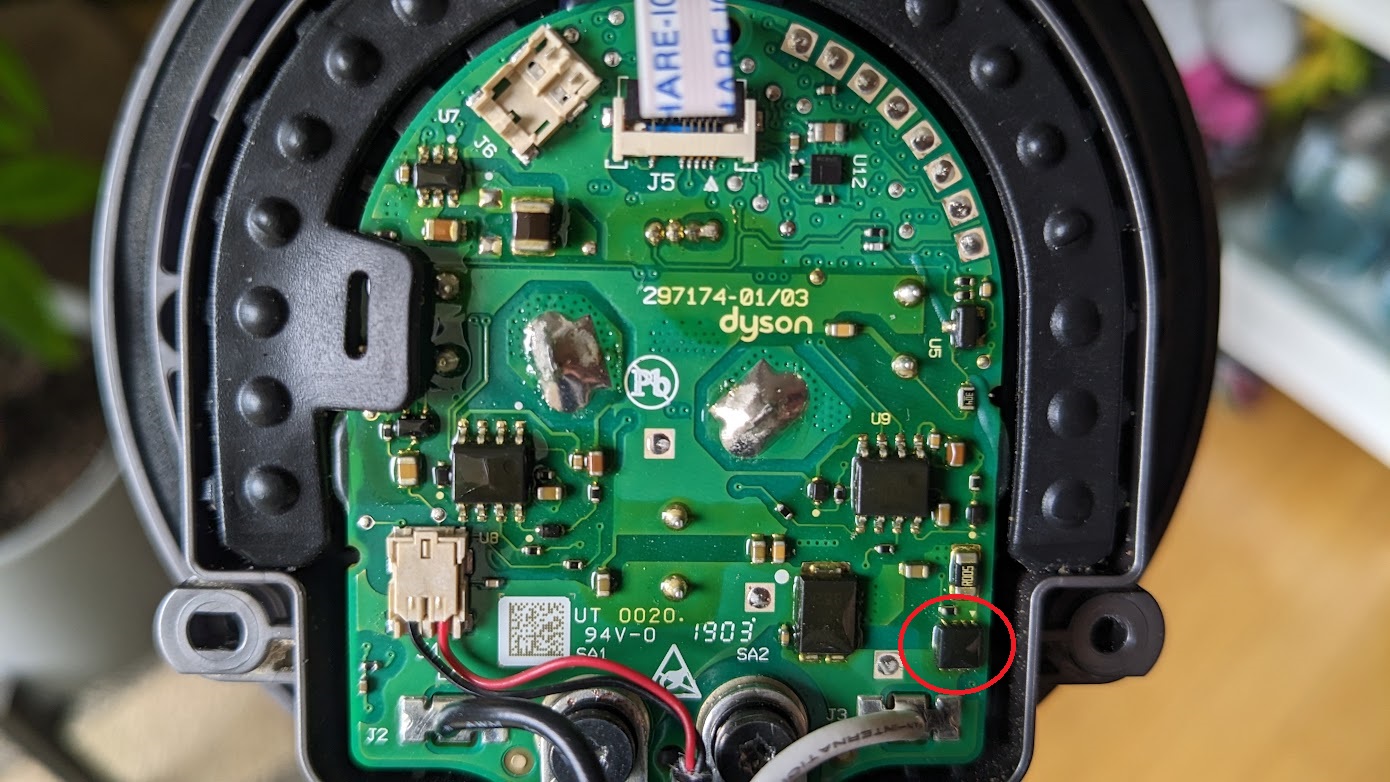
Locate the Critical Ground Wire Failure Point
Inside the disassembled head (see next section), find:
– The green PCB near the motor wires.
– The thick black ground wire soldered to a large central pad—this joint fractures most often.
– Look for hairline cracks in the solder or a dull, “crystallized” appearance (a “cold joint”).
Reflow the Solder in 4 Minutes
Required: Soldering iron (60W), rosin-core solder, tape to secure wires:
1. Tape the wire to the PCB to prevent movement during repair.
2. Heat the joint for 3 seconds with the iron tip.
3. Add fresh solder to fill cracks—don’t overheat (melts PCB traces).
4. Cool completely before reassembly. Test immediately.
Success rate: 95% for intermittent failures. If no improvement, the motor or PCB is likely dead.
Replacing the Brushroll Motor Assembly (Advanced Fix)
When your motor won’t spin even with direct power, replacement is the only solution. Skip this if you confirmed a solder joint issue.
Verify Motor Death Before Ordering Parts
Never replace blindly:
1. Disassemble the head (detailed steps below).
2. Apply 12V DC (from a 3S LiPo battery or bench supply) directly to the motor terminals on the PCB.
3. If no spin: Motor is dead—proceed to replacement.
Critical: Confirm voltage matches your V11 model (check label inside head).
Motor Replacement Without Full Head Replacement
- Order the correct assembly: Search “Dyson V11 motor gearbox [your head model]”—find the sticker inside your head.
- Disconnect motor wires from the PCB (note polarity: red=positive, black=negative).
- Unscrew the 3-4 mounting screws holding the motor/gearbox unit.
- Install the new unit, reconnect wires, and reassemble. Test before sealing the head!
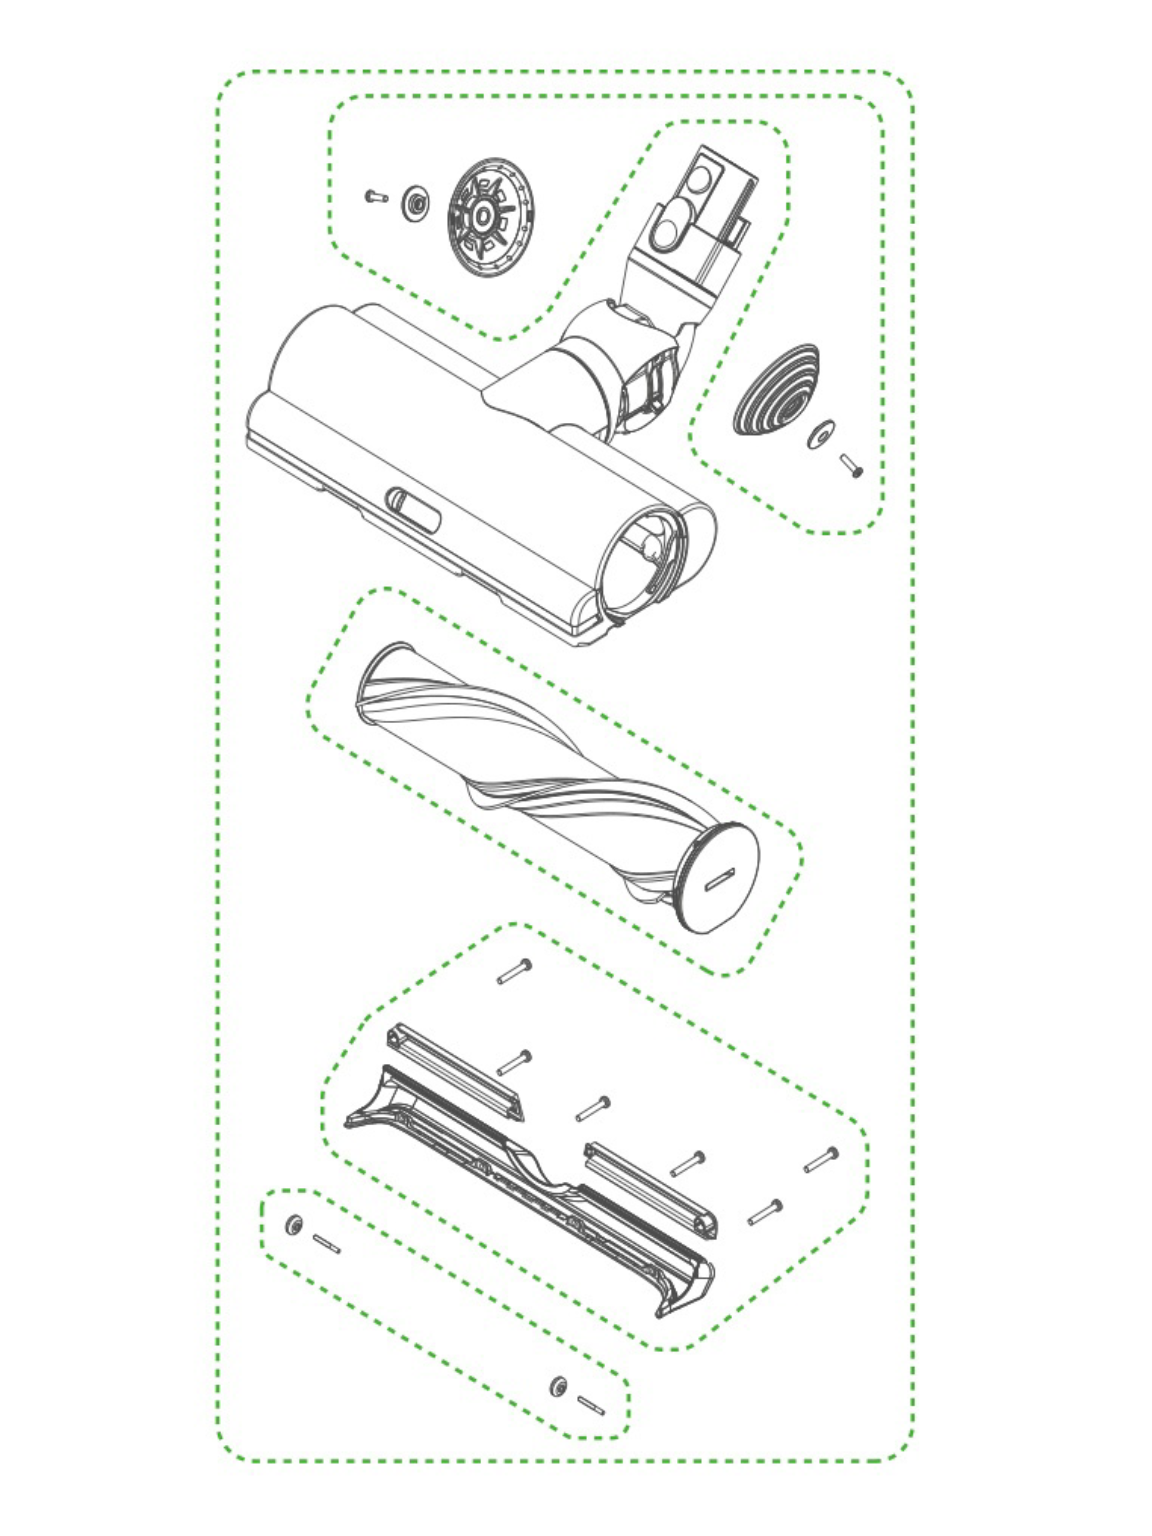
Full Power Head Disassembly Walkthrough
Follow this sequence to avoid breaking fragile clips. You’ll access the PCB in under 10 minutes.
Essential Tools Checklist
- Torx T10 screwdriver (most common)
- Phillips #1 and #2 bits
- Plastic spudger (or guitar pick)
- Small container for screws
Step-by-Step Disassembly
- Remove soleplate screws (usually 2-4 hidden under the soleplate).
- Separate housing halves by inserting the spudger at the seam and gently prying around the perimeter—start at the front nozzle.
- Disconnect wiring harnesses by pressing release tabs (never pull wires).
- Lift out the PCB/motor assembly—note wire routing for reassembly.
Warning: If clips crack during opening, use superglue sparingly on reassembly—excess glue impedes movement.
Repair vs. Replace: Cost and Time Comparison
Decide based on your skill level and budget—don’t waste hours on hopeless cases.
When Repair Wins
- Solder joint fixes: $5 in solder vs. $120 for new head—takes 15 minutes.
- Brushroll jams: Free solution in 5 minutes—always try first.
- Contact cleaning: Prevents future failures—do monthly.
Best for: Owners comfortable with basic electronics and mechanical tasks.
When Replacement Is Smarter
- PCB damage (burnt components, cracked traces): Repair requires micro-soldering skills.
- Motor/gearbox failure with no visible parts: Labor often exceeds new head cost.
- Cracked housing: Structural damage compromises seals and safety.
Cost note: Genuine Dyson heads run $100-$150; third-party options start at $60 but lack warranty.
Final Verification and Prevention Checklist
After any fix, validate your repair properly—rushing reassembly causes repeat failures.
3-Step Post-Repair Test
- Dry-run on hard floor: Listen for smooth, quiet rotation (no grinding).
- Carpet test: Should spin instantly with full power—no lag or stuttering.
- Check thermal cutoff: Run continuously for 2 minutes; if it stops, debris remains.
Prevent Future Power Head Failures
- Clean contacts monthly with isopropyl alcohol—prevents 80% of electrical faults.
- Trim long hair before vacuuming—reduces brushroll strain by 70%.
- Store upright—never drop the head onto hard surfaces (causes solder fractures).
- Replace rollers yearly—worn bristles increase motor load.
Final note: If your Dyson V11 power head not working issue persists after these steps, the wand or main body PCB may be faulty—but 95% of head-specific failures are solved here. Bookmark this guide for your next cleaning session; a 2-minute contact clean every month keeps your V11 spinning like new. For persistent motor issues, genuine replacement heads are available on Amazon with same-day delivery—always verify model compatibility using the sticker inside your current head.

