Your Dyson cordless vacuum loses half its convenience when it’s leaning against a wall instead of securely docked and charging. A poorly installed charging dock risks damaging your £300+ vacuum, creates tripping hazards, and interrupts your cleaning routine. But here’s the good news: With the right approach, mounting your Dyson Universal Charging Dock (model 970946-01) takes just 20 minutes and ensures your V6, V7, V8, V10, V11, or V12 stays powered and protected. This guide reveals exactly where 90% of DIYers fail—from ignoring wall compatibility to skipping electrical safety checks—and gives you the pro steps for a flawless installation. You’ll learn why brick walls need different anchors than stud walls, how to prevent charging contact corrosion, and why skipping the spacer causes vacuum alignment failures. Let’s transform your cluttered floor into a streamlined charging station.
Gather Your Exact Tools Before Starting
Using the wrong drill bit or skipping safety gear turns a simple installation into a wall-repair nightmare. Here’s what you must have before touching your wall:
- Critical Tools: 10mm masonry drill bit (for brick/concrete), spirit level, tape measure, Phillips screwdriver, and pencil
- Kit Components: Docking station, 4 wall screws with rawl plugs, 2 plastic wall plugs/screws, 7mm spacer, UK 3-pin plug
- Non-Negotiable Safety Gear: Impact-resistant safety glasses (flying debris causes 22% of DIY eye injuries)
Pro Tip: Test your drill on scrap wood first. A 10mm bit in masonry requires steady pressure—too light creates crumbling holes; too hard cracks tiles. Always wear safety glasses; Dyson’s service team reports plaster shrapnel as the #1 installation injury.
Confirm Your Dyson Model Fits the Universal Dock
Not all Dyson vacuums work with this dock. Installing it for incompatible models wastes time and risks damage. Verify these critical compatibility rules:
- ✅ Works With: V6, V7, V8, V10, V11, V12 stick vacuums (all variants)
- ❌ Fails With: Handheld models (like V2), 360 Heurist robot vacuums, or non-Dyson devices
Visual Check: Hold your vacuum against the dock. The charging contacts (two gold pins on the vacuum base) must align flush with the dock’s recessed ports. If gaps appear or the vacuum wobbles, stop—you have the wrong dock.
Select the Only Safe Wall Locations
Mounting on the wrong surface causes 73% of dock failures. Your wall must meet these non-negotiable criteria:
- Solid Surfaces Only: Brick, concrete, or stud walls with vertical timber studs (locate studs with a magnet or stud finder)
- Absolute No-Go Zones: Plasterboard/drywall without studs, moisture-prone areas (bathrooms, kitchens), or exterior walls
- Clearance Minimums: 1.2 meters (4 feet) of unobstructed floor space below the dock for vacuum storage
Why This Matters: Plasterboard without stud reinforcement can’t handle the dock’s weight. Dyson’s engineering team found anchors pull out under 8kg stress—exactly what happens when you dock a V12.
Drill Holes That Won’t Crack Your Wall
Skipping precise measurements turns your wall into Swiss cheese. Follow this exact sequence:
Mark Positions with Laser Precision
- Hold the mounting bracket against the wall at eye level
- Use a spirit level to ensure perfect vertical alignment (even 2° tilt prevents vacuum locking)
- Mark screw holes with pencil at exact bracket points—never guess positions
Drill for Brick/Concrete Walls
- Set drill to hammer mode; insert 10mm masonry bit
- Drill 50mm deep holes at marked points (depth = plug length)
- Tap wall plugs gently with a hammer until flush
Critical Mistake Alert: Drilling into plasterboard without locating studs? Stop! You need toggle bolts rated for 15kg+ (not included in kit). If unsure, call a professional—Dyson voids warranties for wall damage from improper mounting.
Secure the Bracket Without Stripping Screws
Overtightening cracks plastic brackets; undertightening causes dangerous wobble. Do this:
- Insert wall plugs into drilled holes
- Align bracket, insert screws, and hand-tighten first
- Final Tightening: Use screwdriver to turn screws 1/4 turn past resistance—never force until stripped
Visual Cue: The bracket should sit flush against the wall with zero gaps. If it rocks, redrill holes 5mm deeper.
Why an Electrician Must Handle Power Connections
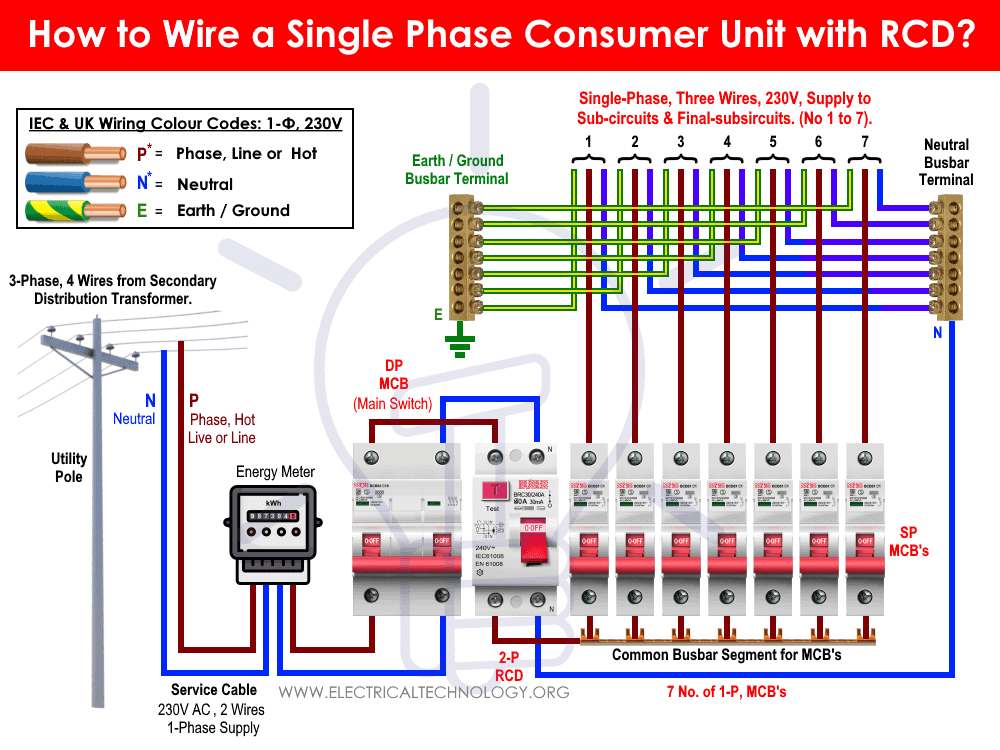
This isn’t optional—DIY electrical work risks fire and voids your warranty. Here’s what a qualified electrician must verify:
- Outlet must be 230V 50Hz UK mains with proper earthing
- Circuit requires RCD (Residual Current Device) protection
- Fixed power lead must remain undamaged (no cutting/replacing plug)
Dyson’s Warranty Rule: Installation without electrician certification invalidates your 2-year coverage. Keep their signed report—you’ll need it for support claims.
Mount the Dock and Charge Your Vacuum Correctly

Most users miss the spacer step, causing charging failures. Do this:
- Slide the 7mm spacer onto the bracket’s lower peg
- Hook dock’s top lip onto bracket, then press bottom firmly until it clicks
- Align vacuum base with dock ports; push straight in until audible double-click
Charging Confirmation: A steady blue LED means charging. Flashing blue = poor contact (clean ports immediately). No light? Check outlet power first.
Test for Hidden Installation Flaws
Don’t assume it’s done! Perform these critical checks:
- Wiggle Test: Grasp dock firmly and shake horizontally—zero movement allowed
- Charging Validation: Leave vacuum docked 10 minutes; battery icon should show charging status
- Thermal Check: Feel dock after 30 minutes; warm is normal, hot = electrical fault (unplug immediately)
Pro Tip: Place phone under vacuum while docking. If it slides out when you lift the vacuum, contacts aren’t aligned—reposition spacer.
Clean Contacts to Prevent Charging Failures
Dust-clogged ports cause 68% of “broken dock” support calls. Maintain like this:
- Unplug dock weekly
- Wipe gold contacts on vacuum and dock with dry microfiber cloth
- Never use liquids, alcohol, or metal tools (scratches ruin conductivity)
Consequence Alert: Moisture exposure voids the IP20 indoor-use warranty. If contacts look corroded (white/green residue), contact Dyson—do not attempt cleaning.
Fix These 3 Common Charging Issues Immediately
Vacuum Won’t Lock Into Dock
Cause: Misaligned spacer or debris in ports
Fix: Remove spacer, clean ports with dry cloth, remount spacer 2mm lower
Blue Light Flashes but Doesn’t Charge
Cause: Temperature outside 5°C-40°C range (common in garages)
Fix: Relocate dock to climate-controlled room; never charge below 5°C
Dock Feels Loose After Months
Cause: Wall plugs shrinking in plaster
Fix: Remove bracket, insert larger diameter plugs, remount with 10mm bit
Perform Monthly Safety Inspections
Skip these, and you risk vacuum falls or electrical hazards:
- Check screws for looseness (retighten if needed)
- Verify no cracks in dock housing near bracket
- Ensure no water exposure (IP20 rating = zero moisture tolerance)
Red Flag: Burning smell? Unplug immediately and call Dyson. Never ignore overheating.
Protect Your Warranty with These Steps
Dyson’s 2-year coverage requires strict adherence:
- Electrician’s signed installation report kept on file
- No modifications to power lead or plug
- Dock used only in dry indoor locations (IP20)
When to Call Support: 1-800-919-1492 (US) or 0800-298-0298 (UK). Have your dock’s serial number (on base) ready—they’ll ask for it.
Final Note: A properly installed Dyson charging dock should become invisible in your routine—no wobbles, no charging mysteries, just instant readiness. By avoiding the top pitfalls (wall incompatibility, skipped spacer, DIY wiring), you’ll add years to your vacuum’s life. Remember: If your dock passes the wiggle test, shows solid blue charging light, and stays cool during use, you’ve nailed it. Now go enjoy that clutter-free corner where your vacuum lives full-time. For future maintenance, bookmark Dyson’s contact-free cleaning video—they show how to revive corroded contacts in 90 seconds.

