Your Dyson vacuum suddenly dies mid-clean, or your air purifier stops functioning just when you need it most. The culprit? Often an improperly installed charger that’s failing to maintain your device’s battery health. Proper Dyson charger installation isn’t just about plugging in a cable—it’s about creating a reliable power connection that maximizes battery lifespan and ensures your device performs when you need it. Whether you own a cordless stick vacuum like the V7, V8, or V15 series, or an air treatment system like the Pure Cool or Purifier Humidify+Cool, correct charger setup is critical. This guide delivers the precise steps to install your Dyson charging system properly the first time, avoiding common mistakes that lead to frustrating charging failures and premature battery degradation.
Optimal Wall Placement for Your Dyson Charger Dock
Selecting the perfect spot for your Dyson charger determines whether your device maintains peak performance or constantly battles charging issues. The right location prevents electrical hazards while ensuring consistent power delivery to your vacuum or air treatment system.
Why Wall Studs Matter for Charger Stability
Mounting your Dyson charger directly into wall studs provides the rock-solid foundation necessary to support your vacuum’s weight without loosening over time. When installing a wall dock for stick vacuums like the V7, V8, or V11 series, always locate the center of a wooden stud using a reliable stud finder—drywall alone cannot safely support the combined weight of the dock and vacuum. Position the dock at eye level for easy visibility of charging indicators, but low enough for comfortable placement of your vacuum after cleaning. Measure carefully to ensure the dock sits perfectly level, as even a slight angle can cause your vacuum to slide off or fail to make proper electrical contact with the charging pins.
Environmental Factors That Impact Charger Performance
Your Dyson charger requires specific environmental conditions to function optimally and maintain battery health. Install the charging dock in a temperature-controlled area between 50-86°F (10-30°C), as extreme cold or heat severely degrades lithium-ion batteries. Avoid locations near kitchen sinks, bathroom showers, or laundry areas where humidity levels regularly exceed 65%, as moisture can corrode charging contacts and create electrical hazards. Never mount your charger in direct sunlight, which can cause the plastic components to warp and the internal electronics to overheat. For best results, choose an interior wall away from exterior doors that experience temperature fluctuations with changing weather.
Secure Wall Mount Installation for Dyson Stick Vacuum Chargers

Installing your Dyson wall charger correctly prevents dangerous falls and ensures consistent electrical contact between your vacuum and charging dock. Follow these precise steps to create a permanent, secure mounting solution for your stick vacuum.
Essential Tools for Proper Dyson Charger Mounting
Gather these specific items before starting your Dyson charger installation:
* The wall dock and mounting hardware included with your Dyson vacuum
* A reliable stud finder (magnetic or electronic)
* Laser level or traditional bubble level
* Pencil for marking
* Drill with appropriate bits (usually 1/8″ for pilot holes)
* Phillips head screwdriver
* Measuring tape
* Heavy-duty wall anchors (only if stud mounting isn’t possible)
Critical safety note: Never use standard drywall anchors—they will pull out under the weight of your vacuum. If you cannot locate a stud, use toggle bolts rated for at least 50 pounds to safely support your charging system.
Step-by-Step Wall Dock Installation for Dyson V7-V15 Models
-
Locate and mark wall studs: Scan your chosen wall area with a stud finder, marking the center of each stud with a pencil. Most homes have studs spaced 16 inches apart.
-
Position the mounting template: Hold the wall dock against the wall at your desired height (typically 36-42 inches from the floor). Use a level to ensure it’s perfectly horizontal, then mark the top screw holes directly onto the wall.
-
Drill precise pilot holes: For stud mounting, drill pilot holes slightly smaller than your mounting screws. For drywall with toggle bolts, drill holes matching the toggle bolt size specified on the packaging.
-
Secure the mounting plate: Insert screws through the wall dock’s mounting holes, driving them firmly into the stud or toggle bolts. The dock should not wiggle when properly installed.
-
Connect power and test: Plug the charger cable into the wall dock, then into a dedicated wall outlet (not a power strip). Hang your vacuum to verify the charging contacts align perfectly and the unit snaps securely into place.
Connecting Power for Dyson Air Purifier Charging Systems
Unlike stick vacuums, Dyson air treatment devices require different installation considerations for their charging systems. Models like the Pure Cool, Purifier Humidify+Cool, and 360 Vis Nav robot vacuum have unique power connection requirements that affect performance.
Proper Base Station Installation for Dyson Air Treatment Models
Place the charging base for your Dyson air purifier on a completely flat, non-carpeted surface at least 12 inches away from walls to ensure proper airflow around the unit. Unlike stick vacuums, these devices shouldn’t be mounted on walls—doing so restricts airflow and creates overheating risks. Connect the power adapter to the designated port on the base unit, ensuring the connector clicks firmly into place. The circular charging contacts on robot vacuums like the 360 Vis Nav must remain completely unobstructed—never place the charging dock against a wall where the robot might push debris against the contacts during docking.
Troubleshooting Common Dyson Charger Connection Failures
When your Dyson device fails to charge after installation, these specific problems are most likely causing the issue:
Why your Dyson vacuum isn’t charging on the wall dock: Check for bent charging pins on either the vacuum or dock—these delicate metal contacts easily bend during rough handling. Use a magnifying glass to inspect both sets of contacts; if bent, carefully straighten them with fine-tipped tweezers. Another common issue occurs when dust and hair accumulate between contacts—unplug the charger and clean both sets of contacts with a dry microfiber cloth, never using liquids or compressed air.
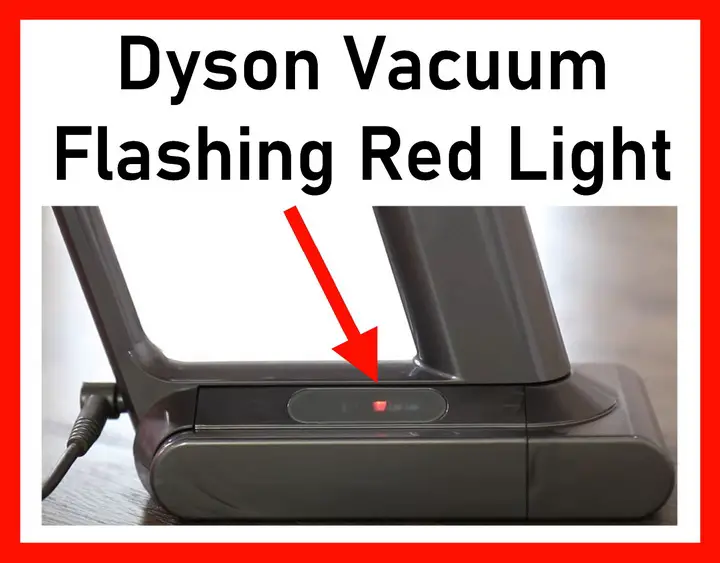
Diagnosing flashing red lights on your Dyson charger: A rapidly flashing red light typically indicates a communication error between the vacuum and charger. First, unplug the charger for 60 seconds to reset the system. If the problem persists, check for firmware updates through the Dyson Link app, as outdated software often causes charging communication failures.
Preventing Electrical Hazards with Dyson Charger Maintenance
Proper maintenance of your Dyson charger installation prevents dangerous electrical issues while extending the lifespan of your entire system. Most charging problems stem from preventable maintenance oversights rather than component failures.
Monthly Charger Inspection Checklist
Examine your Dyson charging system monthly with this critical safety checklist:
* Inspect the power cable for fraying, kinks, or exposed wires—replace immediately if found
* Check wall dock mounting screws for tightness (loose screws create electrical arcing risks)
* Clean charging contacts with a dry, lint-free cloth to remove dust buildup
* Verify the wall outlet isn’t warm to the touch (indicates overloaded circuit)
* Ensure no liquids have contacted the charger or dock assembly
Critical warning: Never attempt to repair a damaged Dyson charger yourself—lithium-ion charging systems contain high-voltage components that can cause severe electrical shock. Contact Dyson support for replacement parts.
Maximizing Battery Health Through Proper Charging Habits
Contrary to popular belief, leaving your Dyson vacuum on the charger continuously is actually recommended for optimal battery health. Lithium-ion batteries perform best when kept between 20-80% charge, and Dyson’s smart charging systems automatically switch to maintenance mode when fully charged. However, if storing your device for more than 30 days, discharge the battery to approximately 50% before powering down—fully charged batteries degrade faster during long-term storage.
When to Contact Dyson Support for Charger Issues
Some charging problems require professional intervention rather than DIY fixes. Contact Dyson support immediately if you notice:
* Burning smells or visible smoke from the charger
* Discoloration or melting of the charger housing
* Intermittent charging that persists after thorough cleaning
* Error codes that won’t clear after resetting
* Any signs of electrical arcing (sparks or popping sounds)
Dyson’s warranty covers charger defects for 2 years, but improper installation voids this coverage—always follow their mounting guidelines to maintain warranty protection.
Proper Dyson charger installation creates the foundation for reliable, long-lasting performance from your vacuum or air treatment system. By mounting your wall dock securely into studs, maintaining optimal environmental conditions, and performing regular maintenance checks, you’ll avoid the most common charging failures that plague Dyson owners. Remember that consistent contact between clean charging pins and proper power delivery are non-negotiable for maintaining your device’s battery health. Take the time to install your charger correctly now, and you’ll enjoy years of trouble-free operation with your Dyson appliance. For ongoing maintenance, incorporate monthly inspections into your cleaning routine—just 5 minutes of preventative care can extend your charger’s lifespan by years and prevent dangerous electrical hazards.

