
Your Dyson V10 cordless vacuum represents a major upgrade from traditional cleaning tools, but only if you know how to use Dyson V10 properly. Many owners miss out on its full potential by overlooking simple techniques that transform everyday cleaning into a breeze. In this comprehensive guide, you’ll discover exactly how to use Dyson V10 for spotless results on every surface, maximize battery life, troubleshoot common issues, and maintain peak performance for years to come.
Unlike conventional vacuums, your Dyson V10 delivers powerful suction without cords or heavy machinery. But to harness its full capabilities—from deep carpet cleaning to delicate surface dusting—you need precise knowledge of its features and functions. This guide cuts through the confusion with actionable steps you can implement immediately, ensuring you get the most from your investment while avoiding common mistakes that damage performance.
Your Dyson V10 Out-of-Box Experience: Setup in 5 Minutes
Before you start vacuuming, proper setup ensures optimal performance from day one. Unbox your Dyson V10 and verify you have all components: main vacuum unit, wand, motorhead tool, crevice tool, combination tool, dusting brush, mini motorized tool, wall dock, and charger. Missing parts? Contact Dyson immediately—never operate with incomplete components.
The critical first step is charging. Connect the charger to a wall outlet and dock your Dyson V10. A flashing blue LED indicates charging in progress, while solid blue means fully charged. Never skip the initial 3.5-hour charge—this calibrates your battery for maximum lifespan. During this time, inspect each attachment for shipping damage and familiarize yourself with their unique functions.
Assembling Your Vacuum for First Use
Snap the wand into the main body until you hear a click, then attach your preferred cleaning head. For your first cleaning session, we recommend starting with the motorhead tool—it automatically adjusts between carpets and hard floors. Hold the vacuum upright and press the power trigger gently to confirm operation before tackling actual cleaning tasks.
Activate Maximum Cleaning Power: How to Use Dyson V10’s Suction Modes Correctly
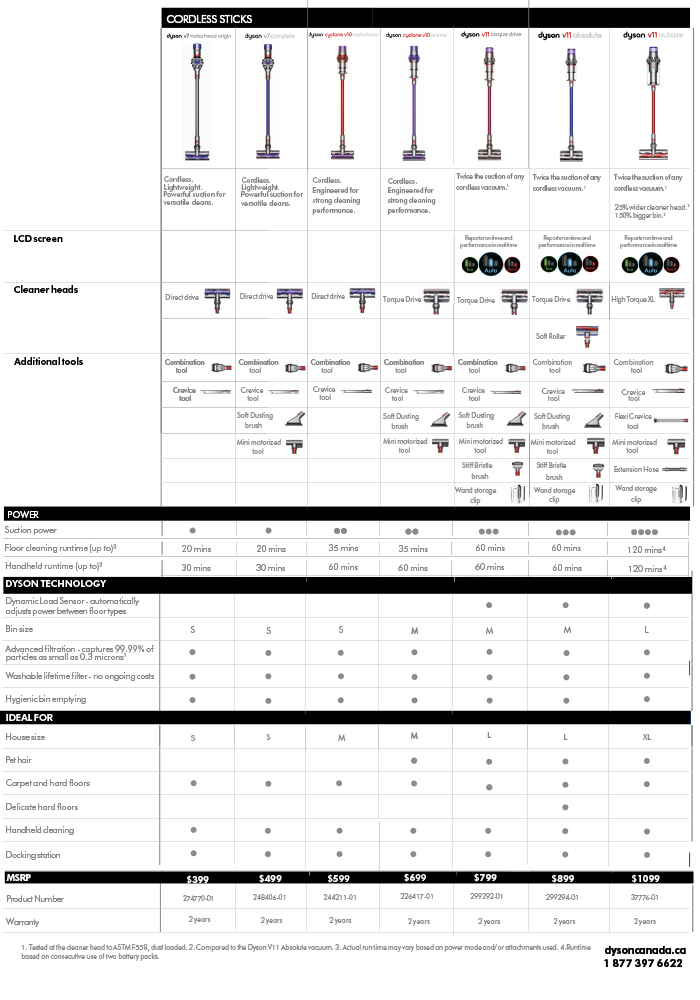
Operating your Dyson V10 is refreshingly simple but mastering its power modes transforms your cleaning efficiency. Press and hold the trigger to start suction—release to stop immediately. The real game-changer is the power mode button that lets you toggle between four distinct settings based on your cleaning needs.
Choosing the Right Power Mode for Each Task
- MAX Mode: Delivers 150 AW of suction for stubborn debris (5-minute runtime)
- Auto/Medium Mode: Balances power and battery life for daily cleaning (40 minutes)
- Quiet Mode: Reduces noise while maintaining effective suction (60 minutes)
- Eco Mode: Maximizes runtime for large spaces with light debris (90 minutes)
For most households, Auto Mode is the daily workhorse—it automatically adjusts suction based on detected debris. Save MAX mode for high-pile carpets or post-renovation cleanup where maximum power is essential. Eco mode shines for quick daily maintenance on hard floors when battery conservation matters most.
Dyson V10 Tool Mastery: Which Attachment to Use for Every Cleaning Task
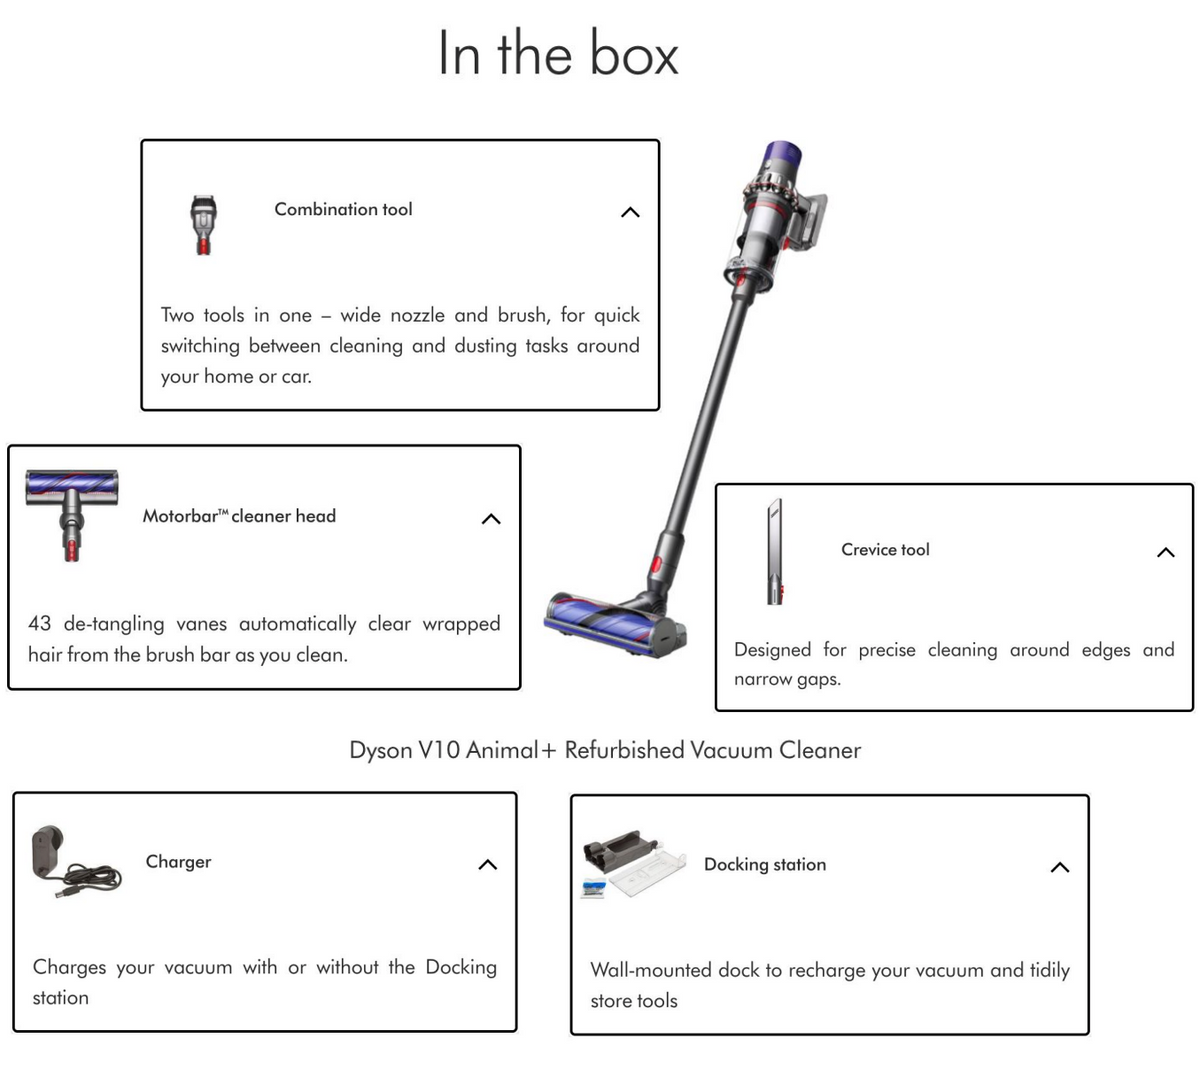
Your Dyson V10 comes with specialized tools designed for specific cleaning challenges—using the wrong attachment wastes time and reduces effectiveness. Each tool clicks securely into place with a simple twist-and-lock mechanism that ensures no suction loss during operation.
The Right Tool for Tough Cleaning Jobs
The motorhead tool’s self-adjusting cleaner head automatically transitions between carpets and hard floors—ideal for whole-home cleaning. For pet hair nightmares, the mini motorized tool’s counter-rotating brushes pull embedded fur from upholstery without scratching surfaces. The crevice tool’s slim profile reaches into car seats and window tracks where debris hides, while the soft dusting brush lifts particles from delicate surfaces like piano keys and bookshelves.
Pro Tip: Store frequently used attachments on your wall dock for instant access. Keep the combination tool (which doubles as a crevice tool and brush) in your car for spontaneous interior cleanups.
Professional Cleaning Results: How to Use Dyson V10 for Deep Cleaning in Half the Time
Achieving professional-level results with your Dyson V10 requires technique, not just power. Start by working systematically—move furniture when possible and clean from farthest corners toward the exit to avoid walking over cleaned areas. For carpets, use slow, overlapping strokes in multiple directions to agitate deep-seated dirt.
Overcoming Common Cleaning Challenges
Hardwood floors require different handling than carpets. Switch to the soft roller head (if you have it) and use Eco mode to prevent scattering fine dust. For embedded pet hair on area rugs, activate MAX mode and make multiple slow passes perpendicular to the rug weave. Never vacuum large debris like paper clips or coins—they can damage your machine and void warranties.
When tackling stairs, detach the wand and use handheld mode for better maneuverability. Start from the top step and work downward, using the mini motorized tool for embedded dirt between treads.
Keep Your Dyson V10 Running Strong: Essential Maintenance Schedule
Regular maintenance prevents 90% of performance issues with your Dyson V10. The most critical routine task? Emptying the bin after every use. Hold the vacuum over trash, press the red bin release, then slide the bottom lever to open the “point and shoot” mechanism—this hygienic design keeps your hands clean while disposing debris.
Filter Care That Makes or Breaks Performance
Your Dyson V10’s two-stage filtration system captures 99.97% of particles but requires proper care:
– Pre-motor filter: Wash monthly in cold water when you see the flashing white light
– HEPA post-motor filter: Clean every three months with thorough rinsing
– Drying: Air dry both filters for 24+ hours away from direct heat
Never operate with damp filters—this damages the motor and reduces suction. Set calendar reminders for maintenance tasks to avoid performance degradation.
Decode Dyson V10 Warning Lights: Troubleshoot Issues Before They Worsen
Your Dyson V10 communicates problems through its LED system—learning these signals prevents minor issues from becoming costly repairs. A flashing red light means immediate blockage; check the wand, hose, and brush bar for obstructions. Flashing white during operation indicates either low battery or dirty filters—clean filters first before recharging.
Critical Warning Light Guide
- Solid blue: Fully charged and ready
- Flashing blue: Charging in progress
- Flashing white (steady): Filter needs cleaning
- Flashing white (rapid): Battery critically low
- Flashing red: Blockage or overheating
When you see flashing red, turn off the machine, unplug it, and methodically check each component for blockages. Start from the brush bar and work backward through the wand to the bin—most obstructions occur at connection points.
3 Most Common Dyson V10 Problems (And How to Fix Them in Under 5 Minutes)
Low suction is the #1 complaint among Dyson V10 owners—and it’s usually fixable in minutes. First, empty the bin (even if not full), then check for blockages in the wand and attachments. Remove the brush bar and use scissors to cut away tangled hair—a common suction killer. Finally, wash and thoroughly dry both filters.
Battery Life Troubleshooting
If your runtime has decreased significantly:
1. Reset the battery by fully discharging then charging for 3.5 hours
2. Store at 50% charge in cool, dry conditions (avoid garages or cars)
3. Never leave on charger continuously—unplug after solid blue appears
For strange noises, immediately turn off the vacuum and check the brush bar for foreign objects. Coins, paper clips, or string can damage internal components if ignored.
Extend Your Dyson V10 Battery Life: Charging and Storage Secrets
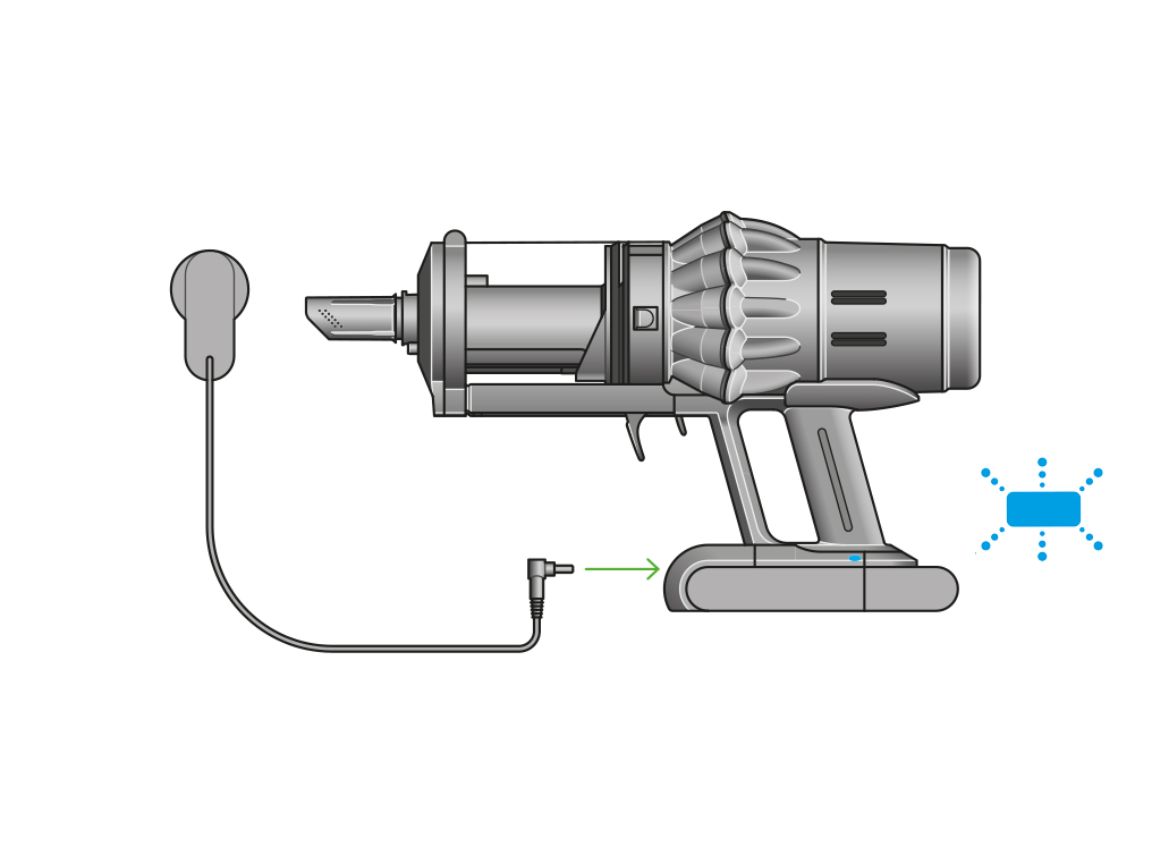
Your battery’s lifespan depends entirely on charging habits. Always complete the initial 3.5-hour charge before first use—this calibrates the battery management system. For daily use, charge after each session but unplug once solid blue appears to prevent overcharging.
Optimal Storage Practices
Store your Dyson V10 upright on its wall dock in a temperature-controlled environment. For extended storage (over 30 days), maintain a 50% charge level—neither full nor empty. Extreme temperatures (below 40°F or above 95°F) permanently damage lithium-ion batteries, so never store in garages, cars, or near heating vents.
Never attempt to replace the battery yourself—this voids your warranty and creates safety hazards. Contact Dyson for authorized battery replacement when runtime drops below 50% of original capacity.
Final Performance Checklist: 5 Critical Dyson V10 Maintenance Habits
Implement these daily habits to keep your Dyson V10 performing like new for years:
- Empty bin after every use—even partial fills reduce suction
- Check brush bar weekly for tangled hair and debris
- Wash filters monthly following Dyson’s specific instructions
- Store upright on wall dock with 50% charge for optimal battery health
- Use correct power mode for each task—don’t default to MAX unnecessarily
By following these precise how-to use Dyson V10 techniques, you’ll maintain maximum suction power while extending your vacuum’s lifespan. Remember that regular maintenance prevents 95% of performance issues—spend just 5 minutes after each use caring for your machine, and it will reward you with years of powerful, reliable cleaning. The true secret to mastering your Dyson V10 isn’t complicated—it’s consistent attention to these simple, proven practices.

