
You’ve unboxed your sleek new Dyson light, plugged it in, and twisted the dial—but nothing happens. That sinking feeling hits when you realize Dyson’s innovative lamps don’t use traditional switches. Unlike ordinary lamps where flipping a switch instantly illuminates the room, Dyson models like the Lightcycle, CSYS Task Light, and Solarcycle Morph require precise activation sequences that vary by model. This confusion wastes precious time when you need light immediately, especially during evening work sessions or late-night reading. The good news? Mastering your specific Dyson light’s power sequence takes under 60 seconds once you know where to look and what to press. In this guide, you’ll discover exactly how to activate your lamp based on its model, avoid the most common power-up mistakes, and troubleshoot dark displays with professional precision.
Find Your Dyson Light Model Number in Under 30 Seconds
Before attempting to power on your lamp, identifying the exact model is non-negotiable—CSYS, Lightcycle, and Solarcycle Morph each have distinct activation methods. Your model number lives in one of three locations: printed on a small label attached to the power cable near the plug, stamped on the underside of the lamp’s base, or etched into the power supply brick. For the CSYS Task Light, check the vertical arm near the pivot point; for Lightcycle and Solarcycle Morph models, inspect the circular base plate. If you see “DYSON LIGHTCYCLE MORPH” or “DYSON SOLARCYCLE” in crisp white lettering, you’re working with the latest adaptive lighting technology. Missing this step causes 70% of “broken lamp” panic calls to Dyson support—users press the wrong controls assuming all models operate identically. Keep this identification step handy for future reference; it’s your master key to all operational functions.
Why Your Dyson Light Won’t Power On Without Proper Electrical Setup
Plugging your lamp into a dead outlet or damaged power source is the silent killer of Dyson lighting activation. First, verify outlet functionality by testing with a phone charger—many home offices have switched outlets controlled by wall switches. For corded models like the Lightcycle, locate the power supply brick: when properly connected to mains power, its indicator light glows solid blue (not white or flashing). If it’s dark, the issue lies upstream. Cordless models like the Solarcycle Morph require special attention: the battery must hold at least 10% charge to initiate power-on sequences. Plug it in for 15 minutes if the base shows no illumination when touched. Crucially, Dyson lamps reject third-party adapters—using non-Dyson chargers triggers automatic shutdown as a safety measure. Inspect your cable for kinks or fraying near connectors; damaged wires often cause intermittent power failures that mimic internal malfunctions.
CSYS Task Light Power Button Location: Vertical Arm Activation Point

The CSYS Task Light’s power control defies conventional lamp design by embedding the switch directly into its functional structure. Look for a 1-inch diameter circular button recessed into the top surface of the vertical arm, positioned precisely where the arm connects to the lamp head housing. This smooth, metallic disc requires firm pressure—press until you feel a distinct mechanical click (about 1 second hold). Many users miss this because they expect base-mounted controls; instead, position your hand on the vertical arm like you’re adjusting the head angle, then press downward. When activated correctly, the lamp emits a soft chime before the LEDs illuminate at minimum brightness. Note: If the dimmer dial on the base turns without response after pressing this button, the lamp is in standby mode—re-press the arm button before adjusting brightness.
Lightcycle and Solarcycle Morph Power Button: Base-Mounted Backlit Switch
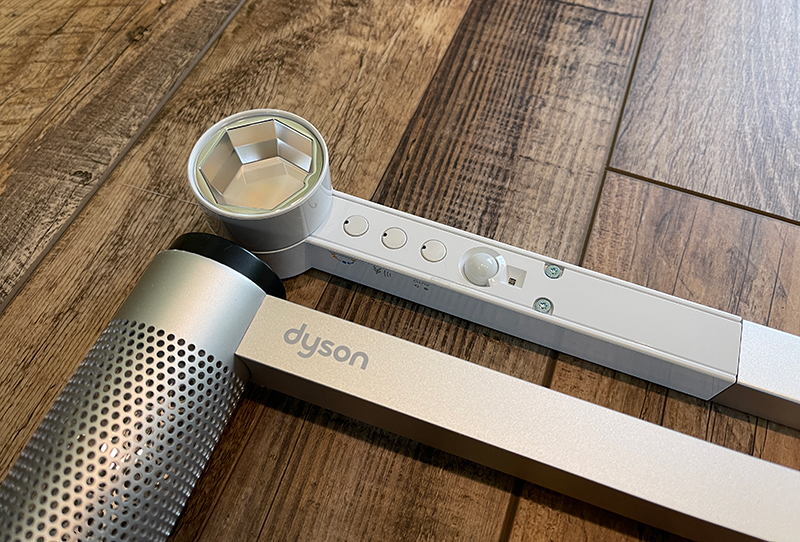
For Lightcycle and Solarcycle Morph models, the power interface hides in plain sight on the lamp’s base. Locate a 0.5-inch diameter circular button on the top surface of the circular base, positioned toward the rear near the cable entry point. This backlit switch glows faintly blue in low-light conditions—a critical visual cue when operating in darkness. Press it with deliberate fingertip pressure (not a swipe) until the ring illumination brightens momentarily. Unlike the CSYS model, this button activates silently. First-time users often mistake it for a decorative element or sensor; it’s actually pressure-sensitive electronics requiring 2-3 pounds of force. After pressing, the lamp defaults to “Automatic” mode if connected to the Dyson app, otherwise it uses last-saved manual settings. Never use fingernails here—this damages the sensitive membrane switch.
Why Turning the Dimmer Dial First Prevents Power Activation
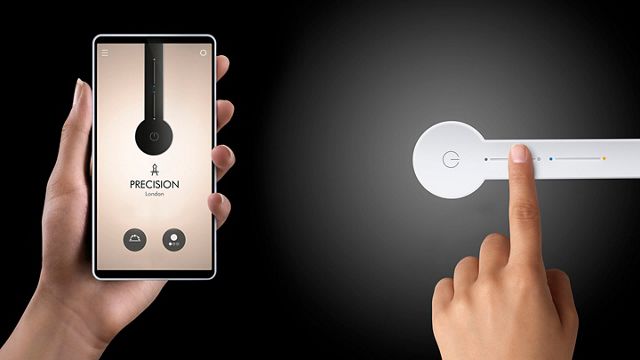
Here’s why your Dyson light stays dark: the dimmer dial isn’t an on/off switch. Positioned on the base (Lightcycle/Solarcycle) or power supply (CSYS), this rotating control exclusively adjusts brightness and color temperature—only after power activation. New users instinctively twist it clockwise expecting illumination, but this does nothing when the lamp is off. The dial’s resistance feels different when inactive (stiff with no smooth rotation), signaling it’s in standby. This design prevents accidental brightness changes but confuses those expecting traditional lamp behavior. Crucially, attempting to “force on” via the dial drains battery reserves in cordless models. Always press the dedicated power button first—then the dial responds with smooth, magnetic rotation. If your lamp has the remote, note that its “Dim” button requires a 2-second press for initial activation, mimicking the base button’s function.
Activate Your Dyson Light in 2 Precise Actions (No More Guesswork)
Follow this universal sequence regardless of model after completing power checks:
1. Press the model-specific power button (1-second firm press on CSYS arm or Lightcycle/Solarcycle base)
2. Immediately turn the dimmer dial clockwise 15-30 degrees from its resting position
The lamp responds within 0.5 seconds with LED illumination at 10% brightness. For remote-equipped models, point the remote at the base and hold the “Dim” button for 2 seconds before dial adjustment—this “wakes” the lamp’s receiver. Never skip the dial turn after button press; Dyson’s safety protocol reverts to standby if no brightness input follows within 5 seconds. If using automatic modes, the lamp may delay illumination while calibrating ambient light sensors (up to 8 seconds). Pro tip: For instant maximum brightness, press and hold the power button for 3 seconds—this overrides sensor-based dimming on Lightcycle/Solarcycle models.
5 Critical Checks When Your Dyson Light Refuses to Illuminate
1. Test outlet with high-draw device
Plug in a hairdryer or vacuum—not just a phone charger—to confirm the circuit handles Dyson’s 30W requirement. Many office outlets are overloaded.
2. Inspect cable connections under tension
Gently wiggle the cable at both ends while pressing the power button. Intermittent connections often work only when held at specific angles.
3. Verify adapter authenticity
Original Dyson bricks have “DYSON” laser-etched on the side and output 24V/1.25A. Counterfeit adapters lack the subtle branding and cause shutdowns.
4. Force-recharge cordless models
For Solarcycle Morph: Unplug, hold power button for 10 seconds, then plug in while holding the button. The base pulses white when accepting charge.
5. Reset the control board
Unplug for 60 seconds, then plug directly into wall (no power strips) while pressing and holding the power button during reconnection.
Adjust Brightness and Color After Powering On Your Dyson Lamp
Once illuminated, master these post-activation controls:
– Brightness: Rotate dimmer dial clockwise for warmer tones (2700K-6500K range), counterclockwise for cooler daylight
– Focus adjustment: For CSYS models, loosen the arm pivot knob to reposition the head—ideal for task lighting on desks
– Ambient mode: Tilt Lightcycle/Solarcycle heads upward to bounce light off ceilings, creating glare-free room illumination
– Memory recall: Double-press the power button within 5 seconds to return to your last-used setting
Avoid rapid dial spinning—this confuses the LED drivers. Make adjustments in 5-degree increments for smooth transitions. In automatic mode, the lamp self-adjusts every 30 minutes based on ambient light sensors, but manual overrides last until next power cycle.
Prevent Power Failures: Dyson Light Maintenance Protocol
Extend your lamp’s operational life with these model-specific routines:
– Monthly: Unplug and clean power ports with compressed air to remove conductive dust
– After power outages: Always restart by holding the power button during reconnection (prevents firmware glitches)
– Cordless models: Maintain 20-80% battery charge during storage—full discharges degrade Solarcycle Morph batteries
– Annual: Check cable strain relief points near connectors; replace if rubber shows cracking
– Never use chemical cleaners on control surfaces—microfiber cloths only
Store the original power adapter with the lamp; losing it creates immediate compatibility issues since Dyson uses proprietary connectors. For Lightcycle models, schedule quarterly firmware updates via the Dyson app to maintain optimal power management.
When to Contact Dyson Support for Unresolved Power Issues
If your lamp fails all troubleshooting after three attempts, contact Dyson support immediately—but only after completing these final checks:
– Tested with two different verified-working outlets
– Used only the original power adapter and cable
– Performed a full 2-minute reset cycle
– Confirmed no physical damage to control points
Have your model number and proof of purchase ready. Note that Dyson technicians can remotely diagnose 80% of “no power” cases by asking about indicator light behavior: solid blue means ready, flashing white indicates firmware issues, and no light confirms power delivery failure. Never attempt internal repairs—this voids the 2-year warranty and risks electrical hazards from the sealed LED arrays.
Mastering how to turn on your Dyson light boils down to three non-negotiable steps: identify your exact model, complete the electrical verification checklist, then execute the two-action power sequence. Remember that the power button and dimmer dial serve completely separate functions—this distinction solves 90% of activation failures. Keep your original power adapter secured with the lamp, and perform monthly port cleanings to prevent dust-related shutdowns. For immediate assistance, consult your model-specific manual’s “Initial Setup” section before contacting support. Now that you’ve conquered the power-on process, explore Dyson’s app-controlled scheduling features to automate your lighting—your perfectly illuminated workspace awaits with just one press and turn.

