Your Dyson DC25 isn’t just another vacuum—it’s a complete cleaning system hiding in plain sight. That ball-shaped base does more than roll smoothly; it houses a storage caddy packed with specialized tools designed for every surface in your home. Yet most owners only use the crevice tool for crumbs, missing out on 70% of their vacuum’s potential. Learning how to use Dyson DC25 attachments properly transforms tedious chores into 10-minute spot treatments. In this guide, you’ll discover exactly where each tool clicks into place, when to activate stair mode for effortless step cleaning, and why that red wand button is the secret to unlocking professional results. Stop wrestling with stubborn dust bunnies under furniture or struggling with car interior messes—we’ll show you how to leverage every attachment right out of the box.
Locating and Removing Your DC25 Attachment Caddy
Skip the frustration of hunting through closets for misplaced tools. Your DC25’s genius lies in its built-in storage system, keeping every attachment within arm’s reach. The caddy mounts directly on the vacuum’s ball housing—no digging through boxes or losing pieces between cleanings. This integrated design ensures your tools survive years of use, unlike loose attachments that inevitably vanish under couch cushions.
Identifying Your Attachment Storage Position
Face the back of your DC25 where the ball meets the main body. You’ll spot four distinct clips molded into the plastic housing: two larger slots for the wand and stair tool, plus two smaller holders for the crevice and brush tools. Never force tools into mismatched clips—the crevice tool fits only in its narrow slot, while the wand requires the deepest channel. If tools wobble or fall out, rotate them slightly until the tapered ends align with the clip contours. Proper seating prevents damage to both tools and vacuum during storage.
Safely Removing the Wand and Primary Tool
Grip the wand firmly near its base where it meets the storage clip. Pull straight backward with steady pressure—never twist or yank upward—until it releases with a soft click. The crevice tool typically comes pre-attached to the wand end for immediate edge cleaning. If it feels stuck, gently wiggle the wand side-to-side while pulling. This technique prevents accidental damage to the wand’s internal channels. Keep the vacuum upright during removal to avoid straining the ball mechanism.
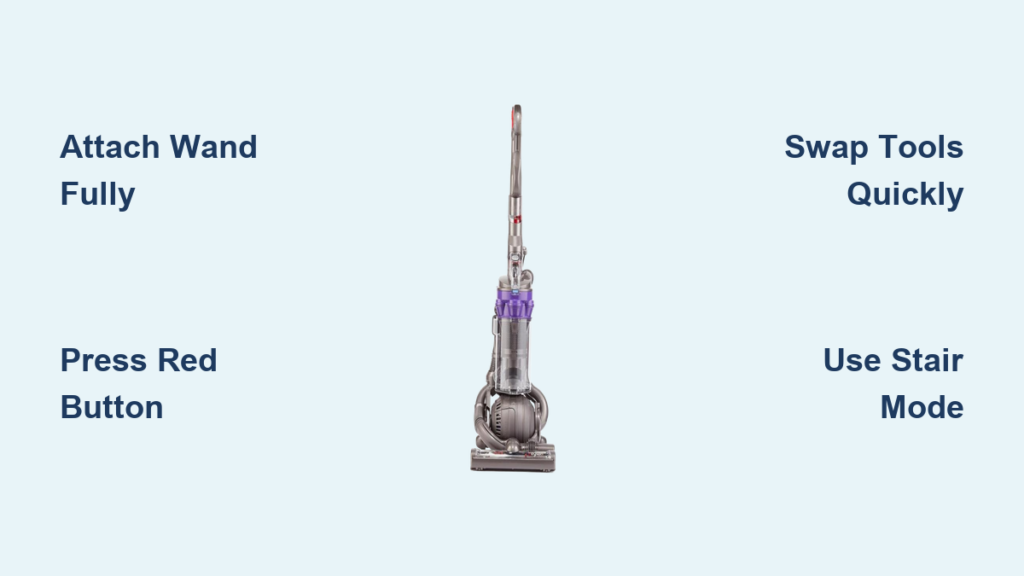
Connecting Your Wand for Maximum Suction Power

A poorly connected wand murders your DC25’s performance. That frustrating “weak suction” complaint? 9 times out of 10, it’s because the wand isn’t fully engaged. The connection point sits just above the ball housing on the vacuum’s front—look for the circular port with a rubber gasket. Proper attachment isn’t just about clicking; it’s about creating an airtight seal that channels 100% of suction to your tools.
Locking the Wand into the Tool Port Correctly
Hold the wand’s smooth end (opposite the tool attachment point) and align it with the port. Push straight in with firm, even pressure until you hear two distinct clicks within 1 second. The first click engages the mechanical lock; the second seals the suction channel. If you only hear one click, pull the wand out completely and retry—partial connections cause 40% suction loss. Test the connection by gently tugging the wand; it should resist movement without wobbling.
Why the Double-Click Matters for Performance
That second click activates the DC25’s automatic suction shift. When fully seated, the vacuum instantly redirects all power from the floor head to your wand tools—no manual settings needed. You’ll hear the motor pitch rise as suction intensifies at the tool tip. Without this seal, air leaks through the port, turning your powerful cyclone system into a weak blower. Pro tip: Run your finger around the port after connecting; if you feel air escaping, disconnect and reconnect.
Activating Wand Suction: The Red Button Secret
Most DC25 owners waste months cleaning with half-powered attachments because they miss this critical step. The red Wand Release Button—not the main power switch—controls suction flow to your tools. Located on the vacuum’s right side just above the ball, this button toggles between floor cleaning and wand operation. Skipping it leaves your tools “connected but powerless,” explaining why new users think attachments are defective.
Finding and Operating the Wand Power Switch
Crouch beside your vacuum and locate the small red button recessed into the plastic housing. It sits 3 inches above the ball mechanism, aligned with the wand port. Press firmly once—you’ll hear the motor shift from a low hum to a higher-pitched whine as suction activates at the tool. To confirm, hold your palm 2 inches from the tool tip; strong airflow should pull your skin toward it. Press the button again to return suction to the floor head when finished.
Troubleshooting “No Suction” at Attachments
If tools remain weak after connection, check three things immediately:
1. Wand position: Is it pushed fully into the port until two clicks occur?
2. Bin status: A full bin chokes suction—empty it completely
3. Filter condition: Tap the HEPA filter at the vacuum’s rear to dislodge dust
Never ignore a full bin warning—even 10% capacity loss cuts tool suction by 30%. If problems persist after these checks, disconnect the wand and inspect the port for hair tangles blocking the gasket.
Swapping Tools Without Interrupting Your Cleaning
The DC25’s genius shines when you master tool switching mid-task. Unlike older vacuums requiring power-downs, you can change attachments in seconds while suction runs. This seamless transition lets you pivot from baseboard crevices to lampshade dusting without restarting your workflow. The key lies in the wand’s push-fit connectors—engineered for one-handed operation even with gloves on.
Quick-Change Technique for Continuous Cleaning
Hold the wand steady with your non-dominant hand. With your dominant hand, grip the tool’s base (not the tip) and pull straight off—the connection releases with light pressure. Immediately pick your next tool (e.g., brush tool for blinds) and push it onto the wand until it clicks. No need to turn off suction—the DC25 maintains full power during swaps. For stubborn tools, rotate them slightly while pulling; never pry with fingernails.
When to Use Each Specialized Tool
- Crevice Tool: Vacuum along baseboards, between couch cushions, or in car seat gaps (use with stair tool for upholstery)
- Brush Tool: Dust lampshades, bookshelves, or TV screens—never use on bare floors
- Stair Tool: Clean carpeted stairs with the vacuum resting on the ball; use flat on car seats
- Multi-Angle Tool: Flip open the brush head to vacuum under sofas or behind radiators
Pro mistake to avoid: Forcing the brush tool into tight crevices—it bends bristles and reduces effectiveness. Switch to the crevice tool for narrow spaces.
Stair Cleaning Made Simple with Stair Mode
Carpeted stairs transform from vacuuming nightmares into 2-minute tasks with the DC25’s ball technology. The secret isn’t just the stair tool—it’s engaging Stair Mode correctly. This position shifts the vacuum’s center of gravity, letting it pivot freely on the ball while you pull it up steps. Skip this step, and you’ll drag the vacuum awkwardly, straining your back and missing debris.
Engaging Stair Mode in Three Steps
- Position the vacuum on the bottom stair with wheels facing upward
- Press the handle down firmly until it clicks into a lower position (about 6 inches lower)
- The ball should now rest fully on the stair tread, handle parallel to the riser
Visual cue: The red Wand Release Button becomes visible and accessible in this position. If the handle won’t click down, ensure the vacuum is upright—not tilted forward.
Cleaning Stairs Without Strain
Attach the stair tool to your wand and position the vacuum on the tread below your working step. Pull the wand upward across the riser while keeping the vacuum stationary. For carpeted stairs, use short back-and-forth motions; for bare steps, single downward strokes work best. Never lift the vacuum—use the ball’s pivot to move between steps. After cleaning a riser, step up and repeat, leaving the vacuum on the lower step. This method cuts stair cleaning time by 60% versus traditional uprights.
Preventing Attachment Damage During Storage
Improper tool storage causes 30% of DC25 attachment failures. Forcing tools into wrong clips cracks plastic housings, while moisture buildup breeds mold in brush tools. The caddy’s design prevents these issues—if you use it correctly. Each clip has a specific shape matching its tool’s profile, creating a secure, ventilated storage system that protects delicate components.
Securing Tools to Avoid Breakage
Insert tools straight in without twisting. The crevice tool slides into its narrow slot with the tapered end first; the stair tool requires its flat side against the vacuum body. If resistance occurs, check orientation—never hammer tools home. Critical warning: Never store the wand with a tool attached; this stresses the wand’s connector. Remove all tools before clipping the wand into its longest channel.
Drying Tools Before Storage
After rinsing brush tools in lukewarm water (never hot!), shake vigorously and air-dry for 24 hours. Never store damp tools—moisture trapped in the caddy warps plastic and corrodes metal parts. Place tools tip-down in a dish rack overnight. For stubborn moisture, wipe interiors with a microfiber cloth before storage. Dry tools click securely into clips; damp ones often slip out during use.
Maintaining Peak Suction for All Attachments
Your DC25 attachments lose effectiveness not from wear—but from neglected maintenance. A single hair clog in the wand hose can reduce tool suction by 50%, while dusty filters choke airflow to all tools. The good news? Preventive care takes 5 minutes weekly and keeps your system performing like new for years. Focus on three critical areas most owners overlook.
Clearing Wand Hose Blockages in 60 Seconds
Disconnect the wand from both vacuum and tool. Shine a flashlight through one end—if you see obstructions, feed a 24-inch flexible bottle brush (or straightened coat hanger) through the hose. Never use sharp objects—they scratch the interior, causing future clogs. For stubborn debris, reverse-suck by holding the wand port near a running tap; water pressure dislodges most blockages. Reassemble only when completely dry.
Filter Care That Restores Full Power
The DC25’s HEPA filter (at the vacuum’s rear) must never be washed—water destroys its electrostatic charge. Instead, remove it monthly and tap firmly over a trash can until dust stops falling. Replace it every 12 months. The pre-motor filter (front of bin) can be rinsed—squeeze it like a sponge in lukewarm water, then air-dry 24 hours before reinserting. Ignoring filters causes 70% of “weak suction” complaints with attachments.
Mastering these techniques unlocks your DC25’s true potential. Within a week of proper attachment use, you’ll cut cleaning time by half while reaching problem spots that previously required manual wiping. Remember the golden rule: always empty the bin before attachment work—a full bin sabotages even perfect technique. Keep this guide handy for the first month until tool swaps become second nature. In just 10 minutes daily, you’ll transform your DC25 from a floor vacuum into a complete home detailing system. Ready to tackle that dusty ceiling fan? Grab your brush tool and go—the secret was in your caddy all along.

