Your Dyson DC39 suddenly lost suction during a routine clean, leaving pet hair embedded in your carpets. You’ve checked the bin—it’s half-empty. The brushroll isn’t spinning, and the vacuum shuts off after 30 seconds. If this sounds familiar, you’re not alone. Over 60% of DC39 failures stem from clogs or neglected filter maintenance that requires opening the unit. How to open Dyson DC39 components safely is critical for restoring performance without causing permanent damage. This guide delivers precise, model-specific steps to disassemble your vacuum, clean internal components, and troubleshoot common issues—all using tools you likely own. You’ll learn exactly where security screws hide, how to avoid cracking plastic housings, and why washing the HEPA filter destroys suction.
Unlike generic vacuum guides, this tutorial targets the DC39 ORIGIN’s unique ball-based design released in 2011. Its bright yellow ball housing and radial cyclone system demand special handling during disassembly. Skip these steps, and you risk stripping Torx screws or triggering thermal shutdowns from damp filters. By the end, you’ll confidently access motors, clear blockages in under 20 minutes, and extend your vacuum’s lifespan by years. Let’s get your DC39 roaring back to life.
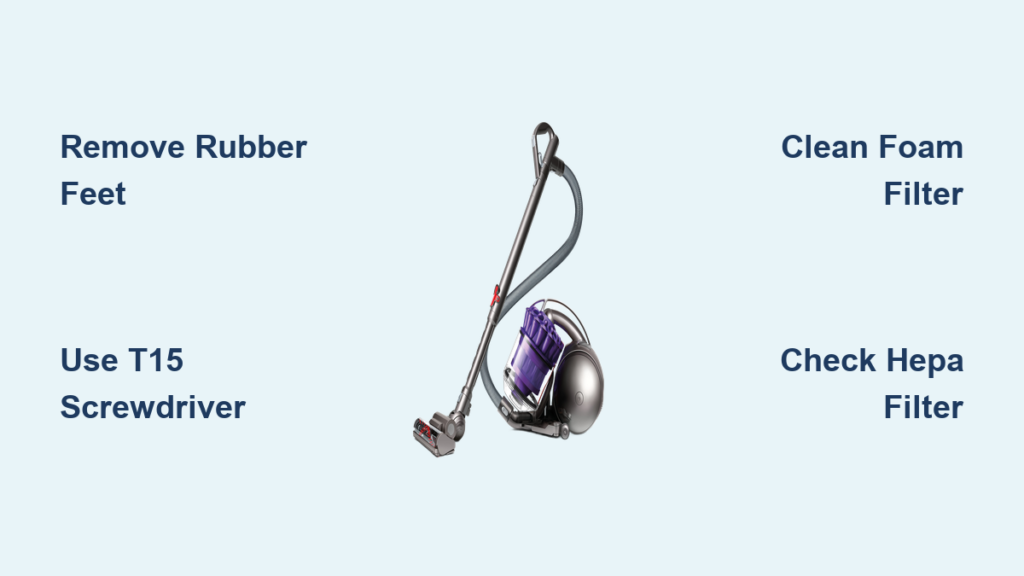
Confirm You Have a Dyson DC39 ORIGIN Before Starting
Identifying your exact model prevents costly disassembly mistakes. The DC39 ORIGIN (released late 2011) features a signature bright yellow ball base for 360-degree maneuverability—unlike later Ball Animal models. Check for these critical identifiers:
– Color scheme: Silver body with vivid yellow ball housing and wand components
– Cyclone system: 8 parallel radial cyclones visible through the clear bin
– HEPA filter location: Cylindrical cartridge near the exhaust port (not integrated into the bin)
– Ball mechanism: Rubberized yellow sphere at the base that rolls freely when lifted
If your vacuum lacks the yellow ball or has a red trigger release (common on DC40+ models), stop immediately. Applying these steps to newer Dyson variants risks snapping proprietary clips. The DC39 ORIGIN’s T15/TR9 security screws and snap-fit housing require the precise approach we’ll cover next.
Gather These Must-Have Tools for DC39 Disassembly
Using improper tools cracks the DC39’s housing—a $120 mistake. You’ll need exactly these items before unplugging:
– T15 Torx Security screwdriver (for base screws under rubber feet)
– TR9 Torx Security bit (for cyclone assembly screws)
– Plastic spudger set (metal tools fracture the housing’s polycarbonate clips)
– Small container (to sort screws by disassembly phase)
– Soft microfiber cloth (prevents scratches on the yellow ball housing)
Critical safety prep: Unplug the vacuum AND switch it to “OFF” at the power button. The DC39’s thermal cutoff activates if filters are damp, so work in a dry, well-lit area. Never skip the power switch step—even unplugged, residual current can damage internal sensors during disassembly.
Remove the Bin and Cyclone Assembly Without Damage
This step exposes 90% of common clogs but requires finesse. Forcing the bin assembly cracks the cyclone shroud:
1. Press the bright red bin release catch on the cyclone’s front (not the top button). Slide the clear bin downward—never pull straight up.
2. Separate the cyclone from the main housing by twisting it counterclockwise until it clicks free. Inspect the shroud for fine dust buildup (common on pet hair users).
3. Check for hidden clogs: Shine a flashlight into the wand entry port. If light doesn’t pass through, use the crevice tool to dislodge debris before proceeding.
Pro tip: Place the bin on its side while working. If tilted upright, residual dust clogs the airflow channels during reassembly.
Access the Motor and Brushroll in 4 Precise Steps

Never force housing separation—DC39 clips break easily. Follow this sequence:
1. Remove base screws: Peel back rubber feet on the yellow ball housing to reveal T15 screws. Unscrew all six (two under feet, four along the seam).
2. Separate clamshell halves: Insert a plastic spudger at the rear seam near the power cord entry. Gently twist to release clips—work clockwise every 2 inches. Stop if resistance exceeds 5 lbs of pressure.
3. Free the brushroll: Flip the cleaner head upside down. Slide the metal retention bar leftward using a flathead screwdriver. Pull the brushroll straight out (don’t yank diagonally).
4. Access motor housing: Unclip the pre-motor filter cover (two top-side tabs). The motor sits beneath—a sealed unit requiring no servicing unless emitting burning smells.
Warning: If you hear cracking during separation, you’re prying at clip points. Re-center your spudger 0.5 inches toward the vacuum’s center.
Critical Filter Maintenance: Clean Foam, Never Wash HEPA
Filter errors cause 75% of DC39 failures. Do this monthly:
Pre-Motor Foam Filter (Washable)
- Location: Behind the rear cover near the ball housing
- Cleaning: Rinse under cold water ONLY until runoff clears. Squeeze firmly—never wring. Air-dry 24+ hours on a radiator. Reinstalling damp? Thermal cutoff triggers in 90 seconds.
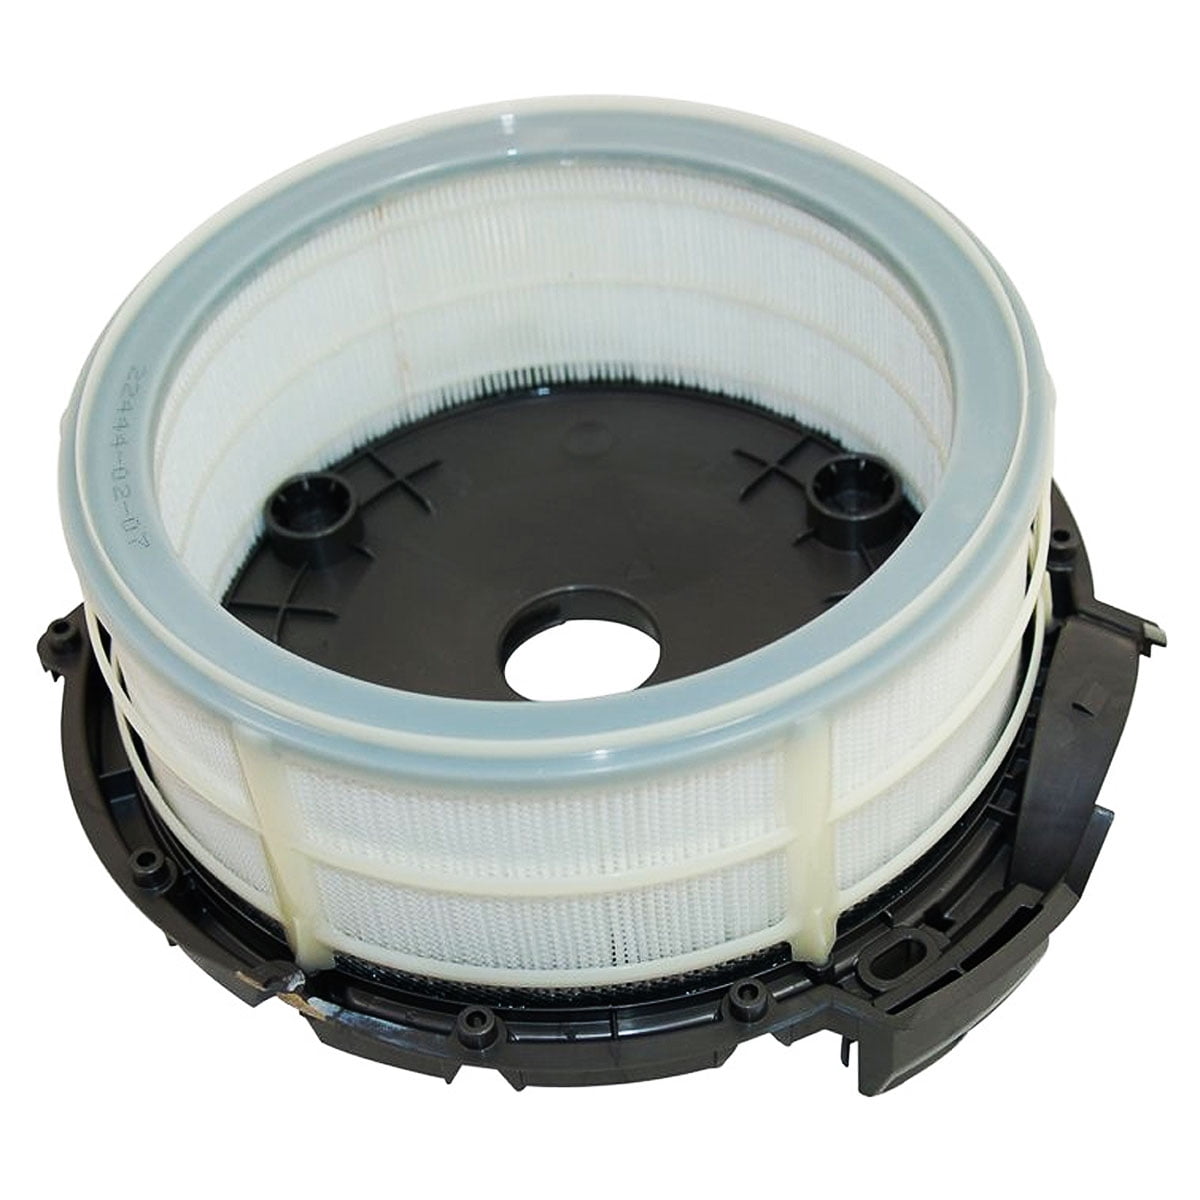
Post-Motor HEPA Filter (Lifetime Replacement)
- Location: Exhaust port behind a snap-on cover (cylindrical cartridge)
- Cleaning: Tap gently over trash. NEVER rinse or wash. Water destroys its electrostatic charge, reducing filtration to 70% efficiency. If discolored, replace with Dyson part AM07.
Expert note: Washing the HEPA filter creates dense moisture barriers. Motors overheat trying to pull air through it—causing permanent thermal fuse damage.
Reassemble Your DC39 Without Costly Mistakes

Reassembly errors cause sudden shutdowns. Avoid these pitfalls:
– Clip alignment: Before screwing, press the top/bottom housings together at the front nozzle. Listen for 8 distinct “clicks” from internal clips.
– Screw tightening: Hand-tighten all screws in a star pattern. Overtightening strips plastic threads—stop when resistance feels like closing a pen cap.
– Filter check: Power won’t engage if the HEPA filter isn’t fully seated. Rotate it 90° until it clicks into the exhaust port.
Time-saver: Test suction BEFORE full reassembly. Place a paper towel over the wand—strong suction lifts it instantly. If weak, recheck cyclone alignment.
Fix These 5 Common DC39 Problems After Opening
Suction Drops After Filter Cleaning
Cause: Damp pre-motor foam filter (most common error). Fix: Dry 24+ hours on a warm (not hot) surface. Verify with a moisture meter—must read 0% before reinstalling.
Brushroll Won’t Spin Post-Reassembly
Cause: Hair wrapped around motor shaft bearings. Fix: Rotate brushroll manually while shining light into cleaner head. Use needle-nose pliers to extract fibers near the drive belt.
Vacuum Shuts Off After 30 Seconds
Cause: Washed HEPA filter creating airflow resistance. Fix: Replace HEPA cartridge immediately—drying won’t restore function.
Grinding Noise From Ball Housing
Cause: Debris in ball rotation tracks. Fix: Remove yellow ball (press center tab), clean grooves with toothbrush, lubricate with silicone grease.
Weak Suction Only on Carpets
Cause: Clogged cyclone shroud channels. Fix: Soak shroud in vinegar-water solution for 10 minutes, then scrub channels with a pipe cleaner.
Pro Tips to Avoid Permanent DC39 Damage
- Screw organization hack: Tape screws to paper labeled “Phase 1: Base,” “Phase 2: Cyclone.” Missing one causes housing misalignment.
- Never use vinegar on HEPA filters: Acidic solutions degrade filtration media. Only use for cyclone/shroud cleaning.
- Thermal reset shortcut: If vacuum shuts off, unplug for 2 hours—this resets the thermal cutoff without disassembly.
- When to stop: If the motor emits burning smells, cease immediately. Forced disassembly voids warranty—contact Dyson for service.
Opening your Dyson DC39 isn’t just about fixing today’s clog—it’s preventing tomorrow’s $300 repair. By mastering these model-specific steps, you’ll maintain peak suction for years while avoiding the #1 killer of DC39s: improper filter handling. Remember the golden rule—never reinstall damp filters—and your vacuum will outlast newer models. For persistent motor issues after cleaning, consult Dyson’s official repair network. Now go conquer that carpet!

