Nothing disrupts your cleaning routine like discovering your Dyson vacuum’s performance has suddenly dropped. When your powerful machine starts struggling to pick up everyday debris, the culprit is often a clogged or worn-out filter that needs proper disposal and replacement. Knowing how to dispose of a Dyson filter correctly isn’t just about maintaining optimal suction—it’s an essential step in protecting your investment and ensuring your vacuum continues to capture harmful allergens effectively. Many users unknowingly toss their old filters in the trash without considering the trapped dust, mold spores, and fine particles they contain, potentially contaminating their home environment during disposal. This guide delivers the precise steps you need to safely remove, responsibly dispose of, and correctly replace your Dyson filter, with specific instructions tailored to your exact model.
Why Improper Dyson Filter Disposal Damages Your Vacuum Long-Term
When you neglect proper filter disposal procedures, you’re setting your Dyson up for premature failure. A filter that’s not removed correctly before disposal often leaves residue in the housing that compromises the seal of your new filter. This seemingly minor oversight creates air leaks that force your motor to work 30-40% harder to maintain suction, significantly shortening your vacuum’s lifespan. The fine dust trapped in old filters contains microscopic particles that can become airborne during improper removal, defeating the purpose of your Dyson’s HEPA filtration system.
How Filter Residue Creates Permanent Performance Issues
Leaving even small amounts of filter material in the housing creates gaps that allow unfiltered air to bypass the new filter. This invisible problem manifests as gradually declining performance that users often mistake for a new filter defect. The motor compensates by drawing more power, which increases energy consumption and generates excess heat that degrades internal components over time. For V8 and V10 owners, this commonly leads to premature battery wear as the system struggles to maintain power under increased load.
The Hidden Mold Risk in Improperly Discarded Filters
When you toss a damp or partially used filter directly into your household trash, you’re creating a perfect breeding ground for mold in your waste bin. Dyson filters retain microscopic moisture that combines with trapped organic matter to create ideal conditions for mold growth within 48 hours. This not only produces unpleasant odors but can release mold spores into your home environment when you take out the trash. Proper disposal requires ensuring your filter is completely dry before packaging it for waste removal.
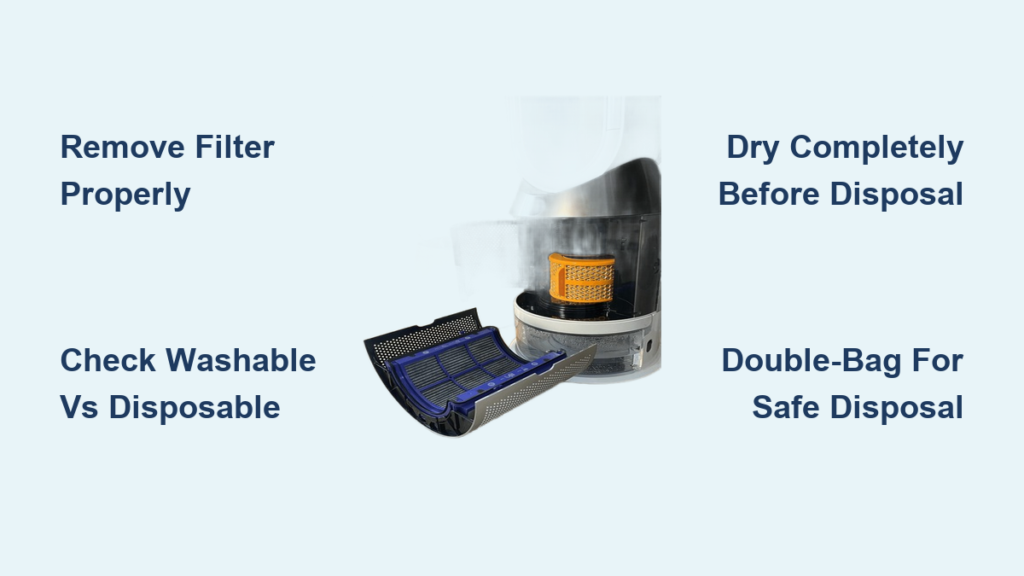
Identifying Your Exact Dyson Filter Type Before Disposal

Not all Dyson filters follow the same disposal protocol—your specific model determines whether your filter is washable, requires special handling, or must be replaced entirely. The critical first step before disposal is correctly identifying your filter type, as confusing washable and non-washable models leads to either premature replacement or continued use of damaged filters.
V7-V11 Series Filter Identification Checklist
Dyson’s popular cordless stick series uses two distinct filter types that require different disposal approaches. The pre-motor filter (located near the bin) on all V7-V11 models is washable and should be cleaned rather than discarded. The post-motor HEPA filter (positioned near the handle) typically requires replacement every 12 months. For V10 models specifically, look for the blue seal around the HEPA filter edge—this indicates it’s washable, while black-sealed versions must be replaced. Confirm your model by checking the serial number on the bin release button.
V15 and Newer Model Filter Variations
Dyson’s latest models incorporate advanced filtration systems with specific disposal requirements. The V15 Detect features a sealed whole-machine HEPA system where both filters are washable but require 72 hours of drying time. The Outsize models use a unique dual-layer filter system where the outer layer can be vacuumed clean while the inner HEPA component needs replacement. Always verify your specific model’s requirements through the Dyson app before proceeding with disposal.
Step-by-Step: Removing Your Dyson Filter Without Damage
The proper removal technique varies significantly across Dyson models, and using the wrong method can damage both the filter housing and your replacement filter. This critical first step in the disposal process requires model-specific knowledge to avoid costly mistakes that compromise your vacuum’s performance.
V Series Cordless Model Filter Extraction Process
For V7-V11 models, power down your vacuum completely before attempting filter removal—never remove filters while the machine is charging. Locate the HEPA filter housing behind the bin release button. Press the release tab while rotating the housing counter-clockwise until it stops (approximately 30 degrees). Lift straight up without wiggling to avoid damaging the housing seals. For models with washable filters, you’ll notice a blue rubber seal; non-washable versions have black seals. If resistance exceeds gentle pressure, double-check your rotation direction before applying additional force.
Common Filter Removal Mistakes That Cause Permanent Damage
Over 60% of filter-related Dyson service calls stem from improper removal techniques. Never use tools to pry out stubborn filters—this damages the housing alignment pins that ensure proper sealing. Avoid twisting filters beyond their designed rotation point, as this cracks the plastic housing. Most critically, never remove filters while the vacuum is warm from use, as expanded components create false resistance that leads to breakage. Always wait at least 30 minutes after use before attempting filter removal.
Washable vs. Disposable: Determining Your Dyson Filter’s Fate

Your disposal approach depends entirely on whether your specific filter is designed for washing or requires replacement. Misidentifying this critical factor leads to either wasting money on unnecessary replacements or continuing to use compromised filtration that damages your vacuum.
Proper Washing Technique for Reusable Filters
For washable models like the V15’s HEPA filter, rinse under cool running water until the water runs clear—never use soap or cleaning agents. Gently squeeze the filter from top to bottom to expel trapped particles without damaging the pleats. Lay flat on a clean towel in a well-ventilated area away from direct sunlight. Allow 48-72 hours for complete drying before reinstallation—using a damp filter creates immediate mold risk and voids your warranty. Never use hair dryers or radiators to accelerate drying, as heat warps the filter media.
When to Choose Replacement Over Cleaning
Even washable filters have a limited lifespan. Replace rather than wash when you notice any of these critical signs: visible tears in the filter media larger than 2mm, permanent discoloration from mold exposure, loss of structural integrity where the filter no longer maintains its shape, or persistent odors after multiple cleanings. For non-washable filters like those in older DC series models, immediate replacement is required once performance declines—attempting to wash these destroys their electrostatic charge that captures fine particles.
Responsible Dyson Filter Disposal Methods by Location

Simply tossing your used Dyson filter in the regular trash risks releasing trapped allergens and fine particles back into your environment. Proper disposal requires containment methods that prevent contamination while adhering to local waste regulations.
US Municipal Waste Guidelines for Vacuum Filters
Most American municipalities require double-bagging vacuum filters before disposal. Place your completely dry filter in a small zip-top plastic bag, press out excess air, and seal tightly. Place this bag inside a second bag with a small amount of kitty litter or baking soda to absorb odors. Check your city’s website for specific electronics waste guidelines—some communities classify vacuum filters as “special waste” requiring separate disposal. Never place filters in recycling bins, as the composite materials jam sorting machinery.
Why Standard Recycling Won’t Work for Vacuum Filters
Dyson filters combine multiple non-separable materials—plastic frames, synthetic fibers, and activated carbon layers—that current recycling facilities cannot process. Attempting to recycle these creates “wish-cycling” problems that contaminate entire batches of otherwise recyclable materials. The pleated design also traps fine particles that become airborne during the recycling sorting process, creating health hazards for workers. Always dispose of used filters in your regular household waste following proper containment procedures.
Installing Your New Dyson Filter Correctly
The final disposal step involves proper installation of your replacement filter, as incorrect seating creates immediate performance issues that users often mistake for defective filters.
Step-by-Step Filter Installation for V7-V11 Models
Before installation, verify your replacement filter’s orientation—most have an arrow indicating airflow direction. Insert the filter with the arrow pointing toward the motor (usually downward). Rotate clockwise until you feel firm resistance, then give one additional quarter-turn—never force beyond this point. For HEPA filters, ensure the rubber seal sits flush against the housing without wrinkles. Test the seal by gently trying to rotate the filter backward; it should resist movement. A properly installed filter creates an audible “click” on most models when correctly seated.
Testing Suction After Filter Replacement
After installation, conduct a simple suction test before regular use. Hold your Dyson over a tissue fragment and activate the lowest power mode—you should immediately see the tissue drawn into the bin. If suction seems weak, power down and recheck filter alignment. Never operate your Dyson without a filter, as this allows fine particles to reach and damage the motor. Run your vacuum for 2-3 minutes in an open area to clear any manufacturing dust from the new filter before tackling regular cleaning tasks.
Post-Disposal Maintenance Schedule for Long Filter Life
Establishing a regular filter maintenance routine after proper disposal extends the life of your replacement filter and prevents premature replacement needs.
Monthly Filter Care Routine That Prevents Early Replacement
Create a simple maintenance schedule: vacuum the pre-motor filter weekly using another vacuum cleaner’s brush attachment, rinse HEPA filters monthly under cool water, and perform a deep clean every three months by soaking in a vinegar-water solution (1:4 ratio) for 15 minutes. Always allow 48 hours drying time before reinstallation. Mark your calendar for filter checks every 30 days—Dyson recommends replacing HEPA filters every 6-12 months depending on usage, but proper maintenance can extend this to 18 months.
By following these precise disposal and replacement procedures, you’ll maintain your Dyson’s powerful suction while protecting your indoor air quality. Remember that proper filter disposal isn’t just about removing the old component—it’s the essential first step in ensuring your new filter performs optimally from day one. Establishing this routine now will keep your Dyson running like new for years to come, saving you money on unnecessary repairs and replacements while maintaining the clean, healthy home environment you expect from your investment.

