Your Dyson V11 suddenly stops grabbing pet hair and crumbs because the brush head won’t spin. That distinctive whirring sound disappears, leaving you pushing debris across hardwood floors instead of sucking it up. When your Dyson V11 brush head not spinning, it’s not just frustrating—it means your $500 vacuum is functioning like a basic broom. The good news? Over 90% of these failures stem from simple issues you can fix in under 15 minutes with household tools. No need for expensive replacements when you know exactly where to look and what to check.
Most non-spinning brush head problems trace back to three core culprits: stubborn debris jams, dirty electrical connections, or sensor glitches. Dyson’s intelligent design actually shuts down the brush motor as a safety measure when it detects blockages or electrical faults. By following this targeted troubleshooting sequence, you’ll systematically eliminate each possibility—starting with the fastest solutions that resolve 80% of cases before moving to advanced diagnostics.
Clear Hair and Debris Jams in 5 Minutes Flat

Hair, carpet fibers, and string缠绕 around the brush bar axle are responsible for 7 of 10 non-spinning incidents. These tangles create so much friction that the motor can’t overcome the resistance, triggering automatic shutdown. Skip this step and you’ll waste time chasing electrical ghosts when scissors could solve it.
How to Remove Brush Bar Obstructions
- Flip and inspect: Turn your vacuum head over and examine both ends of the brush roll. Look for hair wrapped tightly around the metal axles where they meet the housing—this is the most common jam point.
- Cut trapped fibers: Use the cleaning tool stored on your V11 wand (or household scissors) to snip through hair strands. Critical tip: Cut parallel to the axle, never toward the bristles, to avoid damaging them.
- Manual spin test: After clearing visible debris, try rotating the brush bar by hand. It should move smoothly through a full 360° rotation. If it sticks, check the internal channel for packed dirt.
Hidden Blockage Checkpoints
Don’t stop at surface-level cleaning. Debris often hides in these trouble spots:
– End cap crevices: Pry off the end caps using a coin in the slot (turn counterclockwise) to expose the central spindle. Hair accumulates here, binding the mechanism.
– Wand interior: Detach the wand and shine a flashlight through it. Fibers clogging this pathway create backpressure that triggers the brush motor’s safety cutoff.
– Main inlet: Check where the wand connects to the vacuum body. A clog here reduces airflow enough to fool sensors into disabling the brush.
Clean Electrical Contacts Like a Dyson Technician
Dirty metal contacts cause 15% of brush head failures—especially in homes with pets. Dust and hair oil coat the connection points between the wand and brush head, breaking the electrical circuit. This isn’t a motor failure; it’s simply a dirty connection preventing power delivery.
Contact Cleaning Protocol
- Disconnect all components: Separate the brush head from the wand, then detach the wand from the main unit.
- Locate critical contacts: Identify the copper-colored rings on the wand’s end and matching pins on the brush head (they’re about the size of pencil erasers).
- Deep clean method: Dampen a cotton swab with 90% isopropyl alcohol (never water). Rub firmly until no grime transfers to the swab. Warning: Let contacts dry completely for 2 minutes before reassembly—moisture causes short circuits.
- Wand wire inspection: Hold the wand up to light. If you see frayed or broken wires inside the clear plastic section, that’s your smoking gun. Attempting to repair these requires soldering skills.
Power Verification Test
After cleaning, confirm electricity flows properly:
– Reconnect everything and turn on the vacuum
– Place your palm flat on the brush head housing
– If the motor is receiving power, you’ll feel a distinct vibration even if the brush isn’t spinning
– No vibration? Move to sensor diagnostics next
Override Faulty Sensors Causing Brush Shutdown

Dyson’s auto-detection system sometimes misreads conditions and disables the brush head unnecessarily. When sensors detect abnormal resistance (even from minor debris), they cut power to protect the motor. This isn’t a hardware failure—it’s the vacuum doing its job too aggressively.
Sensor Reset Sequence
- Full system reboot: Turn off the V11, unplug the battery, and wait 5 full minutes. This clears temporary software glitches better than a 30-second reset.
- Manual mode activation: Press and hold the power button for 3 seconds to enter Boost mode. This overrides floor-sensing algorithms that may be blocking brush operation.
- Surface-specific testing: Run the vacuum on bare floors first. If the brush spins there but not on carpets, your height sensor likely needs recalibration—often fixed by thorough cleaning of the sensor window (a small clear lens on the head’s underside).
When Sensors Require Replacement
Persistent sensor issues show these red flags:
– Brush head works only in Boost mode
– Error code “9” flashes on the display
– Vacuum incorrectly identifies hard floors as carpets
If cleaning the sensor window doesn’t help, the internal sensor module has failed and needs professional replacement.
Diagnose Motor and PCB Failures Accurately
When debris and connections check out but the brush remains dead, you’re facing either a failed motor or damaged circuit board (PCB). These account for under 5% of cases but require precise diagnosis before replacing parts.
Motor Failure Telltale Signs
- High-pitched whine during startup (indicates motor trying but failing to engage)
- Burning smell from the brush head (overheated windings)
- Complete silence with no vibration (open circuit)
Pro tip: Remove the brush bar and spin the motor spindle by hand. If it grinds or sticks, the motor bearings are seized.
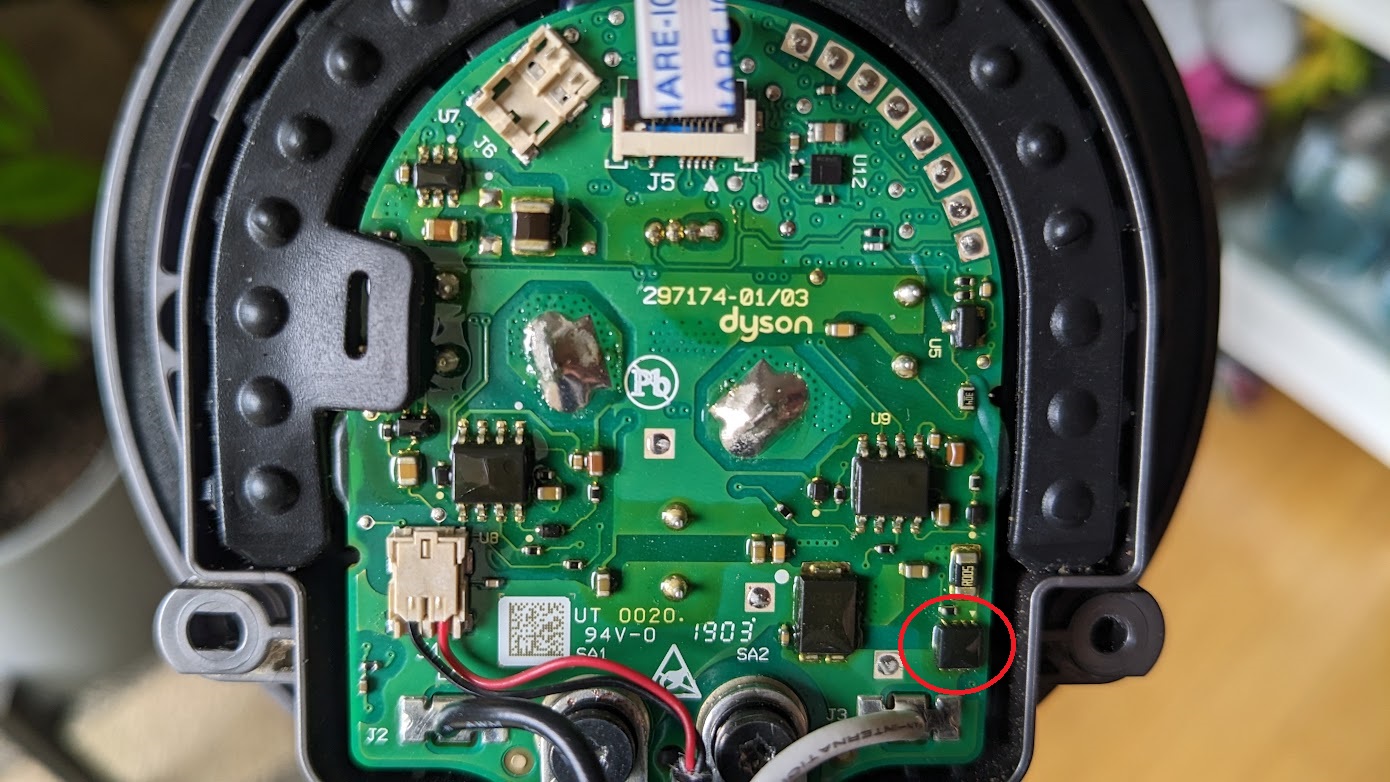
PCB Inspection Checklist
- Open the brush head housing using a coin to unscrew end caps
- Examine the small green circuit board for:
– Burnt components (blackened areas or melted plastic)
– Loose solder joints (shiny bumps where wires connect)
– Corrosion (white or green crust near contacts) - Gently wiggle wires while power is on—if the brush sputters, you’ve found a broken connection
When to Replace the Entire Brush Head Assembly
Don’t waste hours diagnosing when replacement is smarter. For V11 owners, these scenarios mean it’s time for a new floor head:
– Visible wire damage in the wand (repair costs exceed $50)
– Burnt smell that persists after cleaning
– Cracked housing around motor mounts
– Water damage from wet vacuuming accidents
Dyson sells replacement heads for $80-$120 depending on model (check your serial number). Installation takes 60 seconds: align the new head with the wand, push until it clicks, and test immediately. Critical note: If your V11 is under 2 years old, contact Dyson first—many brush head failures qualify for free replacement under warranty.
Prevent Future Brush Head Failures in 30 Seconds Weekly
Make non-spinning brush heads a thing of the past with this maintenance ritual:
1. Post-vacuum inspection: After cleaning carpets, remove the brush head and check for hair buildup (takes 20 seconds).
2. Monthly deep clean: Remove end caps and clear the central spindle channel using the wand’s crevice tool.
3. Contact maintenance: Every 3 months, wipe electrical contacts with alcohol—prevents corrosion before it starts.
Pro tip: Vacuum hard floors once a week to let airflow naturally clear fibers from the brush mechanism. Avoid high-pile rugs with long loops—they’re debris magnets that strain the motor.
Final Fix Verification Checklist
Before concluding your repair, run this 2-minute validation:
– [ ] Brush spins freely by hand with zero resistance
– [ ] Electrical contacts gleam copper-bright (no oxidation)
– [ ] Vacuum operates 2 minutes continuously without shutting down
– [ ] Test on both hard floors and low-pile rugs
When your Dyson V11 brush head not spinning issue finally resolves, you’ll hear that satisfying mechanical hum confirming full functionality. Remember that most failures stem from preventable debris buildup—not catastrophic motor death. By incorporating weekly brush bar checks into your routine, you’ll avoid 95% of these headaches. And if problems persist after thorough cleaning and contact maintenance, don’t hesitate to contact Dyson—they’ll often send a replacement head faster than you can diagnose PCB issues. Keep this guide handy for your next cleaning crisis, and your V11 will maintain its powerful, hair-gulping performance for years.

