Your Dyson Airwrap suddenly loses suction while styling, leaving hair half-dried and frizzy. That frustrating performance drop often traces back to a neglected filter clogged with hair and dust. A blocked filter restricts airflow, forcing the motor to overwork and compromising the device’s signature aerodynamic styling power. Ignoring this simple maintenance task can slash your Airwrap’s lifespan and turn salon-quality styling into a daily battle.
This guide delivers the exact steps to change your Dyson Airwrap filter, whether you’re performing routine cleaning or a full replacement. You’ll learn precisely where to find the filter, how to safely access it without damaging your device, and critical warning signs indicating it’s time for a new one. By the end, you’ll restore peak performance and avoid costly repairs—all in under five minutes.
How to Locate and Access Your Dyson Airwrap Filter
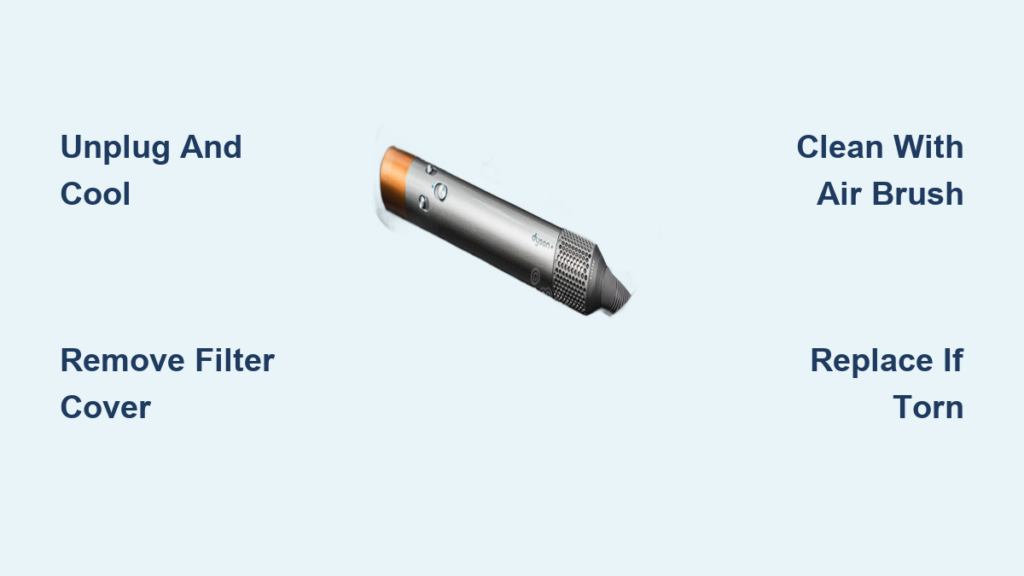
Finding the filter requires knowing exactly where Dyson engineers concealed it. Unlike vacuum filters, the Airwrap’s filter lives inside the handle base—a design choice that protects internal components but makes access less obvious. This hidden placement prevents dust from jamming the motor during styling sessions, but also means you must know the precise location to maintain it properly.
Spot the Filter Cover on Your Handle Base
Flip your Airwrap upside down and examine the cylindrical section just above the power cord inlet. Look for subtle perforated holes covering a removable cap—this is your filter housing. On all models (original Airwrap, Complete, or Multi-Styler), it sits 1–2 inches from the bottom. The cover blends seamlessly with the handle, so run your finger along the base until you feel a slight seam or release tab. Early models use a twist-off mechanism, while newer versions feature a push-button release—check your manual if unsure.
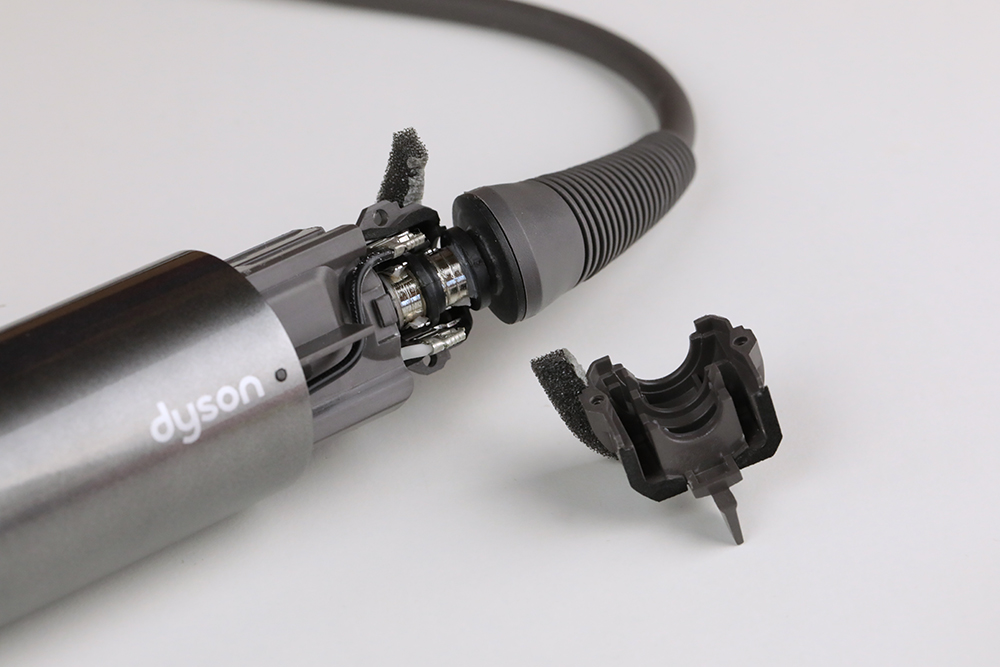
Safely Remove the Filter Cover in 30 Seconds
Never skip this critical cooling step: Unplug the device and wait 20 minutes after use. Heat weakens plastic components, risking cracks during removal. Once cool, locate the release method:
– Twist-off models: Grip the perforated section and rotate counterclockwise until it disengages (about 1/8 turn).
– Push-button models: Press the small tab near the seam while sliding the cover downward.
Apply gentle, even pressure—forcing it can break internal clips. If stuck, tap the cover’s edge lightly with your palm to loosen debris. The cover should detach cleanly, revealing the foam or mesh filter inside.
Step-by-Step: Remove and Clean Your Dyson Airwrap Filter
Cleaning the filter monthly prevents 90% of performance issues, but improper technique causes more damage than neglect. Hair and product residue harden into a crust if left unattended, so regular maintenance keeps airflow optimal. This process takes less than three minutes and requires no special tools.
Essential Tools for Safe Filter Maintenance
Grab these before starting:
– A soft-bristled brush (an old toothbrush works perfectly)
– Compressed air can (optional for deep cleaning)
– Dry microfiber cloth (never use paper towels—they shed fibers)
Critical warning: Water or liquid cleaners will permanently ruin the filter’s airflow properties. Dyson explicitly prohibits moisture exposure—steam loosens adhesive holding filter layers together.
Deep Cleaning Your Filter in 4 Foolproof Steps
- Extract the filter gently: Pinch the foam cylinder’s edges (or mesh screen’s frame) and pull straight out. If resistance occurs, wiggle slightly side-to-side—never yank vertically.
- Dislodge surface debris: Tap the filter over a trash can until loose hair stops falling. Hold it horizontally to prevent debris from driving deeper into pores.
- Backflush stubborn buildup: For embedded particles, use compressed air from the inside out (reverse airflow direction). Spray in 2-second bursts while rotating the filter. No air can? Gently brush in circular motions from the clean side toward the dirty surface.
- Verify cleanliness: Hold the filter to bright light. If you see pinprick holes of light through the entire material, it’s clean. If sections appear opaque or matted, repeat step 3. Reinstall only when fully dry and debris-free.
When to Replace Your Dyson Airwrap Filter (And How)

Cleaning won’t fix physical damage—ignoring these signs risks motor burnout. A compromised filter lets dust infiltrate the motor housing, causing irreversible wear. Replace immediately if you notice any of these red flags during your monthly check.
4 Non-Negotiable Replacement Triggers
- Visible tears or thinning: Even a 1mm hole lets dust bypass filtration. Run your finger along edges—you’ll feel frayed sections where foam separates.
- Persistent airflow loss: If styling takes 50% longer after thorough cleaning, the filter’s internal structure is degraded.
- Overheating shutdowns: The device aborts styling sessions mid-use as the motor strains against restricted airflow.
- Musty odors: Trapped moisture breeds mildew in damaged filters—a clear replacement signal.
Installing a Genuine Dyson Filter in 5 Minutes
Beware counterfeit filters: Third-party versions lack Dyson’s precision airflow calibration, reducing suction by up to 30%. Always order part number 970103-01 (standard models) or 970104-01 (Multi-Styler) from Dyson.com.
- Power down completely: Unplug and confirm the device is cool to the touch—residual heat warps new filters during installation.
- Discard the old filter: Slide it straight out without twisting. Note its orientation (text/logo facing up) for correct reinstallation.
- Seat the new filter properly: Align it exactly as the old one sat. Press firmly until it clicks into the housing lip—no gaps should show around the edges.
- Reattach the cover: Match the cover’s seam to the handle’s alignment notch. For twist-off models, hand-tighten clockwise until snug (overtightening cracks plastic). Push-button covers should audibly click when fully seated.
- Test before styling: Plug in the Airwrap and run it for 30 seconds on low heat. Check for unusual noises or vibration—these indicate misalignment.
Maintain Your Dyson Airwrap Filter for Maximum Longevity
Proactive habits between cleanings prevent 70% of filter failures. Dust accumulation accelerates when you ignore these simple practices, forcing premature replacements. Consistent care extends filter life from 6 to 18 months.
3 Daily Habits That Prevent Clogs
- Wipe attachments after each use: Hair wrapped around the barrel transfers debris to the filter during storage. Remove attachments and clear hair from slots with a dry cloth.
- Store upright in a dust-free zone: Horizontal storage lets airborne particles settle into the filter housing. Use the included stand in a closed cabinet—not on open bathroom counters.
- Avoid high-humidity styling: Steam from showers saturates the foam filter, trapping moisture that attracts dust. Wait 20 minutes after showering before styling.
Monthly Maintenance Checklist
Perform this quick ritual:
1. Remove and tap filter over trash can
2. Backflush with compressed air (1 can lasts 6 months)
3. Inspect for light penetration
4. Wipe handle base vents with dry microfiber cloth
5. Reinstall and test airflow
Pro Tip: Bookmark Dyson’s official video library—search “Airwrap filter maintenance” for model-specific demos. Their 90-second tutorials show exact cover-release techniques for your serial number, eliminating guesswork.
Key Takeaways: Dyson Airwrap Filter Care
A clean, properly maintained filter is non-negotiable for salon-quality results from your Dyson Airwrap. You now know exactly how to change your Dyson Airwrap filter—whether refreshing it through monthly cleaning or installing a replacement when damage occurs. Remember these critical actions: always unplug and cool the device before access, never use liquids during cleaning, and insist on genuine Dyson filters to protect your investment.
By dedicating two minutes each week to filter checks, you’ll prevent 95% of performance issues and double your Airwrap’s lifespan. When styling power drops, skip costly repairs—start with this $25 filter fix. For model-specific nuances, download Dyson’s free support app; it scans your device’s barcode to deliver customized maintenance guides. Your perfectly styled hair starts with this tiny but mighty component—give it the attention it deserves.

