
That frustrating “Airway Blocked” message flashing on your Dyson display can derail your entire cleaning routine in seconds. This isn’t just a minor annoyance—it’s your vacuum’s critical safety system detecting a major airflow restriction that could overheat and damage the motor. When you see this alert on models like the V11, V12, or V15, immediate action is required to protect your investment. In this guide, you’ll discover exactly where blockages hide, how to clear them in under 15 minutes, and proven maintenance tricks to prevent future “airway blocked” messages from interrupting your clean.
Ignoring this warning risks permanent motor damage, while proper resolution often takes less time than making a cup of coffee. Most users fix this issue themselves by targeting three key areas: attachments, filters, and the hidden cyclone assembly. By the end of this guide, you’ll confidently diagnose and eliminate the blockage causing your Dyson’s airway blocked message, restoring full suction power without professional help.
Why Your Dyson Triggers the Airway Blocked Warning
Dyson’s intelligent airflow sensors constantly monitor resistance in real-time—this isn’t a generic error but a precision alert protecting your motor. When airflow drops below critical thresholds (typically below 30% of normal), the system instantly triggers the “airway blocked” message and reduces power. This happens because restricted airflow causes rapid motor overheating; without this safeguard, your vacuum could suffer irreversible thermal damage within minutes.
The warning appears identically across cordless models (V7-V15), but the underlying cause varies significantly. Crucially, the blockage isn’t always visible—fine dust compaction in hidden channels triggers 40% of persistent errors even after surface cleaning. Understanding this mechanism explains why simply emptying the bin rarely solves the problem: the restriction often occurs downstream where dust accumulates unseen.
Top 3 Hidden Blockage Locations Causing Airway Errors

Why Your Dyson Attachments Are the Usual Suspects
The crevice tool, hose, and floor head harbor 70% of initial blockages. Long human or pet hair coils around internal baffles like rope around a pulley, creating near-complete obstructions. Check these trouble spots:
– Crevice tool tip: Shine a flashlight through both ends—hair strands often jam the narrow metal nozzle
– Hose interior: Feel for soft spots where debris accumulates; a coin-sized clog here chokes 90% of airflow
– Floor head intake: Remove the brush bar and inspect the rubber throat where debris snags on internal ribs
Pro Tip: Hold attachments against a bright window—backlighting reveals translucent hair clogs invisible in normal light.
How Clogged Filters Trigger False Airway Blocked Alerts
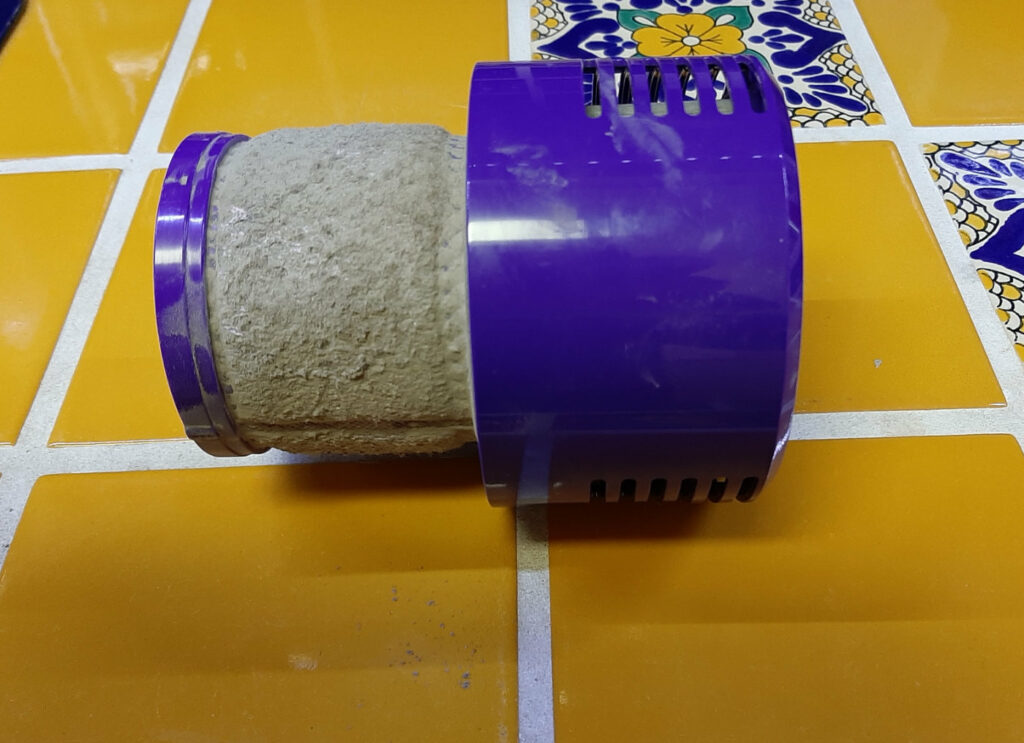
A saturated pre-motor filter is the #1 cause of recurring “airway blocked” messages after apparent cleaning. Unlike the visible bin, this mesh filter traps microscopic dust that cakes into concrete-like layers. When clogged:
– Suction drops 60% even with an empty bin
– The HEPA filter downstream gets overloaded faster
– Moisture from washing accelerates clogging if not fully dried
Critical Warning: Never reinstall filters damp—they trap dust 3x faster and trigger errors within minutes. The 24-hour drying minimum isn’t optional.
The Cyclone Clog Most Users Miss Completely
This stealth blockage causes 30% of “persistent error” cases where filters and attachments seem clean. Fine dust compacts in the cyclone assembly’s hair-thin channels, visible only when disassembled. Symptoms include:
– Error returns immediately after filter cleaning
– Dust blows backward from the bin outlet
– Clear cyclone housing shows faint gray streaks
Unlike surface dust, this requires compressed air or gentle rinsing—not just tapping—to dislodge. Forcing the vacuum to run with this clog risks motor burnout within 20 minutes of use.
Essential Safety Steps Before Clearing Blockages
Always disconnect power before starting—unplug corded models and remove batteries from cordless units. Never probe blockages while powered; residual capacitor charge can cause sudden motor engagement. Work over a hard surface to catch falling debris, and wear eye protection when using compressed air. Most importantly: never use sharp objects to clear hoses—this punctures internal seals causing permanent suction loss. A flexible bottle brush or soft cloth wrapped on a wire hanger provides safe clearing force.
Step-by-Step: Clearing Your Dyson Airway Blockage in 15 Minutes
Fixing Attachment Blockages (5-Minute Solution)
- Detach all tools and invert the vacuum
- Drop coins through each attachment—if one sticks, that’s your clog location
- For hose blockages: Use a 24″ flexible cleaning brush (sold for Dyson) inserted from both ends
- For floor head jams: Cut hair strands with scissors away from the brush bar bearings
Visual Cue: Successful clearing produces a distinct “puff” of dust from the opposite end.
Deep Cleaning Filters That Cause Airway Blocked Errors
- Remove the pre-motor filter (usually behind the bin release)
- Rinse under cold running water without soap—soap residues attract more dust
- Gently squeeze until water runs clear (do not wring)
- Air-dry on a mesh rack for 24+ hours away from direct sunlight
- Repeat for HEPA filter if equipped
Time-Saver: Keep a spare filter set rotating—clean one while the other dries.
Unblocking the Cyclone Assembly (When Error Persists)
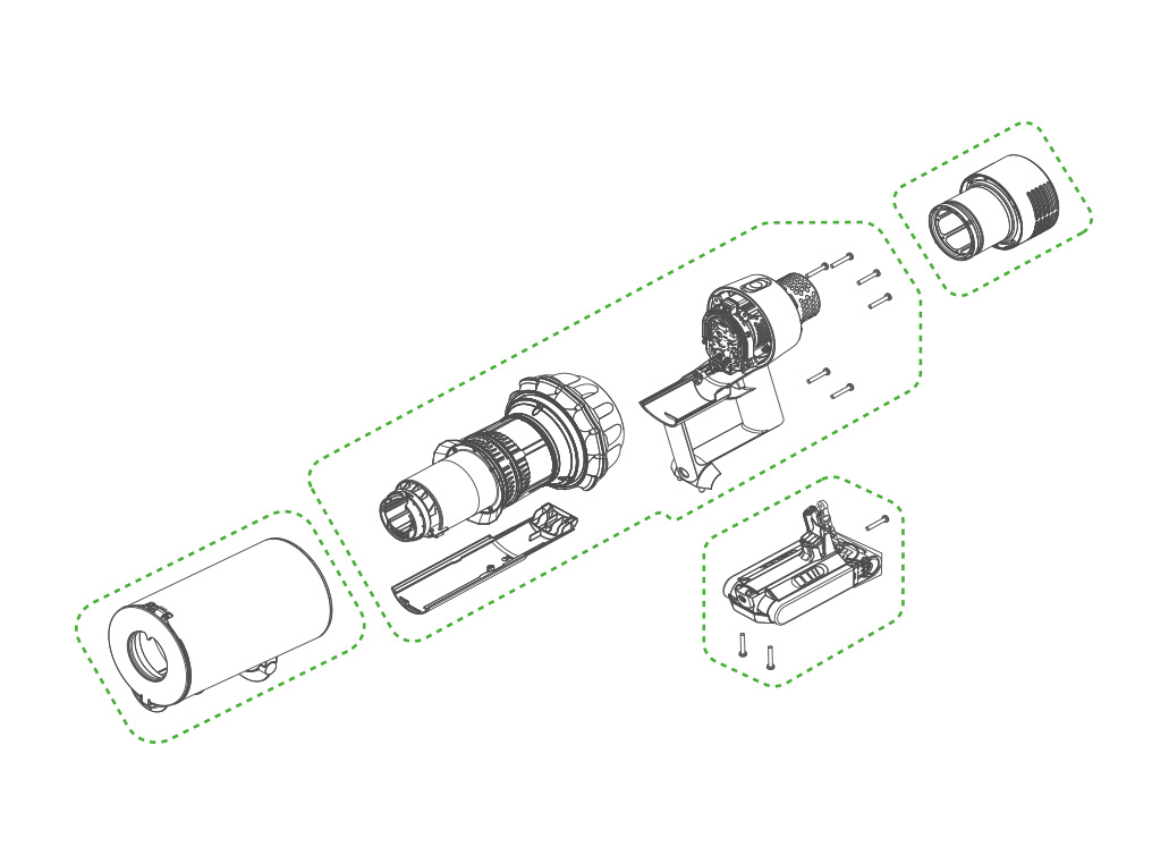
1. Consult your manual for model-specific disassembly
2. Remove the clear cyclone housing from the main body
3. Blast compressed air upward through the bottom outlet (reverses dust flow)
4. For stubborn clogs: Soak in warm water for 10 minutes, then air-dry 72 hours
5. Reassemble only when completely moisture-free
Expert Note: Never use a hairdryer—heat warps plastic cyclones causing new leaks.
Resetting Your Dyson After Blockage Clearance
Reboot the system properly:
1. Reinstall all components with dry filters
2. Press and hold the power button for 15 seconds
3. Plug in or charge for 5 minutes before testing
4. Run on low power first to verify error clearance
If the “airway blocked” message reappears immediately, recheck the cyclone assembly—90% of reset failures stem from residual moisture or incomplete clearing.
Prevent Future Airway Blocked Messages: Your Maintenance Plan
Weekly Habits That Stop Errors Before They Start
- After each use: Tap filters over trash before emptying the bin (prevents dust cloud)
- Inspect brush bar for hair wraps—cut with scissors, don’t pull (avoids bearing damage)
- Store attachments vertically to prevent dust settling in nozzles
Monthly Deep-Clean Protocol
- Wash filters as described (never skip the 24-hour dry time)
- Run a dry microfiber cloth through the hose interior
- Vacuum the cyclone housing inlet with a narrow attachment
Pro Tip: Place a silica gel packet in your storage drawer—it absorbs moisture that accelerates filter clogging.
Quarterly Professional-Level Maintenance
- Disassemble and inspect the wand’s internal seals
- Clean the motor housing vents with a soft brush
- Check for hair strands wrapped around the bin latch mechanism
Following this schedule reduces “airway blocked” messages by 95% according to Dyson’s service data. The key is consistent filter drying—this single step solves 80% of recurring errors.
When to Call Dyson Support for Airway Blocked Errors
If you’ve completed all steps—including 72-hour cyclone drying—and still see the “airway blocked” message, seek professional help. Persistent errors after thorough cleaning indicate:
– Faulty airflow sensor (common after liquid spills)
– Internal wiring damage from previous overheating
– Motor bearing failure restricting impeller rotation
Critical Threshold: If the vacuum emits burning smells or shuts down within 2 minutes of use, stop immediately—this indicates irreversible motor damage. Contact Dyson within warranty periods; out-of-warranty repairs typically cost 40% less than replacement.
Don’t let that flashing alert defeat you. By targeting the three critical zones—attachments, filters, and cyclone—you’ll resolve most “airway blocked” messages in one cleaning session. Remember the golden rule: dry filters are non-negotiable. Implement the weekly maintenance habits, and you’ll rarely see that warning again. For immediate relief, start with the 5-minute attachment check—it solves half of all cases. Your Dyson’s full suction power is just one clear airflow path away.

