Your Dyson Airwrap gathering dust in a tangled mess of attachments? You’re not alone. With seven specialized tools in most kits—from the 1.2-inch barrel to the Coanda smoothing dryer—finding how to store Dyson Airwrap properly has become a daily frustration for thousands of owners. That expensive styling system deserves better than being tossed in a drawer where delicate bristles get bent and ceramic barrels chip. The right storage solution protects your $500+ investment while transforming your morning routine from chaotic to effortless. In this guide, you’ll discover exactly which storage method matches your space, how to organize attachments for instant access, and why proper storage actually extends your Airwrap’s lifespan by preventing common damage points.
Why Your Current Storage Method Is Damaging Your Airwrap
Most Airwrap owners unknowingly sabotage their investment with improper storage techniques that cause cumulative damage over time. Tossing attachments loosely into drawers creates invisible wear that eventually affects performance.
How Improper Storage Damages Specific Components

Your Airwrap’s specialized components suffer unique damage when stored incorrectly. The ceramic coating on barrels chips when they knock against each other, creating hot spots that damage hair. Smoothing brush bristles bend permanently when stored under pressure, reducing their effectiveness for creating sleek blowouts. The main unit’s power cord develops internal breaks from constant tight bending, leading to expensive replacements. Even the seemingly indestructible Coanda dryer suffers when stored with attachments attached—the airflow vents get clogged with hair and product residue that’s difficult to clean later.
Warning Signs Your Storage Method Is Failing
Watch for these red flags indicating your current storage solution isn’t working: bent smoothing brush bristles that no longer glide smoothly through hair, ceramic chips on barrel surfaces causing inconsistent heat distribution, a power cord that only works when bent at a specific angle, or attachments that are constantly missing because they’re not properly organized. If you find yourself spending more time searching for the right barrel than actually styling your hair, your storage system has failed its primary purpose.
Countertop Storage That Actually Works (Without Cluttering Your Vanity)
The right countertop solution keeps your Airwrap accessible while maintaining a clean, professional-looking vanity—no more tripping over cords or knocking over bottles searching for the right attachment.
Choosing the Perfect Countertop Organizer
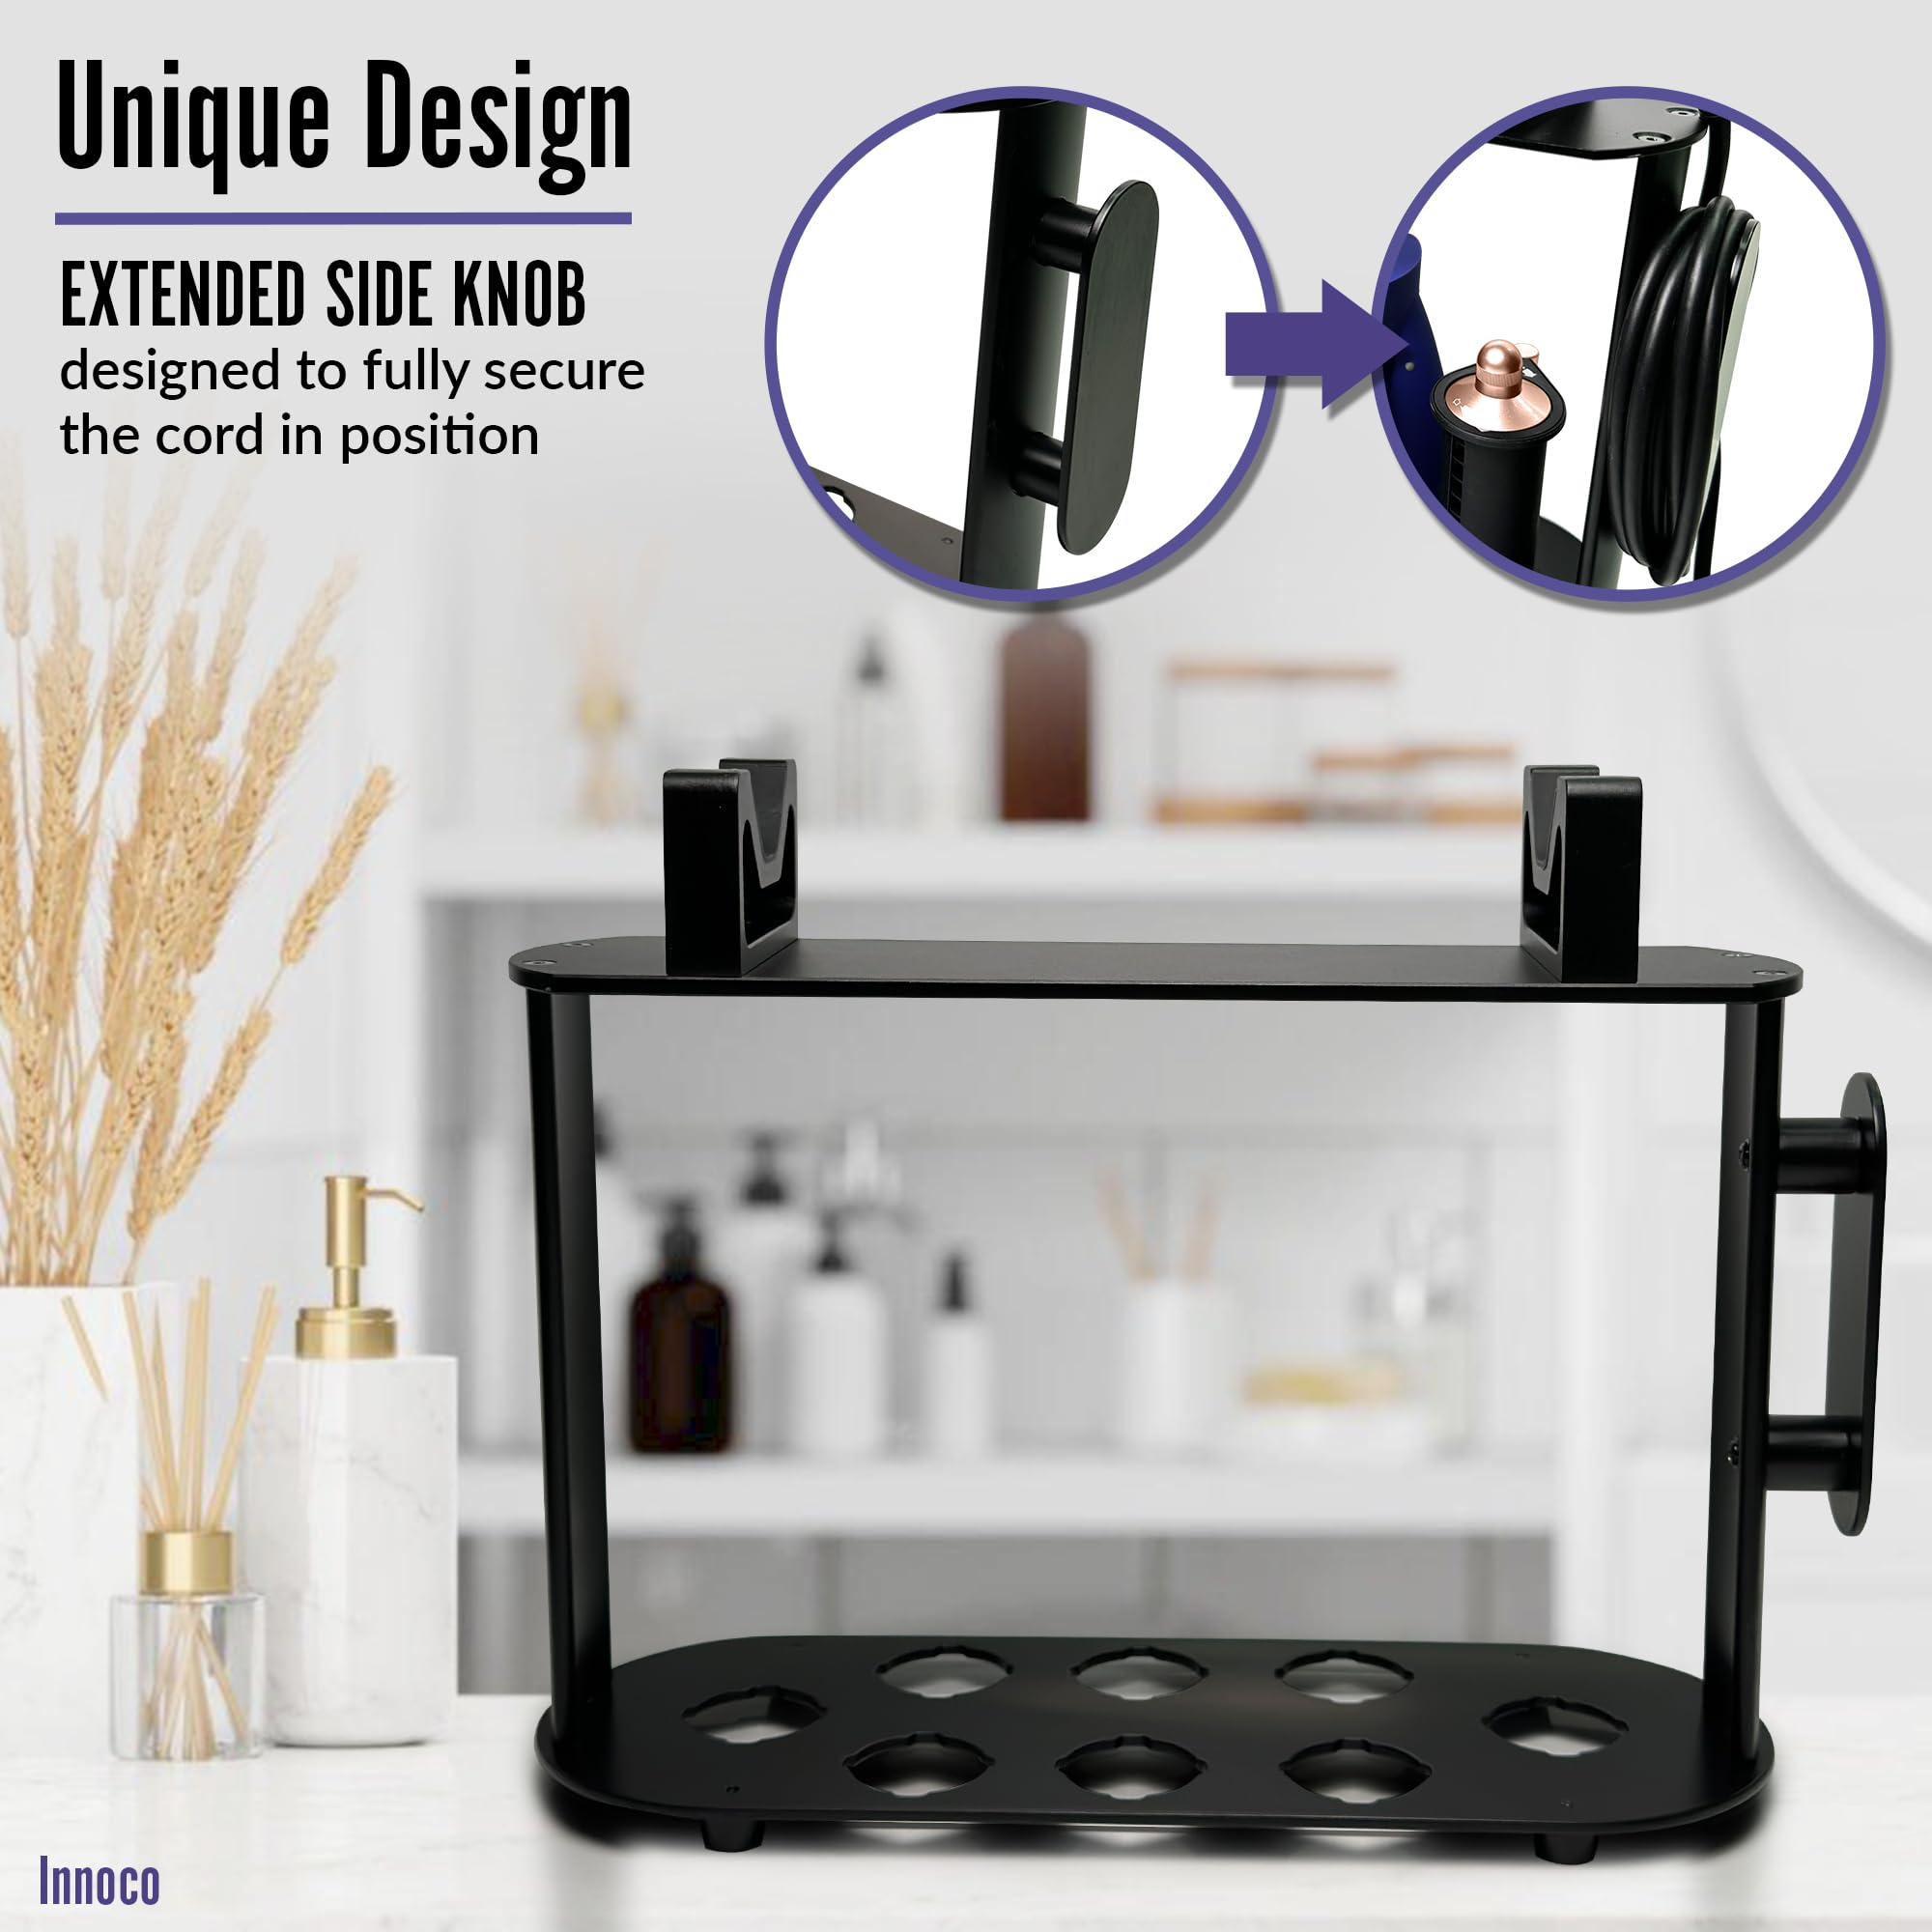
Look for a multi-tiered stand with specific slots for each attachment type rather than generic holes. The best options feature a weighted base (at least 1.5 lbs) to prevent tipping when you grab attachments quickly. For the Dyson Airwrap Complete Long kit with its nine attachments, choose a stand with at least eight dedicated slots plus a separate holder for the main unit. Top-rated organizers like the Innoco Countertop Storage Holder include cable management features—a critical element missing from cheaper alternatives that lets you neatly wrap the power cord without kinking.
Step-by-Step: Setting Up Your Countertop Station
- Place your organizer on a heat-resistant surface at least 6 inches from your sink to prevent water damage
- Insert the main Airwrap unit into the central holder with the power button facing outward
- Arrange barrels from largest to smallest (1.2-inch to 0.7-inch) in dedicated slots
- Store smoothing brushes upright with bristles facing up to maintain shape
- Place the pre-styling dryer in its designated slot with the airflow vent unobstructed
- Use the cable management feature to loosely coil the power cord without tight bends
Pro Tip: Keep a microfiber cloth in your organizer’s bottom shelf for quick wipe-downs before storage—this prevents product buildup that can damage attachments over time.
Wall-Mounted Storage for Small Spaces and Shared Bathrooms
When counter space is limited, wall-mounted solutions transform vertical real estate into functional storage that actually improves your styling experience.
Installing a Damage-Free Wall Mount
For renters or those avoiding wall damage, use heavy-duty adhesive hooks rated for 5+ lbs instead of drilling. The 3M Command Hooks Pro series works perfectly for Airwrap storage when properly installed. Position the main unit hook at eye level for easy access, then arrange attachment hooks in a semicircle below it. For permanent installations, anchor into studs using cabinet screws—never rely on drywall anchors alone for this weight.
Organizing Attachments for Quick Identification
Color-code your wall storage by function: use blue labels for volumizing tools, red for curling barrels, and green for smoothing attachments. This visual system lets you grab the right tool in seconds, even when rushing in the morning. Store barrels horizontally in dedicated hooks rather than vertically—the horizontal position prevents stress on the ceramic coating at the connection point.
Drawer Storage That Protects Your Investment Long-Term
For those who prefer a minimalist aesthetic, dedicated drawer storage offers maximum protection while keeping your tools completely organized and dust-free.
Creating a Custom Foam Insert (Without Special Tools)
You don’t need expensive equipment to create professional-looking drawer storage. Start with high-density craft foam (1-2 inch thickness) cut slightly smaller than your drawer dimensions. Arrange your Airwrap and all attachments on the foam, then trace around each piece with a pencil. Using a sharp utility knife, carefully cut slots ¼ inch deeper than each attachment. Test each slot—you want a snug fit where attachments stay securely in place but can be removed with light pressure.
The Maintenance Schedule Your Drawer Storage Needs
Even the best drawer system fails without regular upkeep. Every two weeks:
– Remove all components and wipe down the foam insert with a slightly damp cloth
– Clean each attachment with a microfiber cloth before returning to storage
– Check for foam compression in high-use slots and replace sections as needed
– Vacuum the drawer interior to remove hair and product buildup
Warning: Never store damp attachments—this causes mildew growth in enclosed spaces. Always allow tools to cool completely and dry for 10 minutes after use before returning to drawer storage.
Official vs. Third-Party Storage: Which Protects Your Airwrap Best?
Dyson’s official storage case offers specific advantages, but third-party solutions often provide better functionality for daily use.
Dyson TAN Storage Case: Pros and Limitations
The official Dyson TAN Storage Case provides excellent protection for travel with its magnetic clasp and soft interior lining. However, it’s designed more for storage than daily access—you’ll still need to unpack everything to use your Airwrap, defeating the purpose of quick morning styling. The case fits all components but requires careful arrangement to avoid scratching attachments against each other during transport.
Third-Party Solutions That Outperform the Official Case
For daily use, the Fle Storage Stand Holder Rack offers superior functionality with its 8+ dedicated slots and cable management system. Unlike the Dyson case, it keeps your entire system organized and accessible without unpacking. The best third-party options feature:
– Individual slots that prevent attachment contact
– Heat-resistant materials for recently used tools
– Modular designs that accommodate future Airwrap models
– Non-slip bases that stay put during frantic morning routines
Preventing the #1 Cause of Airwrap Damage During Storage
Most Airwrap owners unknowingly cause premature wear through one critical storage mistake that affects performance within months.
The Cord Wrapping Technique That Prevents Internal Damage
Never wrap your Airwrap cord tightly around the unit or in figure-eight patterns—that creates internal wire breaks. Instead, use the “over-under” method: hold the plug in one hand, then make loose loops alternating over and under your fingers. This prevents torsion that damages internal wiring. Store the loosely coiled cord in your organizer’s designated channel without pulling it tight.
Seasonal Storage Protocol for Infrequent Use
When storing your Airwrap for more than two weeks:
1. Clean all components thoroughly with a microfiber cloth
2. Remove the filter and clean according to Dyson’s instructions
3. Store in a climate-controlled environment (60-80°F)
4. Place silica gel packets in the storage container to prevent moisture damage
5. Never store with attachments connected—this stresses the connection points
Transform Your Morning Routine With These Storage Hacks
Implement these expert storage techniques to save time and protect your investment simultaneously.
The 60-Second Daily Reset That Maintains Your System
Create a habit of spending just one minute after each use to prepare your Airwrap for storage:
– Wipe attachments with a dry microfiber cloth
– Remove visible hair from brushes
– Loosely coil the power cord using the over-under method
– Return each attachment to its designated slot
– Store in your chosen system while components are still warm (but not hot)
This tiny time investment prevents the 10-minute morning scramble most Airwrap owners experience.
Space-Saving Solutions for Shared Bathroom Storage
In households with multiple users, dedicate separate sections of your storage system using color-coded dividers. Assign each person a specific color for their attachments—this prevents mix-ups that lead to damaged tools. For couples sharing one Airwrap, store volumizing tools on one side and curling attachments on the other based on individual styling needs.
Final Note: Proper Dyson Airwrap storage isn’t just about organization—it’s essential maintenance that extends your tool’s lifespan and enhances performance. By implementing these specific storage techniques, you’ll protect delicate components from damage, reduce morning stress, and maintain your Airwrap’s professional results for years. Start with one change today: implement the over-under cord wrapping method and designate specific slots for your most-used attachments. Within a week, you’ll notice smoother mornings and better styling results. Remember to perform a complete storage system refresh every three months—clean all components, check for wear, and adjust your organization as your styling needs evolve. Your Airwrap represents a significant investment; treat it with the proper storage solutions it deserves.

