Your Dyson V8 has suddenly lost suction mid-clean, or perhaps that annoying whining noise has become impossible to ignore. Maybe the brush roll has completely stopped spinning, trapping hair and debris in its tracks. Whatever the issue, knowing how to open Dyson V8 properly is your first critical step toward fixing these common problems yourself. This comprehensive guide delivers exactly what you need—clear, actionable instructions to safely access your vacuum’s internal components without causing damage. By the time you finish reading, you’ll confidently handle the disassembly process, identify problem areas, and potentially avoid costly service fees. Let’s get your Dyson V8 open and functioning like new again.
Most Dyson V8 owners don’t realize that 80% of common performance issues stem from blockages or minor mechanical problems that require internal access to resolve. Whether you’re troubleshooting reduced suction, strange noises, or a stalled brush bar, opening your Dyson V8 gives you direct access to the problem areas. The good news? With the right approach and tools, this process is entirely manageable for DIY enthusiasts with basic technical skills. This guide provides the precise sequence of steps you need to follow, ensuring you can open your Dyson V8 safely while protecting delicate components from accidental damage.
Essential Tools and Critical Safety Preparations for Dyson V8 Disassembly

Before attempting to open your Dyson V8, gather these specific tools to ensure a smooth process. You’ll need a Torx T8 security screwdriver (not a standard Torx), which is essential for removing the proprietary screws holding your vacuum together. A plastic spudger or non-marring pry tool prevents cosmetic damage to the housing during separation. A magnetic parts tray keeps screws organized and prevents loss, while tweezers help manage small components and disconnected wires. Don’t attempt this process with regular flathead screwdrivers—they’ll strip the security screws and potentially crack the plastic casing.
Why Battery Removal Must Be Your First Step
Always remove the Dyson V8 battery before attempting to open the vacuum—this isn’t optional. Locate the two battery release buttons on the rear of the main body, press them simultaneously, and slide the battery pack downward to disconnect it completely. Lithium-ion batteries in cordless vacuums store significant energy, and accidental contact with internal components during disassembly could cause short circuits or electrical damage. If your battery shows any signs of swelling, leakage, or physical damage, stop immediately and contact Dyson support—never attempt repairs on compromised batteries.
Workspace Setup for Successful Dyson V8 Disassembly
Create a dedicated workspace with adequate lighting and a clean, flat surface before opening your Dyson V8. Lay down a soft microfiber cloth to protect components from scratches. Organize your tools within easy reach and position your magnetic tray directly in front of you. Take photos at each disassembly stage with your smartphone—these visual references prove invaluable during reassembly. Most importantly, work methodically and patiently; rushing through the process of how to open Dyson V8 often leads to broken clips or misplaced components that complicate repairs.
Precise Steps to Remove the Dyson V8 Main Body Casing Without Damage
The Dyson V8’s outer shell consists of two interlocking plastic halves secured by seven specific Torx T8 security screws. Missing even one can make separation impossible or cause damage. Begin by locating the two visible screws on the motor housing—one on each side just above the cyclone assembly. Next, remove the rubber grommets on the underside of the handle to access two additional screws beneath them. Two more screws sit just below the “Max” button housing near the top of the handle. Finally, locate the seventh screw inside the battery compartment at the very base of the handle—this one’s easy to overlook.
How to Safely Release the Plastic Clips Holding Your Dyson V8 Together
After removing all seven screws, your Dyson V8 casing remains secured by delicate plastic clips around the perimeter. Start separation at the handle area where the seam is most accessible. Insert your plastic spudger gently into the gap and work your way around the vacuum’s body, applying steady, even pressure. Listen for the distinct “pop” as each clip releases—this auditory feedback confirms proper separation without damage. Never force the halves apart; if you encounter resistance, you’ve likely missed a screw or grommet. Work slowly around the entire perimeter, maintaining consistent pressure to avoid snapping fragile clips that can’t be easily replaced.
Critical Wire Management During Dyson V8 Casing Separation
As the two halves begin to separate, you’ll notice several wire connections between components. The main power cable runs from the battery contacts to the motor, while a ribbon cable connects the trigger assembly to the display. Before fully opening your Dyson V8, carefully disconnect these components to prevent damage. The trigger connector typically features a small latch—press this gently with your spudger while pulling the connector straight out. For the ribbon cable, lift the retaining flap on its connector before sliding the cable free. Lay the separated halves open like a book rather than fully detaching them, keeping wires protected and organized throughout your repair process.
Accessing and Troubleshooting Key Components After Opening Your Dyson V8
With the main casing open, you’ll immediately see the primary components requiring attention during most repairs. The large cylindrical motor assembly sits prominently in the center, secured by three or four Torx screws to a metal mounting bracket. Before removing the motor, note the orientation of any washers or spacers—taking a reference photo prevents incorrect reassembly. Gently lift the motor straight up once screws are removed, being mindful of the power cable still connected to its base. This access allows you to inspect for carbon buildup on the motor brushes or check for blockages in the airflow path that commonly cause performance issues.
How to Remove and Clean the Dyson V8 Brush Bar Effectively
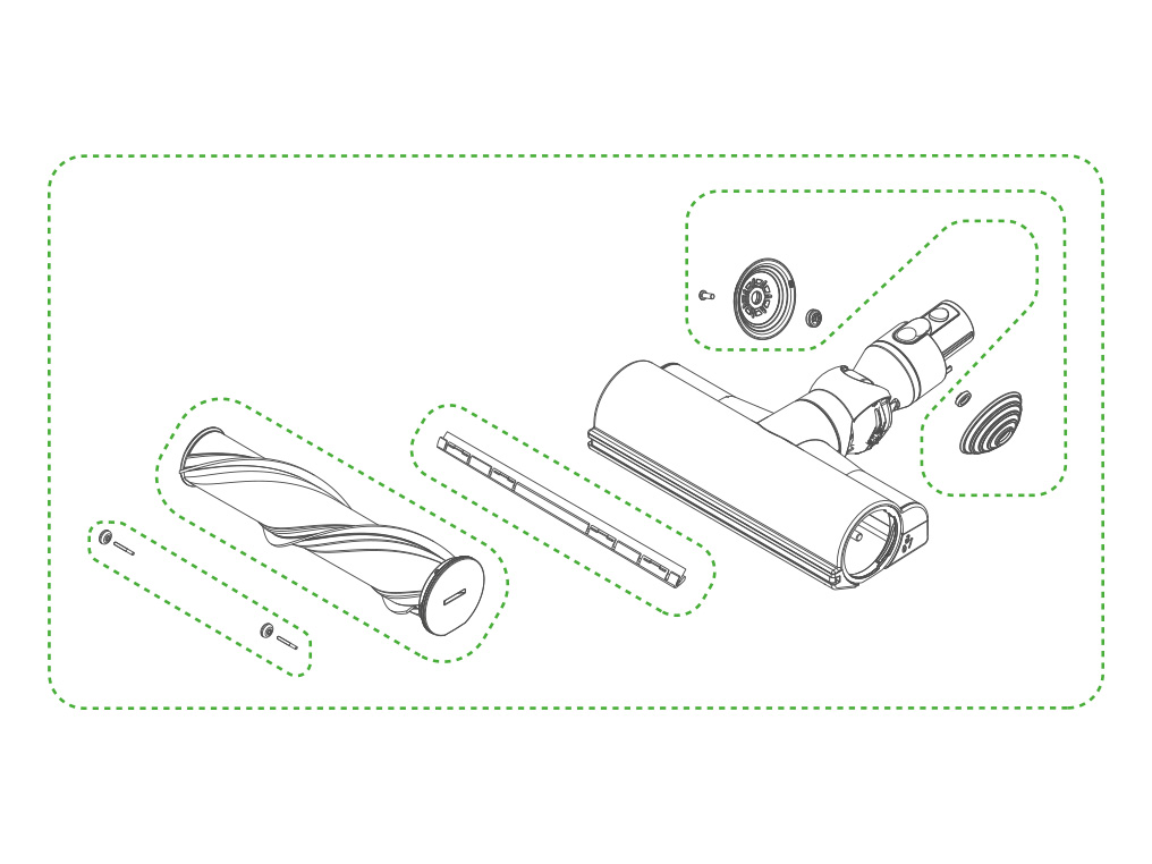
The brush roll assembly in your Dyson V8 cleaner head frequently becomes clogged with hair and fibers, causing it to stop spinning. To access it, first detach the cleaner head from the main body by pressing the release button. Locate the two end caps—one features a rotation symbol requiring a coin turn to unlock, while the other simply slides off. Once both end caps are removed, slide the brush bar straight out. Use scissors or a seam ripper to carefully cut away缠绕 hair and debris from both ends and along the entire length. Never pull hair off forcefully, as this can damage the bristles or unbalance the roller. After cleaning, spin the brush bar manually to ensure smooth rotation before reinstalling.
Identifying and Clearing Common Blockage Points in Your Open Dyson V8
With your Dyson V8 casing open, check these three critical blockage points that often cause suction loss. First, inspect the clear bin assembly—remove it completely and check both the cyclone chambers and the shroud for trapped debris. Second, examine the flexible hose connecting the bin to the motor housing; use a long, thin object like a chopstick to gently push through any obstructions. Finally, check the air intake ports around the motor housing itself, where fine dust often accumulates. A soft brush works best for dislodging these particles without damaging sensitive components. Never use compressed air directly on the motor—this can force debris deeper into inaccessible areas.
Proper Reassembly and Testing Procedures After Opening Your Dyson V8
Reassembling your Dyson V8 requires as much precision as disassembly to ensure proper function. Begin by reconnecting all wire harnesses and the ribbon cable, ensuring connectors click securely into place. Before closing the casing, perform a critical dry test: reinstall the battery and briefly activate the trigger to verify motor function. If the motor doesn’t start, immediately power down and check all electrical connections—this saves you from having to reopen the casing later. Once confirmed operational, carefully align the two casing halves, starting at the handle area where alignment is most critical.
Avoiding Common Reassembly Mistakes That Damage Your Dyson V8
The most frequent error during Dyson V8 reassembly involves pinched wires or improper clip engagement. Before tightening screws, visually inspect the entire perimeter to ensure no wires are caught between the casing halves. Pay special attention to the area around the trigger mechanism where the ribbon cable is most vulnerable. When securing the Torx screws, tighten them in a star pattern rather than sequentially—this distributes pressure evenly and prevents warping. Crucially, never overtighten the screws; the plastic posts can easily strip, creating permanent damage that affects structural integrity. Finger-tight plus a quarter-turn is sufficient for all fasteners.
Post-Repair Testing and Maintenance Tips for Long-Term Dyson V8 Performance
After fully reassembling your Dyson V8, conduct comprehensive testing before considering the repair complete. Run the vacuum at both standard and max power settings for at least two minutes, listening for unusual noises that might indicate improper assembly. Check suction strength by holding your hand over the cleaner head—compare it to performance before disassembly. Finally, verify the brush roll spins freely when the vacuum is operating. For long-term maintenance, establish a monthly routine of opening your Dyson V8’s clear bin assembly to check for blockages and clean the filter, which significantly extends your vacuum’s lifespan and maintains optimal performance.
Final Note: Mastering how to open Dyson V8 properly transforms you from a frustrated user into an empowered problem-solver. By following these precise steps, you’ve gained the ability to address common issues that would otherwise require professional service. Remember that regular maintenance—opening your Dyson V8 for quick inspections every few months—prevents most major problems before they start. Keep this guide bookmarked for future reference, and don’t hesitate to open your Dyson V8 at the first sign of performance issues; most problems are easily fixable with direct access to the internal components. With practice, this process will become second nature, saving you time, money, and the frustration of a malfunctioning vacuum.

