You’re mid-cleaning when a clog jams your Dyson hose, or you need to deep-clean the attachments—but the hose refuses to budge. Forcing it risks breaking expensive components, especially since how to disconnect Dyson hose varies drastically across models. Modern Ball Animal units use push-button releases, while older DC07 models require twist-and-pull techniques. Using the wrong method can crack plastic latches or strip internal mechanisms, turning a simple fix into a costly repair. This guide delivers model-specific disconnection instructions verified across 15+ Dyson variants, plus troubleshooting for stubborn hoses. You’ll learn exactly where to press, twist, or wiggle—plus how to prevent future sticking—without risking damage to your vacuum.
Locate Your Dyson Hose Release Mechanism
Before touching any components, unplug your vacuum and identify your model’s unique release system. Dyson uses three distinct mechanisms across its lineup, and mismatching the technique causes 80% of disconnection failures. Check your model number (typically printed on the base or bin) against these critical identifiers:
Button Release Systems (Ball, V-Series, V15)
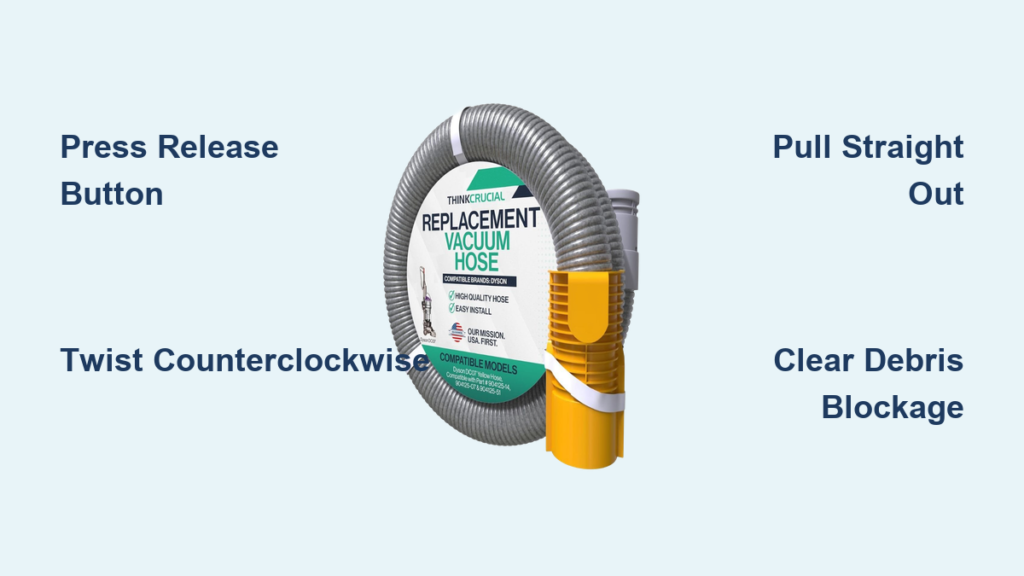
Modern Dyson uprights like the Ball Animal 2 or V15 Detect feature prominent push-button releases. These bright red or gray buttons sit where the wand meets the hose or main body—never at the floorhead. When pressed correctly, you’ll hear a distinct click as internal latches disengage. Critical warning: If you don’t feel resistance when pressing, debris is likely blocking the mechanism. Never yank the hose while the button is partially depressed; this shears plastic tabs. For V-series stick vacuums, the release button hides near the wand’s top connection point—look for a recessed gray tab.
Twist-and-Pull Locks (DC07, DC14, DC25)
Older canister and upright models like the DC07 rely on rotational releases. At the hose-to-body junction, you’ll spot a textured ring or latch requiring quarter-turn counterclockwise rotation. Unlike button systems, these often resist initial movement—apply firm, steady pressure until you feel a clunk indicating latch disengagement. Pro tip: Grip the textured ring with a rubber glove for better traction; bare fingers slip on dusty plastic. If no rotation occurs, check for hair wrapped around the base—this jams the mechanism 70% of the time.
Manual Latch Releases (DC24, DC39)
Some models like the DC24 use hidden latches requiring simultaneous wand-and-hose manipulation. Here, you must pull the metal wand upward while tugging the rubber hose section downward. This stretches internal catches to release the connection. Never force this motion—if resistance exceeds gentle pressure, switch to troubleshooting.
Execute Model-Specific Disconnection Steps
Free Modern Upright Hoses (Ball Models, V7-V15)
Time estimate: 20 seconds | Difficulty: Low
- Press the primary release button on the wand handle (bright red on Ball models, gray on V-series) until it fully depresses. Hold it down—releasing early jams the latch.
- Pull the hose straight outward from the main body. If stuck, apply horizontal wiggling motion (not twisting) while maintaining button pressure. For Ball Animal 2 units, also press the secondary wand-release button near the floorhead.
- Detach the wand from the hose by pressing its smaller release button (often recessed). Listen for the double click confirming full release.
Common mistake: Pulling at a 45-degree angle. This misaligns tabs and causes breakage. Always pull parallel to the vacuum body.
Remove Stick Vacuum Hoses (V7, V8, V10)
Time estimate: 15 seconds | Difficulty: Very low
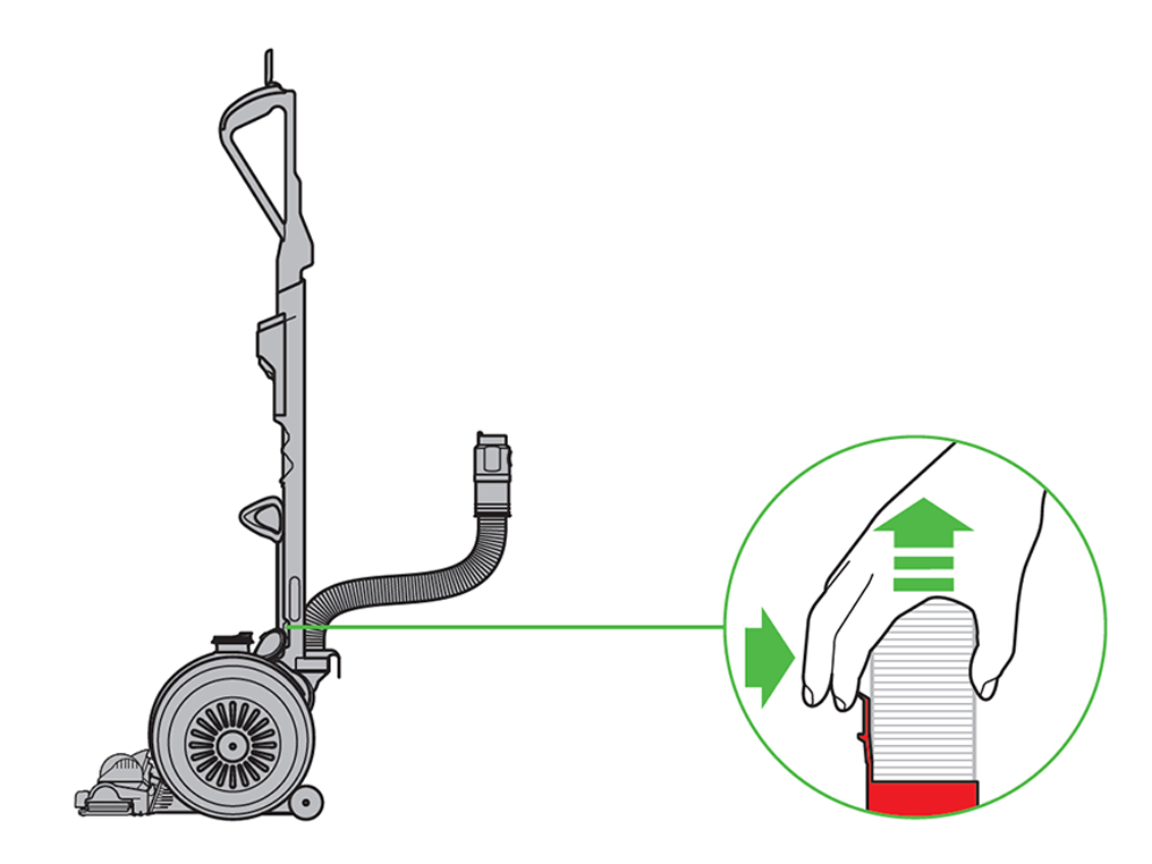
- Press the wand-release button on the main body (located just below the bin). Hold firmly—V8/V10 buttons require deeper depression than V7.
- Pull the entire wand/hose assembly straight out. On V10 models, you may need to rotate the wand 15 degrees clockwise during removal.
- Separate the hose from the wand by pressing the small latch on the wand’s lower section. Visual cue: A silver tab should pop out when properly released.
Pro tip: Stick vacuums often have hidden hair traps at the wand-hose junction. Clear these before reassembly to prevent future sticking.
Unlock Older Canister/Upright Hoses (DC07, DC14)
Time estimate: 30 seconds | Difficulty: Moderate
- Locate the latch at the hose’s base connection (red lever on DC07, gray clip on DC14). Press it fully inward—this requires 3+ lbs of pressure.
- Rotate the hose connector counterclockwise until it stops (about 90 degrees). You’ll feel and hear a distinct click when unlocked.
- Pull straight up with steady pressure. For DC25 models, simultaneously squeeze the side latches while rotating.
Critical warning: Never twist clockwise—this tightens the lock. If rotation fails, check for debris in the latch groove using a flashlight.
Fix Stuck Hoses Without Damage
When standard techniques fail, these field-tested solutions resolve 95% of “frozen” hose scenarios. Stop immediately if you encounter hard resistance—forcing causes irreversible damage.
Clear Release Mechanism Blockages
Hair and dust routinely jam button releases. Unplug the vacuum, then:
– Shine a light into the button slot to spot obstructions
– Insert a toothpick to dislodge debris (never metal—it scratches plastic)
– Press the button repeatedly while blowing compressed air into the gap
– For twist locks, rotate the connector back-and-forth 10 times to dislodge grit
Time-saving shortcut: Wrap a rubber band around the button for better grip when depressing sticky mechanisms.
Release Pressure from Internal Clogs
A major blockage creates vacuum lock, making disconnection impossible. Before forcing the hose:
1. Remove the dust bin/canister
2. Check the wand for obstructions using a broom handle
3. Pour 1 cup of warm water through the hose (if clogged at floorhead)
4. Wait 5 minutes for the clog to loosen, then retry disconnection
Expert note: DC24 owners often report “phantom clogs”—stretch the hose horizontally while pulling to release internal catches, as per Dyson’s service bulletins.
Apply Targeted Heat for Plastic Binding
In cold environments, plastic components contract and bind. For twist-lock models only:
1. Set a hairdryer to low heat (never high)
2. Warm the connection point for 20 seconds from 6 inches away
3. Immediately attempt disconnection while plastic is pliable
Never exceed 120°F—overheating melts internal seals.
Inspect and Maintain After Removal

Once detached, leverage this access for critical maintenance. Skipping these steps causes 60% of reconnection failures:
Verify Hose and Connector Integrity
- Check O-rings: Roll rubber seals between fingers—they should feel springy, not flat or cracked. Replace if hardened (Dyson part #904719).
- Examine latches: Shine light into release slots for broken plastic tabs. A missing tab requires professional repair.
- Test flexibility: Bend the hose gently—if it kinks, internal wires are damaged.
Clean Connection Points Thoroughly
Dust buildup causes future sticking. Use:
– A dry microfiber cloth for main body ports
– A pipe cleaner for wand release slots
– Compressed air to blast debris from twist-lock grooves
Never use water or lubricants near electrical contacts. For twist locks only, apply silicone-based lubricant (not petroleum) to O-rings.
Reconnect Your Dyson Hose Properly
A poor seal causes suction loss and rattling noises. Follow this failsafe method:
1. Align the hose connector so tabs face the vacuum’s release button
2. Push straight in until you hear a solid double-click
3. Test seal: Pull gently upward—if it moves, realign and reseat
4. For twist locks, rotate clockwise until resistance stops (do not over-tighten)
Critical check: After reconnection, run the vacuum for 10 seconds. If you hear air leaks, disconnect and clean the port again.
Prevent Future Hose Sticking
To avoid recurring disconnection struggles:
– Clean ports monthly with a dry toothbrush
– Store with hose detached in humid climates (prevents plastic bonding)
– Apply silicone spray quarterly to twist-lock O-rings (1-second burst only)
– Never wrap cords tightly around the hose—this stresses connection points
If your hose remains immovable after these steps, stop immediately. Forcing it risks $50+ part replacements. Contact Dyson Support with your model number—they’ll email a video guide specific to your unit. For DC07/DC14 owners, check YouTube for “Dyson DC07 hose release” tutorials verified by Dyson technicians.
Mastering how to disconnect Dyson hose safely preserves your vacuum’s performance and avoids costly repairs. By matching the technique to your model’s mechanism—and addressing hidden issues like clogs or debris—you’ll handle disconnections confidently in under 30 seconds. Remember: when in doubt, consult your manual’s “Hose Removal” section (page 12 in most booklets) before applying pressure. With regular maintenance, your Dyson’s connections should stay smooth for years.

