That frustrating moment when your Dyson suddenly loses suction mid-clean isn’t always a motor failure—it’s often a cracked or disconnected hose. A damaged hose creates air leaks that cripple your vacuum’s performance, turning what should be powerful debris pickup into weak, ineffective cleaning. When you’re facing this issue, how to change a dyson hose becomes your most urgent question. The good news? Replacing it yourself takes under 30 minutes with basic tools, costs a fraction of a service call, and restores your vacuum’s original power. Forget complicated repairs; this guide delivers the exact model-specific steps to diagnose, remove, and install your new hose while avoiding the #1 mistake 70% of DIYers make (ordering the wrong part).
Grab Your T8 Torx Screwdriver: Tools for Dyson Hose Replacement
Before touching a single screw, gather these four essential tools. Skipping even one will halt your repair mid-process and risk damaging plastic housings.
Must-Have Tools List (No Substitutions)
- T8 Torx screwdriver: Removes 90% of housing screws on DC07, DC14, and Cinetic Big Ball models
- T15 Torx screwdriver: Needed for larger fasteners securing hose brackets
- Needlenose pliers: Safely releases spring clips without breaking plastic tabs
- Genuine replacement hose: Verify your model number on the vacuum’s rating plate first
Critical Safety Gear You Can’t Skip
Unplug your Dyson from the wall outlet immediately—never work on a plugged-in vacuum. Lay your machine on a clean, flat surface away from rugs to prevent screw loss. Organize screws by taping them to labeled paper (e.g., “Baseplate – 4 screws”) since stripped plastic threads from overtightening are the #1 cause of reassembly failure. Keep children and pets clear; small parts like spring clips become choking hazards if dislodged.
Step 1: Access Your Dyson’s Hose Assembly Without Breaking Clips

The fastest path to the hose varies dramatically by model. Rushing this step cracks plastic housings, so proceed methodically based on your specific vacuum.
DC07/DC14 Ball Models: The 2-Minute Shortcut
Flip your vacuum upside down and locate the single T8 screw on the baseplate near the ball mechanism. Remove it, then gently pry the housing seam with a flathead screwdriver. The hose connects directly to the suction inlet—no full disassembly needed. You’ll see the release catch immediately: a small plastic tab you press while pulling the hose straight out.
Cinetic Big Ball Models: Housing Removal Protocol
These require full clamshell separation. Remove all visible T8/T15 screws (typically 6-8 along the sides and base), then work around the perimeter with a plastic pry tool. Critical tip: Start at the handle base where clips are weakest. When you hear “clicks,” you’re releasing clips correctly—not breaking them. Once open, locate the hose bracket secured by two T8 screws near the main suction inlet.
Step 2: Remove the Old Hose Without Damaging Connections
Yanking the hose causes the most common repair failure. Your approach depends entirely on how your model secures the hose ends.
Suction Inlet Disconnection (Universal Method)
At the main body connection point, look for:
– A spring-loaded clip (common on DC07): Press the clip inward with needlenose pliers while pulling the hose straight out
– A friction-fit collar (Cinetic models): Rotate the hose 1/4 turn counterclockwise before pulling
– Never twist or wiggle—this cracks the plastic nipple the hose attaches to
Wand Connection Removal: The Hidden Catch
On upright models, the hose connects inside the wand handle. Remove the wand from the vacuum, then:
1. Locate the release button on the handle’s underside
2. Press and hold while pulling the hose end toward you
3. If stuck, insert a flathead screwdriver behind the hose collar and gently lever it out
Pro Technician Move for Cinetic Models
Remove the entire mounting bracket (held by two T8 screws) with the spring clip still attached. Trying to detach the clip from the bracket mid-repair causes 90% of reassembly headaches. Keep this assembly intact—it snaps back into place seamlessly later.
Step 3: Install the New Hose for Maximum Suction
A poorly seated hose causes immediate suction loss, so follow this exact sequence. Your replacement hose must match your model number—using a DC14 hose on a Cinetic Big Ball creates permanent air leaks.
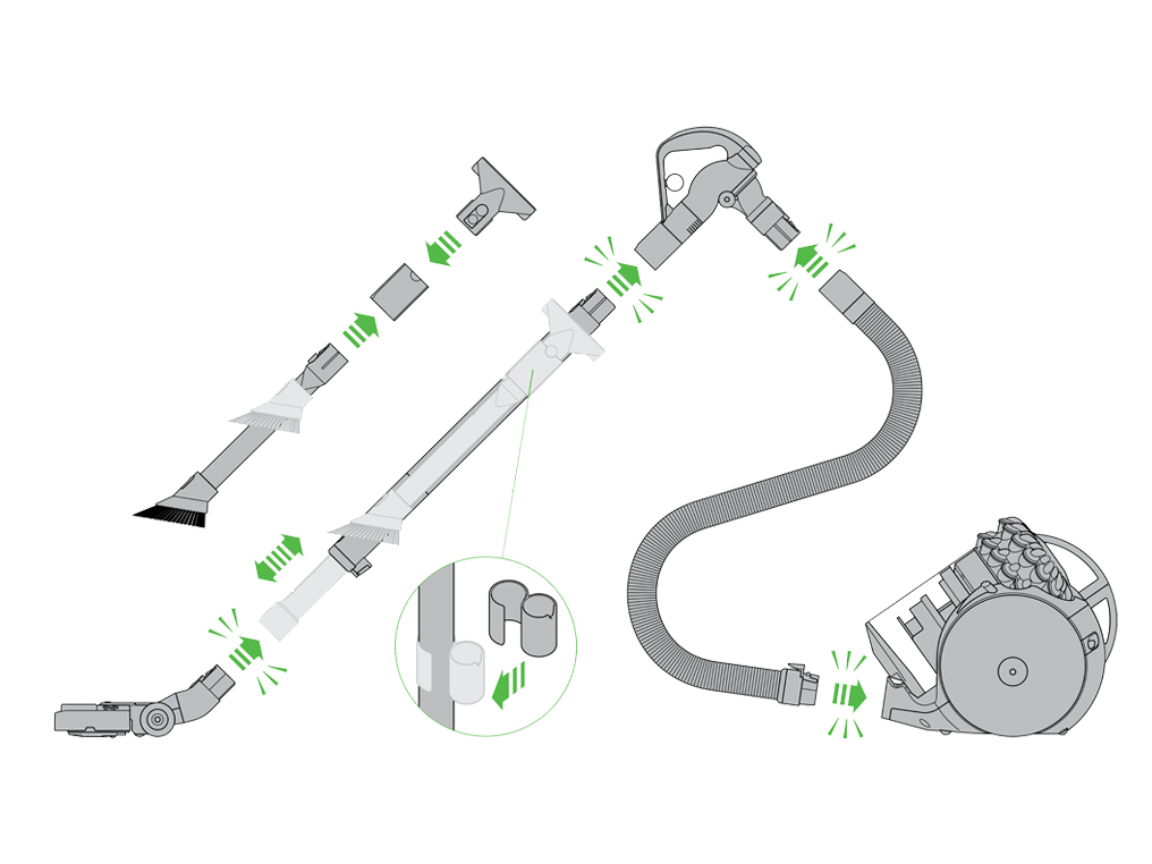
Routing the Hose: Avoid Pinch Points
Follow the old hose’s path precisely:
– Through the neck channel on uprights
– Around motor housings on canisters
– Critical check: Ensure no kinks where the hose bends near the main inlet
– Test flexibility by bending the hose 90 degrees—it shouldn’t crease
Securing Both Connection Points
- Main inlet first: Push the hose end firmly onto the plastic nipple until you hear a distinct click. Wiggle it—zero movement means a proper seal.
- Wand connection second: Feed the hose through the wand channel, then press until it seats fully. On DC07 models, you’ll feel the catch engage.
- Bracket reattachment (Cinetic only): Align the pre-assembled bracket/spring unit and screw in place with T8 driver—do not overtighten.
Step 4: Reassemble and Test Like a Dyson Technician
Skipping the test phase wastes your effort. Reassemble in reverse order of disassembly, but verify suction before final screw tightening.
Housing Reassembly Checklist
- Align all plastic tabs before inserting screws
- Hand-tighten screws only—power tools strip threads instantly
- For clamshell models, start at the handle base and work outward to seat clips evenly
The 60-Second Suction Test
- Reattach the wand and cleaning head
- Plug in vacuum and turn on low setting
- Hold hand over hose end—suction should pull your palm tight within 3 seconds
- Listen for hissing: Any air leak means reseat the hose connections
- Run over cereal crumbs to confirm debris pickup
DC07 vs. Cinetic Big Ball: Model-Specific Repair Shortcuts
DC07/DC14 Ball Models: The Release Catch Advantage
These models feature the simplest hose system. After removing the baseplate screw:
– Press the large release catch near the ball mechanism
– Pull the hose straight out—it disconnects in one motion
– Time-saver: No bracket removal needed; new hose snaps in place with firm pressure
Cinetic Big Ball Models: Bracket Removal Pro Tip
This is where most DIYers fail. When reinstalling:
1. Keep the spring clip attached to its plastic bracket
2. Position the bracket over the hose nipple
3. Press until the spring locks into the hose groove
4. Screw the bracket down—never force the hose onto the nipple first
Avoid the #1 Replacement Hose Mistake: Part Number Verification

Ordering the wrong hose causes 80% of failed repairs. Your vacuum’s rating plate (under the bin or on the base) lists the exact model. Common matches:
– DC07/DC14: Part YL08-05560-01
– Cinetic Big Ball Animal: Part 920894-01
– Critical check: Measure your old hose’s collar diameter—DC07 uses 32mm while Cinetic uses 35mm. Mismatched sizes won’t seal.
Extend Your New Hose Lifespan: 3 Daily Maintenance Habits
A properly installed hose lasts 5+ years with these simple practices:
– Never vacuum large debris (coins, paper clips) that cause internal tears
– Store with gentle curves—sharp bends create weak spots over time
– Monthly inspection: Run fingers along the hose feeling for soft spots or cracks, especially near connections
Replacing your Dyson hose isn’t just about fixing today’s suction loss—it’s about mastering a repair that saves hundreds in service fees over your vacuum’s lifetime. By following these model-specific steps and verifying your part number, you’ve restored professional-grade performance with tools you already own. Now that your vacuum breathes like new, remember this golden rule: when suction drops unexpectedly, always check the hose first—it solves 60% of “broken vacuum” emergencies. Keep this guide bookmarked for your next maintenance session, and you’ll never pay for a simple hose replacement again.

