
Your Dyson V7 powers on, but dies after just a few minutes of cleaning. The LED light bar flashes a confusing pattern, and you can’t finish vacuuming your living room before needing to recharge. If this sounds familiar, your battery has likely reached the end of its 2-4 year lifespan. Replacing your Dyson V7 battery is one of the simplest maintenance tasks you can perform, but choosing the right replacement is critical for both performance and safety. This guide shows you exactly how to replace Dyson V7 battery properly while avoiding common pitfalls that could damage your vacuum or create safety hazards.
Before you begin the replacement process, you need to confirm that the battery is actually the problem. Many users mistakenly replace the battery when the issue lies elsewhere, wasting money and time. Let’s identify the true culprits behind your vacuum’s poor performance.
Spotting the Signs Your Dyson V7 Battery Needs Replacement
When your Dyson V7 starts underperforming, certain symptoms clearly point to battery failure rather than other issues. The most obvious sign is significantly reduced runtime—you might notice your vacuum dying after just 2-3 minutes of use when it previously handled 7+ minutes on high power. If you’re seeing 12 or more flashing red lights when attempting to power on your vacuum, this is Dyson’s specific error code indicating battery replacement is needed.
Other telltale symptoms include the vacuum failing to hold a charge overnight despite completing a full charging cycle, or experiencing a noticeable drop in suction power during use. Physically, check if the battery feels unusually hot during operation or charging—while some warmth is normal, excessive heat could indicate failing cells. Remember that typical Dyson V7 batteries last 2-4 years with regular use (about 300-1000 charge cycles), so if your vacuum is approaching the 3-year mark, battery replacement becomes increasingly likely.
How to Confirm Battery Failure Before Replacement
Don’t jump straight to replacement without proper diagnosis. First, clean the charging contacts on both your vacuum and charger with a cotton swab and isopropyl alcohol—dirty contacts often mimic battery failure. Next, try charging with a different power outlet to rule out electrical issues. If your vacuum still shows flashing lights or dies quickly after these steps, the battery is almost certainly the culprit. A definitive test is using your original charger with a known-good battery—if available—to see if performance returns to normal.
Choosing the Right Replacement Battery for Your Dyson V7

Your replacement decision boils down to two options: genuine Dyson OEM or third-party batteries. This choice affects not just your wallet but also safety and long-term performance. The OEM battery costs $70-$96 and delivers consistent performance with tested 7-minute, 25-second runtime on high power. It uses high-quality Murata VTC4 lithium-ion cells rated for 30A discharge—perfectly matched to your V7’s 16A+ requirements.
Third-Party Battery Options: Performance vs. Risk
Third-party batteries range from $29-$37 but vary dramatically in quality. The PowerExtra 5.0Ah offers excellent value at $36 with 7-minute, 19-second runtime and safe 30A-rated EVE 25P cells. The Kodolate 4.5Ah ($29) has solid build quality with 30A-rated cells but disappoints with only 5-minute, 52-second runtime. Avoid the DTK 4.0Ah ($35) despite its impressive 7-minute, 32-second runtime—its cells are only rated for 6A discharge, dangerously below your V7’s 16A+ requirements, creating serious overheating risks.
Critical buying tips:
– Ignore exaggerated capacity claims (e.g., “5.0Ah” often means 2.5Ah actual)
– Verify cells are rated for at least 16A continuous discharge
– Look for UL/CE certifications and clear warranty terms
– Check recent user reviews for reliability reports
– Avoid batteries that run significantly hotter than OEM (107°F max)
Step-by-Step: Installing Your New Dyson V7 Battery
Replacing your Dyson V7 battery takes just minutes when you follow these precise steps. First, power off your vacuum completely and unplug the charger. Locate the gray release button above the battery compartment and press it firmly. While holding the button, pull the old battery straight down and out—it should slide smoothly without resistance.
Proper Battery Installation Technique
- Prepare the new battery: Remove any insulator tabs from third-party batteries
- Align correctly: Match the battery with the guide rails inside the handle
- Insert firmly: Slide the battery straight up until it clicks securely into place
- Verify seating: Check for any gaps between battery and vacuum body
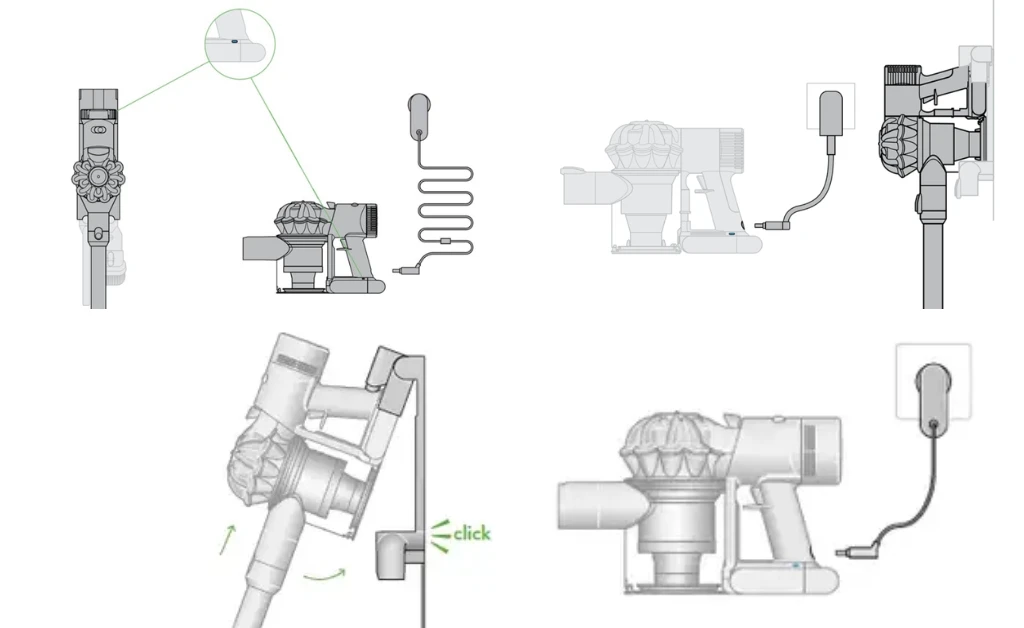
- Initial charge: Connect to original Dyson charger for 3.5+ hours before first use
Critical warning: Never force the battery into place. If it doesn’t slide in smoothly, double-check the alignment. A properly installed battery will click audibly and sit flush with the vacuum body. Forcing it could damage the internal contacts or housing.
Maximizing Your New Dyson V7 Battery’s Lifespan
Your replacement battery’s longevity depends heavily on how you charge and store it. Always unplug the charger once the battery reaches full charge—modern lithium-ion batteries don’t benefit from “topping off” and can degrade from prolonged charging. For optimal lifespan, avoid letting your battery drop below 20% charge during regular use and never store it fully depleted.
Essential Charging Best Practices
- Charge at room temperature (68-77°F is ideal)
- Let the vacuum cool for 15-20 minutes after use before recharging
- Store long-term at 40-60% charge in a cool, dry place
- Use only the original Dyson charger or explicitly compatible alternatives
- Never charge a frozen battery or one that’s extremely hot from use
Following these practices can extend your battery’s life significantly beyond the typical 2-4 year lifespan, potentially saving you from premature replacement costs.
Troubleshooting Common Dyson V7 Battery Installation Issues
Even with careful installation, you might encounter problems. If your vacuum won’t power on after replacement, first remove and reseat the battery—90% of “dead battery” issues are actually poor connections. Ensure you hear the distinct click when installing and that no gap exists between battery and vacuum body.
Fixing Runtime and Error Problems
Problem: Vacuum dies quickly or shows error lights
Solution: Perform a hard reset by holding the power trigger for 15 seconds. If problems persist, check for clogs in the cleaner head or wand that could be straining the motor.
Problem: Battery gets uncomfortably hot during charging
Solution: Immediately unplug and discontinue use—this indicates dangerous cell mismatch or defective battery. Return for replacement.
Problem: Battery won’t accept a charge
Solution: Clean both battery and charger contacts with isopropyl alcohol, then try a different power outlet before concluding the battery is defective.
OEM vs. Third-Party: Making the Smart Choice for Your Dyson V7

Your final decision should balance safety, performance, and budget. Choose the genuine Dyson battery if safety is your top priority, you want guaranteed compatibility, and the 90-day warranty matters to you. It’s the only option covered under Dyson’s support system and uses cells perfectly matched to your vacuum’s power demands.
When Third-Party Batteries Make Sense
Opt for PowerExtra 5.0Ah if you want the best value—offering 98% of OEM runtime at less than half the price with safe 30A-rated cells. This model consistently delivers the best performance-to-price ratio in independent testing. Avoid bargain options with dubious safety credentials; that $29 battery could cost you your vacuum or create a fire hazard. Always verify recent user reviews and check the seller’s return policy before purchasing any third-party battery.
Final recommendation: For most users, the PowerExtra 5.0Ah represents the sweet spot between safety, performance, and cost. But if you value peace of mind above all, the genuine Dyson battery remains the safest choice despite its higher price. Regardless of your selection, proper installation and charging practices will maximize your new battery’s lifespan and keep your Dyson V7 performing at its best for years to come. Remember that how to replace Dyson V7 battery correctly is just the first step—maintaining it properly ensures you get the full value from your investment.

