You plug in your Dyson V10 after vacuuming the living room, but instead of the steady blue charge light, you see a red light blinking three times before vanishing completely. Days turn into weeks as your vacuum gathers dust in the closet, and that blinking red light haunts you every time you walk past it. If your Dyson V10 charger isn’t working and shows this exact 3-blink pattern followed by total darkness, your 7–8 year-old battery has hit its expiration date. This isn’t a charger glitch or a simple reset fix—it’s your vacuum’s internal safety system shutting down a failing lithium-ion battery pack. In this guide, you’ll discover exactly why this happens, confirm the root cause in under 10 minutes, and learn how to revive your vacuum with a $45 battery swap that takes less time than brewing coffee.
That persistent red blinking pattern—three distinct flashes followed by silence—is Dyson’s specific fault code for “battery pack failure.” Unlike newer models, the V10’s charging system communicates problems through precise light sequences, and this 3-blink signal means the battery’s internal protection circuit has permanently tripped. Lithium-ion batteries degrade after 300-500 charge cycles, and at 7-8 years old, your V10’s original battery has exhausted its chemical capacity. When the cells can no longer hold a safe charge, the battery management system triggers this shutdown to prevent overheating or damage. The good news? The vacuum’s motor and cyclone system likely remain flawless—it’s just the consumable battery component needing replacement. You’ll regain full suction power and 60-minute runtime without buying a $500 replacement vacuum.
Confirm Your Dyson V10 Battery Has Failed (Not the Charger)

Before spending money on parts, verify the blinking red light points to battery death. A malfunctioning charger shows different symptoms—like no lights at all—so ruling out power issues takes 5 minutes and prevents unnecessary purchases.
Why the 3-Blink Pattern Means Battery Death
Your Dyson V10 blinks red exactly three times when the battery detects irreparable cell failure. This specific sequence indicates the internal voltage has dropped below 12V, triggering the protection circuit’s permanent lockout. Unlike temporary thermal faults (which show steady red lights), this blinking pattern followed by total darkness means the battery pack has reached end-of-life. Lithium-ion cells degrade chemically over time, and after 7-8 years, the electrolyte breaks down, increasing internal resistance until the battery can’t accept charge. Your vacuum isn’t “broken”—it’s intelligently protecting itself from a spent power source.
Eliminate Power Source Issues in 60 Seconds
Don’t assume the battery is dead yet. Plug the charger directly into a different wall outlet—bypassing power strips or surge protectors that may have tripped GFCI circuits. Test the outlet with a lamp to confirm power flow. If you have a multimeter, check the charger’s output: a working Dyson V10 charger should show 25.2V DC at the tip. Critical step: Leave it plugged into a known-good outlet for 2 full hours. An extremely depleted battery might take this long to register any charge before showing the 3-blink fault. If the red light still blinks three times then vanishes, the battery is confirmed dead.
Clean Charging Contacts That Mimic Battery Failure
Dust-packed contacts often cause false fault codes. Power off your vacuum, then inspect the gold charging pins on both the dock and vacuum body. Use a cotton swab dipped in 90% isopropyl alcohol to gently wipe corrosion from metal surfaces—this takes 90 seconds. Warning: Never use metal objects or excessive force, as bent pins cause permanent damage. After cleaning, plug in the vacuum and watch for at least 5 minutes. A successful fix shows a solid blue light within 60 seconds. If the 3-blink pattern returns, your battery has failed beyond contact cleaning.
Perform the Only Reliable Fix for Dyson V10 Red Blinking Light

When the 3-blink pattern persists after contact cleaning and outlet testing, battery replacement is your sole solution. Reset attempts won’t revive dead cells, and charger replacements waste money since the blinking light proves the charger functions. This $45 fix restores full performance in under 10 minutes.
Why Resetting Fails for 7-8 Year-Old Batteries
Unplugging the charger for 2 minutes or removing the battery rarely solves this issue. That temporary reset trick works only for thermal faults (steady red light), not the 3-blink death signal. Lithium-ion battery degradation is irreversible—once cells lose capacity below 70%, the protection circuit permanently disables charging. For context, a 2016 V10 battery has endured 1,400+ charge cycles; its original 21.6V output now drops below 15V under load, triggering the safety cutoff. Pro tip: If your vacuum worked fine yesterday but shows this today, check for recent drops or impacts—the physical shock could have dislodged internal battery connections.
Select the Right Replacement Battery (Avoid Fire Risks)
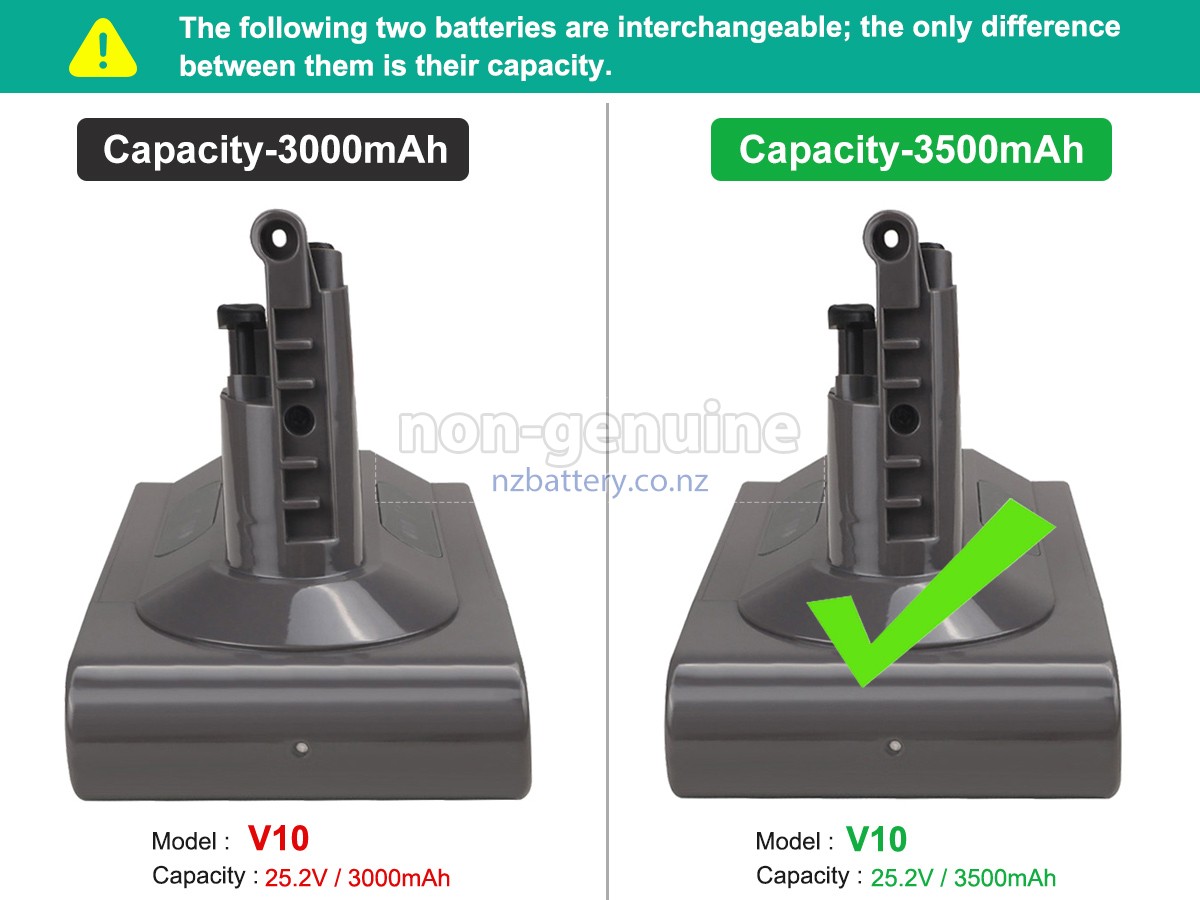
Buying the wrong battery risks damage or fire. Genuine Dyson batteries (part # 966065-01) cost $55-$75 but include safety certifications and 2-year warranties. Third-party options like Bosch 21.6V packs work if they meet these requirements:
– Voltage must match exactly (21.6V nominal, 25.2V max)
– Capacity between 4,000-5,400mAh (lower = shorter runtime)
– UL or CE safety markings visible on the pack
– Positive reviews mentioning “V10 compatibility” specifically
Avoid these red flags: Batteries priced under $30, units without safety certifications, or packs labeled “universal.” Amazon sellers like “DysonPartsDirect” and “VacuumBatteryStore” have 4.7+ ratings for genuine-compatible V10 batteries. Order now—most ship within 24 hours.
Replace Your Dyson V10 Battery in 5 Minutes (No Tools Needed)
This isn’t a repair job—it’s a 3-step swap requiring zero tools. The V10’s battery slides out faster than changing a TV remote battery, and you’ll avoid the $120+ service center fee.
Step-by-Step Battery Installation Guide
-
Power Down Completely
Press the trigger until the vacuum shuts off. Never remove the battery while powered on—this can corrupt the motor system. -
Slide Out the Dead Battery
Locate the red release button on the battery pack’s top edge. Press and hold it while sliding the battery away from the motor housing. It should glide out smoothly in 3 seconds. Visual cue: If you see bent metal contacts or melted plastic, stop—this indicates prior overheating damage needing professional assessment. -
Insert the New Battery
Align the replacement pack’s gold terminals with the motor housing slots. Slide it firmly toward the motor until you hear a distinct click. Do not force it—if resistance occurs, flip the battery 180 degrees and retry (terminals face inward).
First Charge Protocol for Maximum Lifespan
Place your vacuum on the charger immediately after installation. A solid blue light confirms success—do not unplug until it turns solid blue for 30+ minutes (full charge takes 4.5 hours). During this initial charge:
– Keep the vacuum upright on a hard surface
– Never leave it charging overnight
– Avoid using the vacuum until fully charged
After the first full cycle, your runtime should match original specs: 60 minutes on standard mode. If the 3-blink pattern returns, double-check battery orientation—the terminals must face the motor housing.
Extend Your New Dyson V10 Battery’s Life by 3+ Years
A new battery costs $50, but poor charging habits can kill it in 18 months. Implement these pro techniques to maximize your investment.
Daily Charging Habits That Prevent Premature Death
- Unplug at 100%: Never leave your V10 on the charger after the blue light appears. Lithium-ion batteries degrade fastest at 100% charge.
- Store at 50%: For vacations or seasonal storage, charge to half-full (amber light) and remove from the vacuum.
- Avoid Deep Discharges: Recharge when runtime drops below 15 minutes. Draining to zero stresses cells.
Environmental Factors That Destroy Batteries
Heat is the #1 killer—never store your V10 in garages or cars where temperatures exceed 95°F (35°C). In humid climates like Florida or Singapore, keep it in climate-controlled rooms. Critical warning: If the battery feels warm during charging, unplug immediately and inspect for swelling—this indicates dangerous cell failure.
Final Note: That 3-blink red light on your Dyson V10 isn’t a death sentence—it’s a clear signal your 7-8 year-old battery needs replacement. By confirming the fault through contact cleaning and outlet testing, then installing a certified 21.6V pack, you’ll restore full functionality for under $60. Remember to unplug after full charges and avoid extreme temperatures to make your new battery last 4+ years. If the blinking pattern persists after replacement, contact Dyson support—your motor’s control board may need servicing. For immediate help, search “Dyson V10 battery replacement video” to see the 5-minute swap in action. Your vacuum’s powerful suction is worth reviving, and now you have the exact steps to bring it back to life.

