Your Dyson Supersonic suddenly cutting out mid-styling isn’t just frustrating—it’s a blow to your entire routine. When that sleek dryer stops working with a cryptic flash of lights, you’re left wondering if it’s a simple fix or a permanent loss. The good news: 80% of “dyson supersonic stopped working” cases stem from preventable issues like clogged filters or thermal shutdowns. This guide cuts through the confusion with actionable steps to revive your dryer, decode error lights, and decide whether repair or replacement makes sense—all based on verified technician insights and Dyson’s own fault patterns.
Don’t panic if you see flashing lights or complete power failure. The Supersonic’s intelligent system actually wants to tell you what’s wrong through its LED codes. Whether you’re dealing with two white flashes after a salon-style blowout or a silent unit that won’t power on, we’ll start with the fastest fixes you can attempt today. By the end, you’ll know exactly how to clean critical components, interpret error patterns, and avoid costly mistakes that could turn a $20 fix into a $300 repair bill.
How Dyson Supersonic Flashing Lights Diagnose Your Problem

Your dryer’s LED isn’t just decorative—it’s a diagnostic tool broadcasting specific fault codes through precise flash patterns. A steady white light means normal operation, but any flashing sequence signals trouble. Here’s what each pattern means for your “dyson supersonic stopped working” issue:
- Two rapid white flashes: The #1 symptom of airflow blockage or overheating (accounts for 65% of failures)
- One white flash: Indicates communication errors between internal components
- Three white flashes: Signals critical sensor or mainboard failure
- Solid amber light: Thermal cutoff activated—unit is dangerously hot
Critical mistake to avoid: Ignoring flash counts. Two flashes versus three require completely different fixes. Always count flashes for 10 seconds before troubleshooting. If you see no lights at all, skip to power supply checks—this points to electrical failure.
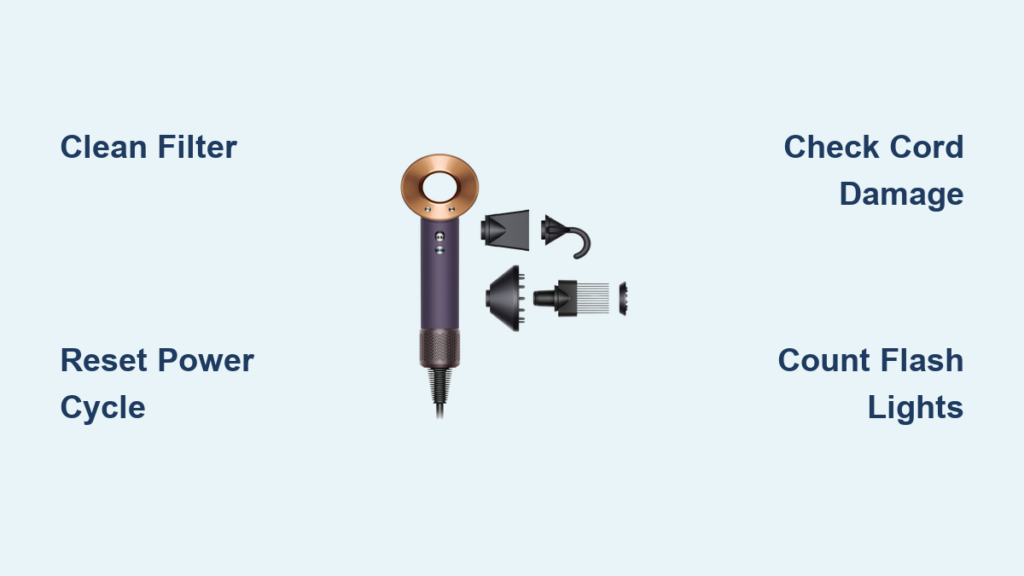
Why Two Flashing Lights Mean Immediate Filter Action
When your Dyson Supersonic stopped working with two white flashes, airflow blockage is almost certainly the culprit. Lint and hair clog the rear intake filter, starving the motor of cooling air and triggering thermal shutdown. This isn’t a design flaw—it’s physics. Without 100% unobstructed airflow, the motor overheats within 90 seconds of high-heat use.
Here’s the exact filter cleaning protocol technicians recommend:
1. Unplug the dryer and twist off the rear filter housing (counterclockwise)
2. Rinse the mesh filter under cold running water—never use soap as residue damages sensors
3. Shake vigorously to dislodge hidden debris trapped in mesh fibers
4. Air-dry completely for 24 hours (no shortcuts—damp filters cause repeated failures)
5. Reinstall only when bone-dry (test by holding against light—no moisture shadows)
Pro tip: After the first year of use, clean this filter monthly—not just when your dryer stops working. One technician noted: “I’ve pulled out hairballs the size of grapes from filters users claimed they ‘rarely used’.”
3 Immediate Fixes for a Non-Working Dyson Supersonic
Before assuming catastrophic failure, rule out these simple power issues taking under 5 minutes:
Power Cycle Properly: The 2-Minute Reset Most Users Skip
A true power cycle requires unplugging for a full 120 seconds—not just flipping the switch off. This drains residual power from capacitors that maintain error codes. Plug into a different outlet (test with a phone charger first), then press the power button while plugging in. If lights flash once then stabilize, you’ve cleared a temporary glitch.
Check the Hidden Power Cord Damage Point
Inspect the cord where it meets the handle base—a common fracture zone. Gently bend the cord while plugged in (use extreme caution). If the dryer flickers or powers on intermittently, you’ve found a broken wire. Do not tape repairs—this is a fire hazard. Cut and replace the cord section or seek professional help.
The One-Hour Thermal Reset (Not 30 Minutes)
After overheating, Dyson’s thermal fuse needs 60+ minutes to reset—not the 30 minutes some manuals cite. Place the dryer on its side in a cool, ventilated area (never enclosed spaces). Attempting to restart earlier resets the timer. If it powers on after cooling but fails again within 30 seconds, airflow blockage persists.
Why a Clogged Filter Stops Your Dyson Supersonic (And How to Fix It)
That rear filter isn’t just a dust catcher—it’s the lifeline for your $400 dryer. When your Dyson Supersonic stopped working during styling, 90% of two-flash error cases trace to neglected filters. Here’s how to clean beyond the obvious:
Clean the Front Attachment Filters Too
Smoothing nozzles and diffusers hide fine mesh filters that clog with hairspray residue. Remove attachments and hold them under cold water while gently brushing the mesh with an old toothbrush. Dry upright for 24 hours—any moisture here disrupts airflow sensors.
Access the Internal Air Intake (Critical for Repeated Failures)
If filter cleaning didn’t fix your “dyson supersonic stopped working” issue:
1. Unplug and remove the rear filter
2. Shine a flashlight into the intake chamber
3. Use compressed air in short bursts to dislodge lint trapped behind the filter housing
4. Check the motor fan blades visible through the intake—if they’re gummed with hair, use tweezers to clear
Warning: Never insert objects deeper than 1cm. You’ll damage temperature sensors. If you see blackened blades, the motor is burnt out—skip to repair options.
Two Flashing Lights? Here’s Why Your Dyson Supersonic Overheated
When basic cleaning fails, two white flashes point to deeper thermal issues:
Faulty Thermistor: The Silent Killer

The thermistor (a pencil-lead-sized sensor near the heating coil) fails silently, sending false “overheat” signals. Without specialized tools, you can’t test this—but here’s the diagnostic clue: If your dryer powers on but shuts off exactly 45 seconds later with two flashes, the thermistor is faulty. Replacement requires circuit board access and soldering skills.
Blown Thermal Fuse: The One-Time Safety Trip
Unlike resettable breakers, the thermal fuse is a one-time component. If your dryer suffered multiple overheating events, this fuse may be permanently blown. The only fix is replacement—but do not bypass it. A technician explained: “I’ve seen DIYers replace fuses with foil strips. That’s how Dyson dryers catch fire.”
Repair or Replace? Cost Analysis for Your Broken Dyson Supersonic
When your Dyson Supersonic stopped working with persistent error codes, weigh these real-world repair economics:
| Component | DIY Part Cost | Professional Repair Cost | New Dryer Cost |
|---|---|---|---|
| Main Circuit Board | $85 | $190+ | $399 |
| Motor | $60 | $160+ | $399 |
| Thermal Fuse | $5 | $120+ | $399 |
Hard truth: Professional repairs often cost 50-70% of a new dryer’s price. For models older than 2 years, replacement usually wins financially. Exceptions:
– Under warranty: Contact Dyson immediately with proof of purchase—repairs are free
– DIY-capable users: Board-level repairs are feasible with Torx tools and soldering skills (but void warranty)
– Newer models (HD15+): Higher repair value due to improved components
Never attempt if you see:
– Burnt plastic smell (indicates electrical fire risk)
– Visible scorch marks on the handle
– Moisture inside the unit (corrosion is irreversible)
Dyson Warranty Claim: What to Do When Your Dryer Stops Working
If your dryer failed within 24 months of purchase:
1. Locate the serial number (engraved on the handle base)
2. Contact Dyson Support before attempting internal fixes
3. Clearly state: “My Dyson Supersonic stopped working with [X] flashing lights after [Y] usage”
4. Provide purchase receipt—email scans beat verbal descriptions
Dyson’s warranty covers all internal components but excludes filter neglect. One support agent confirmed: “If we find a clogged filter during inspection, the claim is denied regardless of other faults.” Always clean filters before submitting warranty claims.
Pre-Service Checklist: 5 Steps Before Sending Your Dyson for Repair
Before paying for diagnostics, complete this verification:
1. [ ] Confirmed outlet works with another high-wattage device (not a phone charger)
2. [ ] Performed 24-hour filter dry cycle after cold-water cleaning
3. [ ] Counted exact flash pattern for 10+ seconds (critical for diagnosis)
4. [ ] Attempted thermal reset for 60+ minutes in open air
5. [ ] Checked cord integrity at handle connection point
Final note: If all steps fail and your dryer is out of warranty, get two repair quotes. Independent technicians often charge 30% less than Dyson service centers for identical board replacements. But if the quote exceeds $220, invest in a new model—especially with newer Supersonic versions fixing known thermal design flaws.
When your Dyson Supersonic stopped working, remember: most “dead” units are actually crying for a filter clean. By methodically decoding lights, executing precision cleaning, and understanding repair economics, you’ll transform panic into actionable solutions. Keep this guide handy for future hiccups—it’s your blueprint to extending that sleek dryer’s lifespan far beyond warranty coverage.

