Your Dyson vacuum suddenly stops deep-cleaning carpets because the floor attachment not working properly. That spinning brush bar—the heart of your machine’s dirt-lifting power—freezes solid while you’re mid-clean. You’re not alone: thousands of Dyson owners face this exact frustration weekly, with the floor attachment not working being the #1 reported issue across V8-V15 models. When the brush stops spinning, your vacuum essentially becomes a weak air mover that just pushes debris around. The good news? 90% of these failures stem from simple, user-fixable problems like hair clogs or dirty contacts—not expensive internal damage. This guide cuts through the confusion with battle-tested diagnostics straight from repair technicians and Dyson community experts.
Most users immediately blame the motor, but the truth is far simpler. Your Dyson floor attachment not working is almost always a localized problem within the cleaner head assembly itself. The brush bar requires both mechanical freedom to rotate and clean electrical pathways to receive power. When either fails, the spinning stops—but diagnosing which component failed requires a systematic approach. Skip the guesswork and avoid unnecessary part replacements by following this precise troubleshooting sequence used by professional repair shops.
Why Your Dyson Floor Attachment Stops Spinning Mid-Clean
The critical failure point isn’t your main vacuum body—it’s the floor attachment’s internal ecosystem. Newer models like the V15 Detect use smart torque sensors that deliberately cut brush power when resistance exceeds safety thresholds (like thick rugs or hidden tangles). Older models rely on mechanical clutches and belts that fail under strain. Both systems share a fatal vulnerability: hair and string infiltrate the brush bar’s end bearings, creating invisible resistance that either triggers sensor shutdowns or physically seizes components. When your floor attachment not working manifests as intermittent spinning, it’s almost always debris-induced overload protection activating—not “dying electronics” as many assume.
Critical Safety Prep Before Touching Your Vacuum
Skipping these steps risks electric shock or permanent damage to your Dyson:
- Complete Power Isolation: Unplug from charger AND remove the battery pack (slide release button on base). Models like V12 require holding the power button for 10 seconds after removal to fully discharge residual current.
- Debris-Containment Setup: Work over dark fabric—a light towel makes hair and string invisible. Place small parts in a magnetic dish to prevent screws from vanishing into carpet fibers.
- Tool Kit Essentials: You only need a quarter (for end-cap removal), seam ripper (never use knives—they slice delicate clutch components), and 90% isopropyl alcohol. Skip screwdrivers; Dyson’s tool-free design means stripped screws are your #1 self-inflicted repair disaster.
Step-by-Step Diagnosis: Pinpoint Your Floor Attachment Failure
Stop replacing parts randomly. Follow this exact sequence to isolate the culprit.
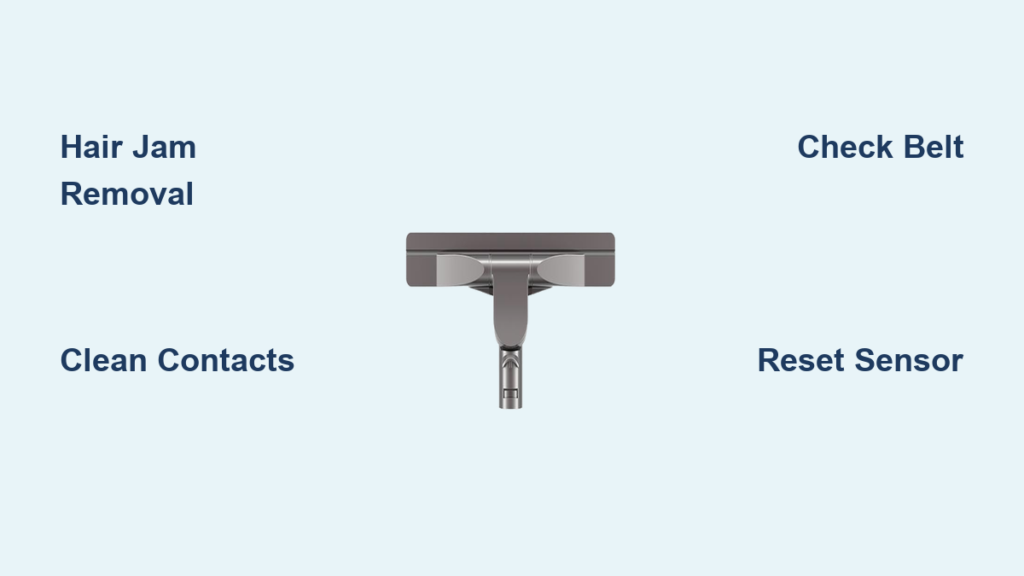
1. Hair Jam Detection: The 2-Minute Tug Test
Over 75% of floor attachment not working cases stem from hidden hair bindings. Here’s how to confirm:
- Flip vacuum upside down and remove brush bar using coin (turn end caps to open position)
- Critical Check: Grab both ends of the brush bar and rotate by hand. It must spin freely for 3+ full rotations with zero resistance. Any grinding or sticking means embedded debris.
- Examine the very ends of the bar shaft—this is where hair compacts into steel-like cords inside the bearing housings. Shine a flashlight into the cleaner head cavity; look for “fuzz volcanoes” erupting from the spindle ends.
- Pro Tip: Insert seam ripper under hair wraps at a 45-degree angle and pull toward you—never cut toward bristles. For stubborn mats, soak ends in warm soapy water for 10 minutes before extraction.
2. Electrical Contact Revival: Fix “Ghost Power” Failures
When your floor attachment not working affects only the brush motor (suction still works), dirty contacts are the prime suspect:
- Detach cleaner head and inspect the 3-4 gold pins on the wand’s docking point
- Check for “green crust” (corrosion) or white powder (oxidized metal)—this blocks current flow to the brush motor
- Dampen cotton swab with isopropyl alcohol and gently wipe pins in one direction (never scrub back-and-forth)
- Validation Test: Attach a different tool (crevice/hose). If it works, the fault is isolated to your floor head. If not, the problem is upstream in the wand wiring.
3. Drive System Stress Test: Belt vs. Motor Failure
With brush bar removed, power on the vacuum and observe the spindle inside the cleaner head:
- Spindle spins BUT brush won’t turn? → Broken drive belt or disengaged clutch mechanism. Inspect the black plastic “spiral connector” gear—it should snap firmly into place with an audible click when reassembling.
- Spindle DOESN’T spin? → Internal wiring fault or dead motor. Check for loose wires near the motor housing (common after drops). If you hear a faint humming but no movement, the motor gearbox is stripped—replacement is required.
4. Smart Model Sensor Override: Bypass False Overloads
V11-V15 owners face unique “floor attachment not working” symptoms where the brush spins on hardwood but quits on carpets:
- Trigger: Torque sensor misreads backward-pulling resistance as a dangerous jam
- Emergency Fix: Perform a hardware reset—remove battery for 30 seconds, then reinsert while holding power button for 10 seconds
- Permanent Fix: If resetting fails, clean the optical sensor window (tiny clear lens near spindle) with alcohol. Blocked sensors can’t measure resistance accurately.
How to Fix Your Non-Spinning Floor Attachment in Under 10 Minutes
Armed with your diagnosis, execute these targeted repairs.
Fix 1: The Surgical Brush Bar Cleanse
For hair-jammed attachments:
- Remove brush bar and submerge ends in warm water for 5 minutes (softens hair resins)
- Use seam ripper to lift hair wraps away from shaft—never cut toward bearings
- Insert compressed air nozzle into bearing housings to blast out hidden fibers
- Before reassembly, verify the black clutch gear spins freely when pressed into housing
Fix 2: Contact Revival Protocol
For intermittent power failures:
- Rub pencil eraser gently across wand contacts (removes oxidation without scratching)
- Apply isopropyl alcohol to contact points using toothpick (prevents overspill)
- Dry completely with microfiber cloth before reconnection
- Warning: Never use vinegar or window cleaner—acids destroy gold plating
Fix 3: When Professional Help Is Non-Negotiable
Call Dyson support if you observe:
- Burning smell from cleaner head (melted wiring insulation)
- Visible sparks at contact points
- Grinding noise with no brush movement (stripped motor gears)
- Error codes persisting after full reset (e.g., V15’s red LED flashes 5x)
Attempting DIY repairs here risks permanent main unit damage. Document your troubleshooting steps first—Dyson often denies warranty claims if they suspect user tampering.
Failure Symptom Decoder: Match Your Issue to the Fix
| Your Exact Symptom | Most Likely Cause | First Action | Red Flag |
|---|---|---|---|
| Stops after 3 seconds on carpet | Hair jam in bearings OR over-sensitive torque sensor | Deep clean brush ends + hardware reset | If persists, replace belt immediately |
| Spins when lifted but not on floor | Debris-induced resistance OR clutch failure | Check spindle rotation under load | Broken clutch requires full head replacement |
| Only works pushing forward (not pulling back) | Torque sensor misreading backward motion | Clean sensor window + reset vacuum | Firmware update needed if recurring |
| Zero spin but suction works | Corroded contacts OR broken drive belt | Clean contacts + inspect black spiral gear | If belt intact, motor assembly failure likely |
| Humming noise but no movement | Stripped motor gearbox | Stop using immediately | Continuing causes irreversible damage |
Strategic Replacement Guide: Save $100+ on Unnecessary Parts

Replace Yourself:
– Brush bars ($15-25): When bristles are matted or ends show wear
– Drive belts ($8-12): If stretched beyond 1/8″ gap when removed
– Full cleaner heads ($40-75): For persistent electrical faults (search “Dyson [your model] cleaner head” + serial number)
Avoid These Costly Mistakes:
– Buying “universal” belts—they lack Dyson-specific tensioning
– Replacing motors when the real issue is a $0.50 clutch gear
– Using non-OEM heads on V15/V12 models (triggers firmware errors)
Prevention Protocol: Stop Floor Attachment Failures Forever
Implement this 30-second weekly ritual:
- After Every Clean: Flip vacuum and visually inspect brush bar ends—remove visible hair with fingers
- Monthly Deep Maintenance: Remove brush bar, clean spindle cavity with soft brush, apply 1 drop sewing machine oil to bearings
- Proactive Belt Swap: Replace belts every 18 months regardless of symptoms (prevents motor strain)
When your Dyson floor attachment not working strikes, remember: the solution is almost always mechanical, not magical. By methodically checking for hair jams, reviving electrical contacts, and resetting smart sensors, you’ll restore deep-cleaning power in minutes—not days. Keep this guide handy for your next “spinning stoppage,” and never pay for a preventable repair again. For persistent issues, always reference your vacuum’s serial number when contacting support—generic model names often trigger incorrect warranty denials.

