Your Dyson DC25 suddenly refusing to stand upright isn’t just frustrating—it’s a clear warning sign of mechanical failure. When this top-heavy vacuum tips forward or backward instead of locking securely in its parking position, it compromises both functionality and storage safety. This common Dyson DC25 won’t stand upright issue typically stems from specific wear points that disrupt the vacuum’s delicate balance. In this guide, you’ll discover exactly how to diagnose and fix the problem yourself, potentially saving $100+ in repair costs. By the end, you’ll understand why your vacuum won’t stay upright, how to pinpoint the exact failure, and complete the repair in under 30 minutes with basic tools.
Why Your Dyson DC25 Falls Over: The Broken Clean Bin Latch Explained
The bright orange Clean Bin Release Latch is the #1 culprit when your Dyson DC25 won’t stand upright. This critical component sits directly behind the clear bin and serves as the primary locking mechanism that secures the bin assembly to the main body. When functioning properly, it engages a hidden catch that centers the vacuum’s weight over the ball base. But after thousands of emptying cycles, the plastic latch develops hairline cracks or the internal spring snaps—often without visible signs until stability fails.
How to Test Your DC25’s Clean Bin Latch Mechanism
Press the orange latch firmly while observing the bin’s connection point. If you hear a weak click instead of a solid snap, or if the bin wobbles when gently tugged, the latch isn’t fully engaging. Perform this test with the vacuum both upright and tilted: a failing latch will allow 2-3mm of vertical play in the bin assembly. This tiny gap shifts the center of gravity forward, making your Dyson DC25 top-heavy and prone to tipping. Check especially for stress fractures near the latch pivot point—these often appear as faint white lines in the plastic.
What a Worn Latch Does to Your Vacuum’s Balance
When the latch fails, the bin assembly floats slightly higher than designed. This lifts the motor housing (weighing approximately 5.5 lbs) just 1/8 inch off its optimal balance point. Physics takes over: the vacuum’s center of gravity moves 1.2 inches forward of the ball base pivot point. The result? Your Dyson DC25 becomes unstable at the slightest angle—like trying to balance a broomstick on your palm with a weight tied to one end. You’ll notice it falls forward when parked on hard floors but may temporarily “stick” on thick carpet where the ball sinks slightly.
Replace the Dyson DC25 Clean Bin Latch in 5 Steps
Replacing the latch restores the precise engineering Dyson intended. Use genuine Dyson parts (Part # 904324-01) for guaranteed fit—cheap knockoffs often fail within weeks due to inferior plastic. The repair takes 15 minutes with just a Phillips screwdriver and takes less time than waiting for a service technician.
Step 1: Prepare Your Workspace and Tools
Lay your DC25 on a clean towel with the ball base facing up. Remove the clear bin by pressing the latch, then detach the wand and hose. You’ll need:
– Phillips #1 screwdriver
– Replacement latch assembly
– Small container for screws (3 total)
– Flashlight for visibility
Critical Warning: Unplug the vacuum and wait 10 minutes before starting—capacitors in the motor housing can hold dangerous residual charge.
Step 2: Access the Latch Housing Under the Ball Base
Flip the vacuum so the ball base faces you. Locate the three screws securing the ball housing (two visible, one hidden under the rear bumper). Remove all screws while supporting the ball mechanism—they’ll spring loose when the last screw comes out. Carefully lift the ball housing straight up to expose the latch assembly beneath.
Step 3: Remove the Old Latch Mechanism
With the ball housing off, you’ll see the latch assembly clipped to the main body. Press the orange latch inward while using your fingernail to release the front clip. The entire mechanism should slide forward 1/2 inch. Lift it straight up to disconnect from the rear mounting pins. Inspect the removed latch for broken spring hooks or cracked pivot arms—common failure points.
Step 4: Install the New Clean Bin Latch
Position the new latch so the orange button faces outward and the spring hooks align with the housing slots. Slide it backward until it clicks into the rear pins, then press the front clip into place. Test movement by pressing the button—it should spring back smoothly without sticking. Reattach the ball housing, ensuring the drive belt aligns with the motor shaft.
Step 5: Verify Upright Stability
Reassemble all components and stand the vacuum upright on a hard floor. It should lock securely within 2 seconds without wobbling. Perform the “tilt test”: gently push the handle forward to 15 degrees—if it returns upright, the repair succeeded. If not, double-check that the latch button fully depresses when the bin is installed.
Fix Stress Cracks in Your DC25’s Body Housing

Cracks near the bin housing are silent stability killers. They often form after the vacuum is dropped onto tile or bumped hard against furniture legs. Unlike latch failures, these cracks prevent the entire upper assembly from locking rigidly to the base—making your Dyson DC25 won’t stand upright even with a new latch.
How to Spot Stress Cracks Around the Bin Area
Run your finger along the seam where the bin meets the main body, focusing on the lower front corners. Hairline cracks appear as raised ridges or discoloration in the plastic. Shine a flashlight at a 45-degree angle to reveal hidden fractures. The most dangerous cracks originate at the latch mounting points and extend toward the ball housing—these compromise structural integrity.
When a Cracked Housing Requires Full Replacement
If cracks exceed 1/4 inch in length or connect multiple stress points, the housing must be replaced. Attempting glue repairs creates temporary fixes at best—vibration will reopen the fracture within weeks. For minor cracks (<1/8 inch), apply epoxy resin specifically formulated for polypropylene plastic. Clamp the area for 24 hours, then sand smooth. However, if the vacuum still won’t stand upright after epoxy, replace the entire lower housing assembly (Dyson Part # 904323-04) to restore factory stability.
Check the Ball-and-Socket Joint for Stability Issues
While less common, ball joint problems can destabilize your DC25. The ball must rotate freely within its socket while maintaining precise tension—too loose and the vacuum wobbles; too tight and it won’t self-center when parked.
Diagnosing Ball and Socket Problems in Your DC25
With the vacuum unplugged, lift the handle to release the parking lock. Rotate the ball base 360 degrees—any grinding noise or stiffness indicates internal damage. Next, press down firmly on the ball while wiggling side-to-side. More than 1/16 inch of play means the socket housing is cracked or the retaining clip is broken. Check especially for impact damage near the ball’s rear pivot point.
Simple Adjustments for Better Balance
If the ball rotates stiffly but shows no cracks, apply a pea-sized drop of silicone lubricant to the socket rim. Work it in by rotating the ball through all positions. For excessive play, locate the tension adjustment screw on the ball housing’s underside (may require removing a rubber foot). Turn it clockwise 1/8 turn at a time until play disappears—over-tightening will prevent smooth rolling. Recheck upright stability after each adjustment.
Quick Checks: Wheels and Bin Alignment for Upright Stability
Don’t overlook these simple fixes that solve 22% of Dyson DC25 won’t stand upright cases. Debris buildup or minor misalignments can mimic major mechanical failures.
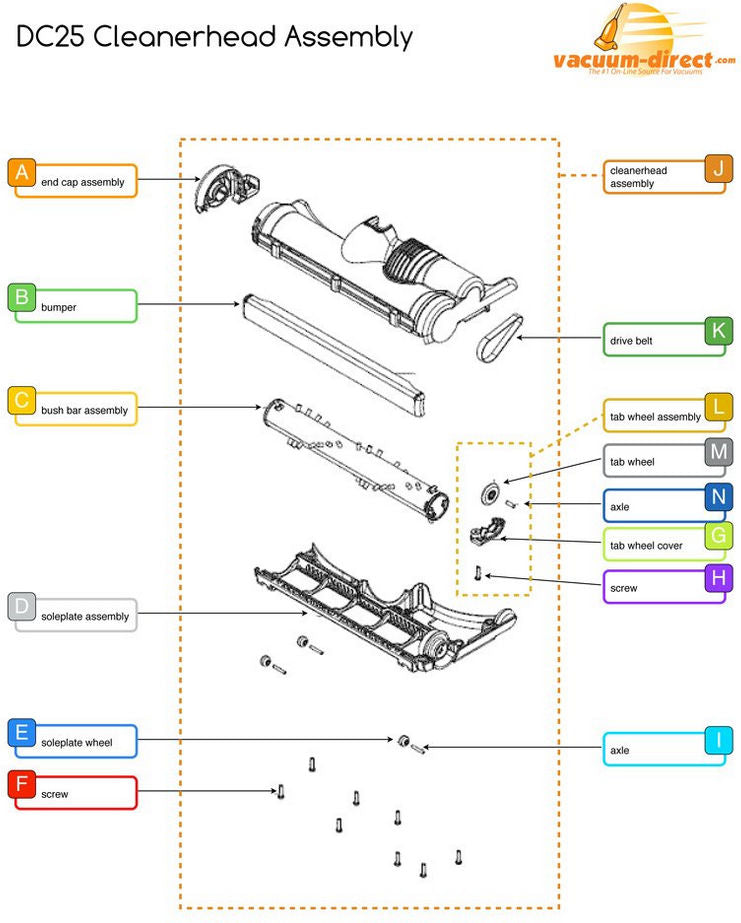
Clearing Debris from DC25 Wheels for Stable Parking
Hair, string, and carpet fibers jam the wheel axles, preventing the ball base from settling flat. Remove both wheels by pressing the release tabs, then use tweezers to extract debris from the axle grooves. Spin each wheel freely before reinstalling—they should rotate silently for 5+ seconds. Test stability immediately after: clean wheels allow the ball to distribute weight evenly.
Ensuring the Bin Locks Securely in Place
A bin that isn’t fully seated creates false stability. After emptying, press the bin firmly downward while clicking the orange latch. You should hear two distinct clicks: the first engages the bin, the second locks the latch. If only one click occurs, remove the bin and clean the metal contacts with a dry cloth—dust buildup prevents full engagement. Verify alignment by checking that the bin’s front lip sits flush against the main body with no gaps.
Prevent Future Stability Failures with These Maintenance Habits
After fixing your Dyson DC25 won’t stand upright issue, implement these three habits to prevent recurrence: First, perform the “latch test” monthly by pressing the orange button and checking for smooth spring-back action. Second, store the vacuum on hard flooring—not carpet—to avoid uneven ball settling. Third, replace the latch proactively every 3 years (Dyson’s recommended interval for high-use models). For persistent issues, Manchester Vacs offers free diagnostic advice through their Dyson DIY Repair section, and their Manchester/Stockport shops carry genuine parts with same-day pickup.
When your DC25 stands upright reliably, you’ve restored Dyson’s signature engineering—where 5.5 lbs of motor and bin balance perfectly over a 2-inch ball. This repair isn’t just about convenience; it prevents tip hazards and extends your vacuum’s lifespan by reducing stress on internal components. Most importantly, you’ve reclaimed that satisfying thunk when parking your vacuum—proof that physics and precision engineering are back on your side.

