That frustrating moment when your Dyson DC25’s roller brush suddenly stops spinning while the vacuum motor continues running normally is all too familiar for many owners. When your Dyson DC25 roller not working properly, you lose the essential agitation needed to lift embedded dirt from carpets. Without that spinning action, your vacuum is essentially just blowing dust around rather than removing it. This guide gives you the exact steps to diagnose and fix your non-spinning roller—often in under 30 minutes with basic tools you likely already have.
Most DC25 roller failures fall into three categories: mechanical jams (hair and debris), drive belt issues, or electrical problems with the mini motor. The good news? Over 80% of “dyson dc25 roller not working” problems can be resolved without professional help. By following this systematic approach, you’ll quickly identify whether you’re dealing with a simple blockage or a component that needs replacement.
Why Your Dyson DC25 Roller Suddenly Stops Spinning
Your DC25 roller failure likely stems from one of three specific problems. Mechanical blockages from hair and string wrapping around the roller shaft account for nearly half of all “dyson dc25 roller not working” cases. These jams prevent the roller from rotating freely, even when the motor is functioning properly. You’ll often notice the roller spins freely when manually turned but stops immediately when powered on.
Recognizing Belt-Related Roller Failures
A worn or broken drive belt is the second most common culprit. When your DC25’s belt stretches beyond its tension point or develops cracks, it slips instead of transferring power from the motor to the roller. Look for visible fraying, glazing (a shiny surface), or complete separation. A properly tensioned belt should have about 1/4 inch of deflection when pressed with your finger. If you can press it more than that, the belt has lost its grip.
Identifying Electrical Motor Problems
Electrical failures typically present as intermittent operation or complete silence from the roller motor. If you hear a faint humming or clicking sound but no rotation, your mini motor (Part #965680-01) might be receiving power but failing to turn. A complete lack of sound suggests either a switch failure, wiring problem, or motor burnout. Thermal cut-off switches often trigger after repeated overheating from blockages, causing the roller to stop working until the motor cools down.
How to Perform a Quick Visual Inspection of Your DC25 Roller Assembly
Before disassembling your vacuum, conduct a targeted inspection that takes less than five minutes. Always unplug your DC25 first—safety should be your top priority when working with any electrical appliance.
What to Look for When Your DC25 Roller Won’t Spin
Turn your vacuum completely over and examine the brush roll area. Look for visible hair strands wrapped around the roller ends where it meets the housing. Pay special attention to the metal shaft ends—they’re notorious for collecting hair that gradually tightens like a tourniquet. Check if the roller toggle switch illuminates when pressed; if not, you likely have an electrical issue rather than mechanical.
Safety Precautions Before Inspecting Your Vacuum
Remove any attachments and place your DC25 on a stable surface with the cleaner head facing up. Have a pair of safety glasses ready—debris can sometimes pop out unexpectedly when clearing jams. Keep a small bowl nearby to collect screws as you remove them to prevent losing them. Never attempt to force the roller to spin while the vacuum is plugged in, as this could damage internal components.
Removing Hair and Debris from Your DC25 Brush Roll

Most “dyson dc25 roller not working” issues stem from hair and string accumulation. This simple fix requires minimal tools and takes just minutes.
The Right Tools for Clearing DC25 Roller Blockages
Use a seam ripper or small scissors with a pointed tip to carefully cut through hair and string wrapped around the roller ends. A flathead screwdriver helps pry out stubborn debris from the housing edges. Have a pair of needle-nose pliers ready to grip and pull out stubborn fibers. Never use your fingers—you risk cuts from the brush bristles or sharp debris.
Step-by-Step Hair Removal Technique
- Unplug your DC25 and turn it upside down
- Locate the hair-wrapped areas at both ends of the roller
- Carefully insert your seam ripper between the hair and roller shaft
- Cut the hair in small sections, working from one end to the other
- Use needle-nose pliers to pull out remaining debris from the housing
- Manually spin the roller to ensure it rotates freely
Pro Tip: After each vacuuming session, spend 30 seconds cutting away hair from the roller ends. This simple habit prevents 90% of roller failures and extends your belt’s lifespan.
Testing and Replacing the Drive Belt on Your Dyson DC25
When your DC25 roller not working despite clearing debris, the drive belt is your next suspect. Belt replacement is straightforward and costs less than $15.
How to Check if Your DC25 Belt is Worn or Broken
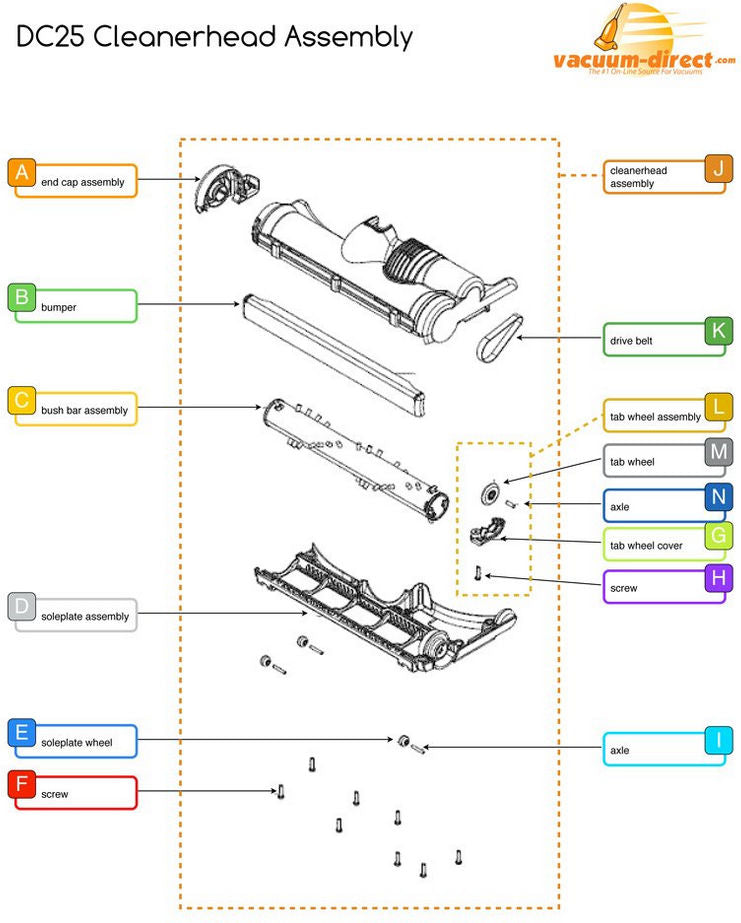
Remove the soleplate by unscrewing the five retaining screws (usually requiring a 6.5mm Allen key). Look for the rubber belt connecting the motor spindle to the brush roller. A healthy belt appears uniformly black with no shiny spots. If you see cracks, fraying, or a glazed appearance (shiny surface), replace it immediately. Test tension by pressing the belt midway—it should deflect about 1/4 inch.
Installing a New Belt on Your DC25 Roller Assembly
- Remove the old belt by stretching it off both the motor spindle and roller
- Position the new belt around the motor spindle first, ensuring it sits in the pulley groove
- Stretch the belt to reach the roller, using your thumbs to work it into position
- Verify the belt sits evenly on both components with proper tension
- Reattach the soleplate and test operation
Warning: Never force the belt—it should stretch smoothly into place. Forcing can damage the motor bearings. Replacement belts for the DC25 (Part #YW24527002) are widely available online for $8-15.
Diagnosing Your DC25’s Brush Motor Failure

If your roller still won’t spin after clearing debris and replacing the belt, the mini motor (Part #965680-01) may have failed. This 12V DC motor powers the roller assembly and commonly fails after 3-5 years of regular use.
Listening for Signs of Motor Trouble
Turn on your DC25 and listen closely to the base. A healthy roller motor produces a consistent low hum. If you hear clicking without rotation, the motor may be seized. Complete silence suggests either a switch failure or dead motor. Burning smells indicate immediate motor failure—stop using the vacuum immediately to prevent further damage.
Testing Your DC25’s Mini Motor with a Multimeter
- Unplug the vacuum and remove the roller assembly
- Locate the motor’s wiring harness connector
- Set your multimeter to continuity mode
- Test for resistance across the motor terminals (should read 5-20 ohms)
- If no continuity, the motor has failed and needs replacement
Cost-Saving Tip: A new mini motor costs $30-60 online versus $150+ at authorized repair centers. Replacement takes about 45 minutes with basic tools.
Preventing Future DC25 Roller Problems with Simple Maintenance
Avoid recurring “dyson dc25 roller not working” issues with these proactive maintenance steps. Consistent care extends your vacuum’s lifespan and maintains peak cleaning performance.
Weekly Maintenance Routine for Your DC25
After each use, spend 60 seconds cutting away hair from the roller ends using a seam ripper. Check that the roller spins freely by hand. Listen for unusual noises during operation that might indicate developing problems. This simple habit prevents 90% of roller failures and takes less time than refilling your coffee.
Monthly Deep Cleaning Procedures
Once a month, remove the soleplate to inspect the belt and clean the roller housing. Use compressed air to blow out dust and debris from the motor area. Check belt tension and condition—replacing it at the first sign of glazing prevents unexpected failures. Clean the roller bearings with a dry cloth to maintain smooth rotation.
Quarterly Preventive Measures
Every three months, perform a complete roller disassembly. Remove the brush roll and inspect both ends for bearing wear. Clean all housing components with a dry microfiber cloth. Test the clutch engagement by applying light pressure to the spinning roller—it should maintain rotation under moderate pressure. Replace the belt proactively every 6-12 months regardless of visible wear.
When your Dyson DC25 roller not working properly, remember that most issues stem from simple causes you can fix yourself. Start with the easiest solutions—clearing debris and checking the belt—before moving to more complex electrical diagnostics. By implementing the preventive maintenance schedule outlined here, you’ll keep your DC25’s roller spinning powerfully for years to come. If you’ve tried these steps without success, consider professional repair when the cost is less than half the price of a new vacuum—typically under $150 for parts and labor.

