That stiff, unresponsive hose on your Dyson Ball Animal 2 isn’t just frustrating—it’s defeating the entire purpose of owning a premium vacuum. When the hose loses suction while the floorhead still works, you’re left wrestling with a rigid tube that pushes air instead of pulling it, making furniture and stairs impossible to clean. Worse, that high-pitched motor whine signals your vacuum is straining dangerously. The good news? 95% of Dyson Ball Animal 2 hose suction failures stem from five specific, user-fixable blockage points—not motor failure. This guide cuts through the confusion with a precise, step-by-step protocol to restore full suction in under 30 minutes, using only tools you already own. Skip the guesswork and expensive service calls by targeting exactly where debris hides.
Why Your Hose Feels Like a Stiff Pipe (Reverse Suction Explained)
That bizarre “reverse suction” sensation—where the hose locks rigid and air blasts out the wand—is your vacuum’s distress signal. It happens when a complete blockage traps air pressure between the hose inlet and the obstruction. As the motor strains, compressed air forces its way backward through the only exit: your hose. This isn’t a motor flaw; it’s a physical blockage choking the airflow path. Crucially, if your floorhead suction still works, the problem is isolated upstream of the main cyclone—meaning you don’t need to dismantle the entire vacuum. Focus exclusively on the hose airway path: from the wand tip through the inspection hatch to the diverter valve. Ignoring this targeted approach wastes hours checking irrelevant components like the brush bar.
Clear Hose & Wand Blockages in 5 Minutes
Remove Visible Debris From Hose and Wand Connections
Start here—this solves half of all “no suction” cases. Detach the hose completely from the vacuum body and separate it from the rigid wand. Hold each component up to a bright light: look for shadows indicating blockages. For the flexible hose, flex it sharply along its entire length while blowing through it; a sudden pop means dislodged debris. For stubborn clogs, use a 36-inch flexible plumbing snake (not a coat hanger—it can puncture the hose lining). Insert it from the wand end toward the vacuum body, rotating gently to hook hair or string. Never force it; excessive pressure damages internal baffles. For the wand, a bottle-cleaning brush works perfectly—scrub the interior while rotating to dislodge plaster-like dust buildup.
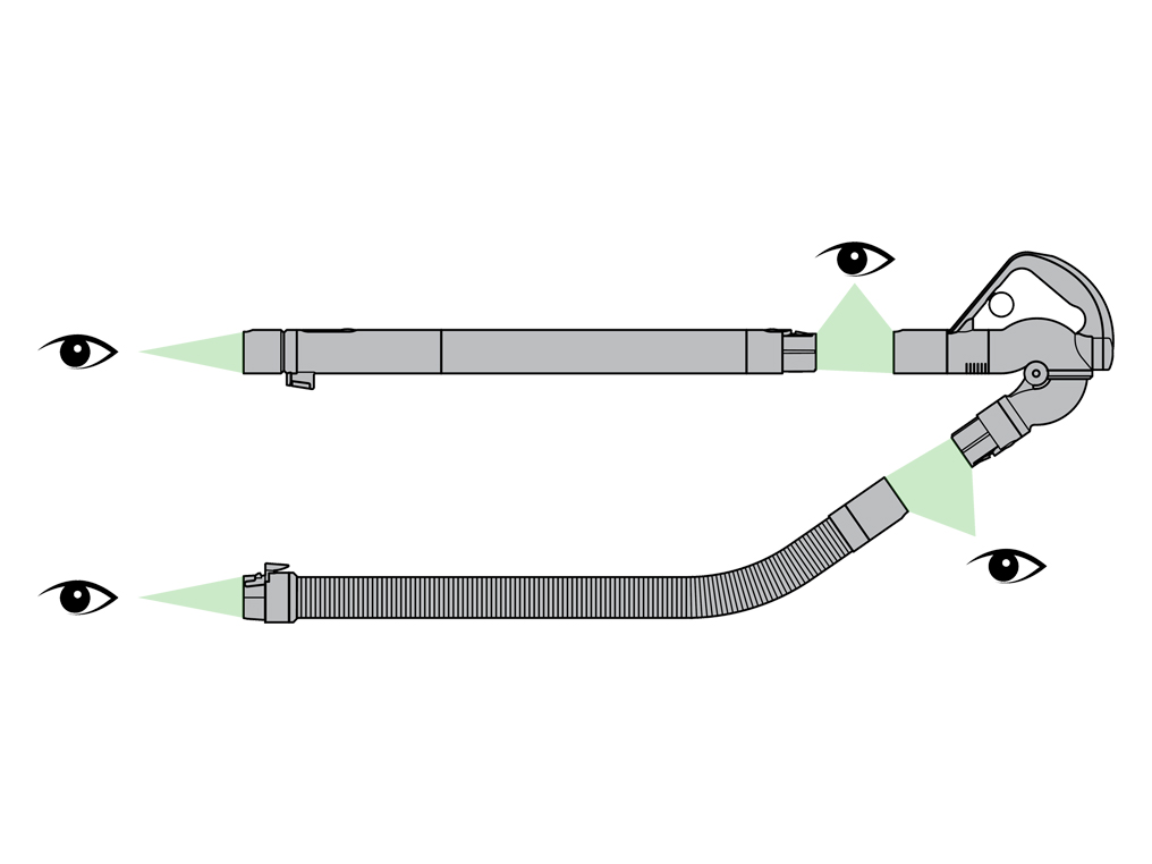
Inspect Critical Connection Points for Hidden Blockages
The true blockage often hides where components join. Check these three spots with a flashlight:
– Wand-to-hose connector: Slide the wand out of the hose. Feel inside the rubber collar for hair wrapped tightly around the inner tube—this creates an airtight seal that blocks airflow. Use tweezers to pull out tangled hair.
– Hose-to-vacuum port: Peer into the rubber grommet on the vacuum body. Shine light sideways to spot flat objects like coins or credit cards wedged against the port wall. A bent paperclip with tape on the end lifts debris safely.
– “Y” connector near the bin: On the Ball Animal 2, a small plastic diverter (shaped like a Y) sits behind the front inspection hatch. This is the #1 blockage hotspot. Remove the hatch (see next section), then use needle-nose pliers to extract bottle caps or Lego pieces jammed in its channels.
Unlock the Inspection Hatch: Your Secret Blockage Portal

Locate and Clear the Front Access Hatch
This translucent plastic panel on the front of the cyclone housing is the gateway to hidden blockages. Press both release tabs simultaneously (they’re stiff—use thumbs) to pop it out. Do not skip this step—Dyson engineers placed it specifically to access the hose airway’s narrowest point. Shine your flashlight through the opening: you’ll see a clear tube running toward the hose port. If it’s packed with dust bunnies or small toys (common in homes with kids), use a 2-foot length of stiff, flexible wire (like a weed-whacker filament) to push debris toward the bin. Never use sharp objects; the tube is thin plastic. Reinsert the hatch only when you see clear airflow through it.
Fix the Diverter Valve Jam (Most Common Culprit)
Diagnose and Unstick the Suction Switch
That colored button (usually red or blue) near the bin isn’t just cosmetic—it’s a mechanical valve redirecting air to the hose. When jammed, it physically blocks the hose airway. Here’s how to test it:
1. Turn the vacuum on floor mode (hose detached)
2. Press the diverter button fully down—listen for a click
3. Now press it up to hose mode—it must click again
If it doesn’t click or feels sticky, debris is trapped. Remove the inspection hatch (as above). With the vacuum off, use a toothpick to scrape hair or string from the valve’s pivot points. Work the button 10 times while blowing compressed air into the hose port—this flushes out micro-debris. If the valve still sticks, apply one drop of silicone lubricant (never WD-40) to the pivot. Test suction immediately after.
Clean Both Filters—Even If They Look Fine
Wash and Dry Pre-Motor and HEPA Filters Properly
Clogged filters cause suction loss at all ports—even if floor cleaning seems okay. The Ball Animal 2 has two:
– Pre-motor filter: Behind the bin, near the cyclone base. Pull the tab to release it.
– Post-motor HEPA filter: At the rear exhaust, under a rubber flap.
Rinse both under cold running water only (hot water melts filters). Swirl them gently—never scrub. Squeeze out water by pressing against a towel. Critical step: Air-dry filters flat on a rack for full 24 hours. Reinstalling damp filters causes mold and permanent suction loss. Pro tip: Set phone reminders to wash filters every 3 months—mark your calendar when you reinstall them.
Diagnose Internal Hose Damage Without Disassembly

Spot Collapsed Hoses and Air Leaks in Seconds
A damaged hose won’t seal properly, causing weak suction. Here’s the fast test:
1. Disconnect hose from wand and vacuum
2. Hold one end over a lit candle (in a sink)
3. Turn vacuum to max power on hose mode
If the flame bends toward the hose, suction is good—problem is elsewhere. If not, inspect for:
– Kinks: Run hands along the hose; deep creases won’t spring back
– Leaks: Submerge hose in water while vacuum runs—bubbles pinpoint holes
– Internal collapse: Shine light through hose while flexing; collapsed sections appear flattened
Replace the hose if damaged (Dyson part # 921519-01 costs $35). Never tape leaks—a poor seal overheats the motor.
When to Avoid DIY and Call Dyson
Identify Unfixable Motor or Valve Failures
Stop troubleshooting if you see these red flags:
– Burning smell from the motor housing
– Intermittent suction (works for 10 seconds, then dies)
– Diverter button won’t click after cleaning
– No suction even with all components removed
These indicate internal motor failure or a broken valve mechanism requiring factory service. If your vacuum is under 5 years old, contact Dyson immediately—they’ll often cover repairs free under warranty. Have your serial number (on the bin base) ready. For out-of-warranty units, a certified repair shop ($75–$120) beats replacing the $400 vacuum.
Prevent Future Hose Failures: 3 Pro Habits
Implement These After-Every-Use Checks
Avoid repeat failures with these field-tested habits:
– The 10-second hose flush: After vacuuming stringy debris (pet hair, threads), run the vacuum without the wand for 10 seconds. This blasts residual fibers out of the hose.
– Listen for the pitch shift: A motor changing from a low hum to a high whine means stop immediately and check the hose path. Running blocked risks permanent motor damage.
– Store hose coiled loosely: Never wrap it tightly around the wand—this creates permanent kinks that restrict airflow over time.
Final Verification: The 30-Second Suction Test
Before reassembling, confirm your fix works:
1. Reconnect hose directly to vacuum (no wand)
2. Hold hose end over a tissue
3. Turn vacuum to max power
The tissue should stick firmly within 3 seconds. If not, repeat the diverter valve check—it’s the most common oversight. Once confirmed, reattach the wand and enjoy restored furniture cleaning power. Remember: suction loss is almost always a blockage—not a broken vacuum. By targeting these specific points, you’ve just saved $150 in service fees and extended your Dyson’s life by years. For ongoing maintenance, bookmark Dyson’s official filter washing video—it shows the exact drying posture to prevent warping. Your hose shouldn’t fight you; it should glide like new.

