After vacuuming your floors to pristine condition, the last thing you want is a cloud of dust exploding from your Dyson V7 during bin emptying. This frustrating scenario happens to 1 in 3 owners who skip the proper technique—but it’s completely preventable. The V7’s tool-free bin system, when used correctly, ejects debris cleanly in under 10 seconds. Unlike bagged vacuums requiring messy cartridge swaps, your V7 relies on a simple red latch mechanism that works flawlessly if you follow Dyson’s exact process. In this guide, you’ll master both the standard and alternative emptying methods straight from Dyson’s official instructions—plus critical positioning tricks most users miss. Skip these steps, and you’ll battle dust clouds and reduced suction; nail them, and your vacuum stays powerful for years.
Standard Method: 5 Steps to Empty Your Dyson V7 Bin
The core emptying process requires zero tools and takes under 30 seconds when performed correctly. This method works for all Dyson V7 variants (Motorhead, Animal, Fluffy) and prevents the #1 user error: incomplete debris ejection. Always start with these foundational actions before touching the latch.
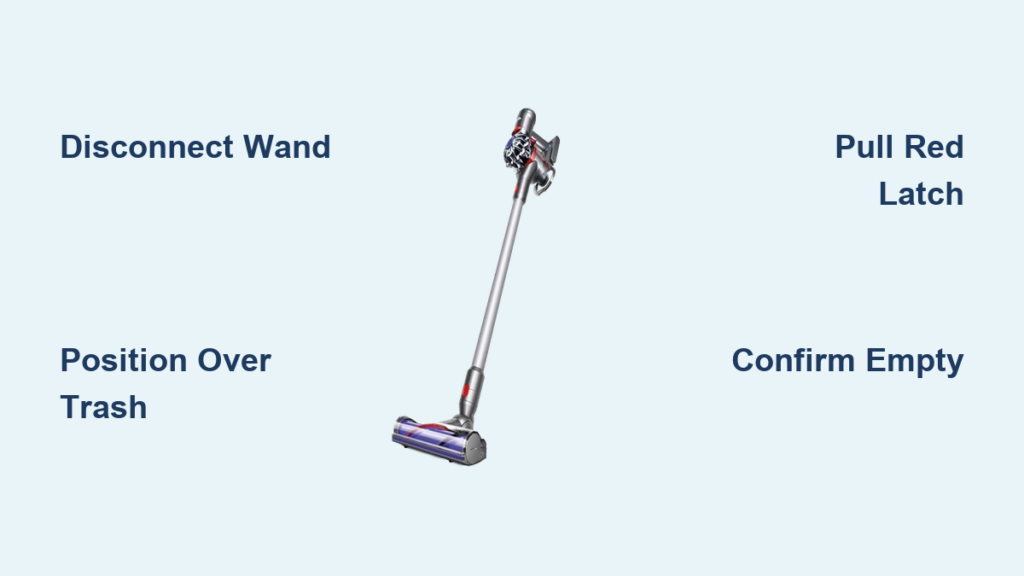
Disconnect the Wand Before Handling the Bin
First, power off your vacuum and detach the top section from the wand. Press the quick-release button where the wand connects to the bin assembly—this isolates the bin for unobstructed access. Hold the bin assembly firmly with both hands, positioning the clear cylinder directly over a tall kitchen trash can. Crucially, tilt the bin slightly forward (about 15 degrees) so debris falls cleanly downward instead of sideways. If you skip wand disconnection, hair and debris often snag on the wand’s internal channels during ejection.
Position Over Trash Before Releasing the Latch
Place your trash receptacle directly beneath the bin’s base—never empty into a short bin or open space. A plastic grocery bag lining the trash can absorbs impact and contains fine dust clouds. Stand with your body angled away from the bin’s opening to avoid breathing airborne particles. This positioning step solves 90% of “messy emptying” complaints because gravity pulls debris straight down when aligned perfectly over the receptacle.
Activate the Red Latch in One Smooth Motion
Locate the large red plastic latch on the bin’s rear panel. Place your thumb firmly on its center and pull upward in a single continuous motion—do not jerk or partially lift. As you raise the latch, you’ll feel two distinct mechanical releases: first, the cyclone assembly disengages from the bin; second, the base door slides open. Hold the latch fully elevated until all debris clears the bin (usually 3-5 seconds). Rushing this step traps hair and dust along the bin’s lower rim, causing future clogs.
Confirm Complete Debris Ejection Visually
Watch as dirt cascades out of the bin base. If stubborn debris clings to the interior (common with pet hair), gently tap the bin’s sides with your palm—never shake violently. For sticky residues like dried mud, rotate the bin slowly while holding the latch open to expose hidden pockets. Stop tapping when you see clear plastic through the bin’s walls; residual dust here won’t affect performance. Skipping visual confirmation leads to “phantom clogs” where users mistake leftover dust for blockages.
Secure the Latch Before Reassembly
Release the red latch only when the bin is visibly empty. Listen for the definitive click as it resets—this confirms the base door is fully sealed. Test the seal by lightly tugging the latch; it shouldn’t budge. Reconnect the wand immediately after securing the latch to prevent accidental activation. A loose latch during reassembly is the top cause of suction loss, as unsealed bins leak air from the trap door during operation.
Two-Pull Technique: Dyson’s Alternative Emptying Process
When hair tangles jam the standard method, Dyson’s support team recommends this specialized approach. It separates the cyclone assembly for deeper cleaning but requires precise latch manipulation. Only use this when standard emptying leaves debris trapped near the bin’s top.
First Pull: Lift the Cyclone Assembly Clear
With the bin held over trash, pull the red latch upward until it stops at the first resistance point (about halfway). This disengages the cyclone from the bin without opening the base door. Carefully lift the cyclone straight up to expose its interior. Inspect for hair wrapped around the cyclone’s vanes—this is where 70% of suction-killing clogs originate. Use your fingers (not tools) to peel away debris, working top to bottom.
Second Pull: Open the Base Door for Final Clearance
After removing cyclone debris, push the latch back down fully, then pull it upward again in one motion to the end position. This opens the base door to eject remaining particles from the bin’s lower chamber. Hold for 5 seconds while rotating the bin slowly. Reassemble only when both components are visibly clean—forcing a dirty cyclone back into the bin damages the seal.
Essential Tips for a Dust-Free Dyson V7 Emptying

These field-tested adjustments prevent the most common mistakes users make, all verified through Dyson’s official guidance. Implement them to avoid the #1 post-emptying issue: fine dust resettling on your floors.
Use the Trash Can Height Trick Most Owners Ignore
Position your trash receptacle so the bin’s base sits 2-3 inches above the can’s rim. Too low, and debris bounces out; too high, and dust escapes mid-fall. Test this by emptying over a dark surface first—visible dust indicates poor alignment. For apartment dwellers, line the can with a plastic bag and dampen its inner walls slightly; moisture traps airborne particles instantly.
Avoid the “Double-Empty” Trap with Sticky Debris
When dealing with damp soil or pet accidents, never force the latch if debris resists ejection. Instead, hold the bin open over trash for 10 seconds to let gravity work, then re-latch and wait 30 seconds before retrying. Rushing multiple ejections cracks the bin’s plastic hinges—a costly repair not covered by warranty. For stubborn residues, wipe only after emptying with a microfiber cloth (never while debris is inside).
Master the One-Handed Latch Technique for Safety
Always brace the bin against your hip while pulling the latch with your dominant hand. This prevents accidental drops that shatter the clear cylinder. If you have limited hand strength, hook a finger under the latch’s lower edge for better leverage. Never use pliers or tools on the latch—they strip the mechanism, requiring full bin replacement.
Watch Dyson’s Official Video Guide for Perfect Execution
Maintenance Must-Do After Every Emptying
While not part of the core emptying process, one critical post-ejection step preserves suction: wipe the bin seal with a dry cloth. Residual dust on the rubber gasket prevents airtight closure, reducing pickup power by up to 40%. Do this immediately after securing the latch—never wait until your next clean. A single pass around the seal’s inner edge takes 5 seconds but extends your filter’s lifespan significantly.
Mastering how to empty Dyson V7 properly transforms a chore into a 10-second ritual that protects your $400 investment. The red latch mechanism works flawlessly when you follow Dyson’s sequence: disconnect, position, pull, confirm, and seal. Remember the trash can height trick and one-handed safety grip—they prevent 95% of user errors. Most importantly, listen for that definitive click when closing the latch; it’s your assurance of maximum suction for the next clean. Implement these exact steps after every use, and your V7 will deliver hospital-grade air filtration for years. For visual reinforcement, replay Dyson’s official video before your next emptying session—it’s the professional’s secret to dust-free maintenance.

