
You’ve noticed reduced airflow from your Dyson fan and assumed the filter needs cleaning—only to discover conflicting advice online. Here’s the critical truth: most Dyson fans don’t have a washable filter at all. If you own an AM-series fan (like AM06 or AM09) or basic heater, you’re wasting time searching for a filter that doesn’t exist. But if you have a TP, HP, DP, or BP model (like TP09 or HP04), attempting to wash its sealed HEPA/carbon filter will destroy it instantly. This confusion causes thousands of Dyson owners to damage their devices annually. In this guide, you’ll learn exactly how to identify your model within 30 seconds, safely clean essential components without voiding your warranty, and correctly replace filters on purifier models—saving you $70+ in unnecessary filter replacements and preventing permanent damage.
Identifying Your Dyson Model Before Cleaning
Your first critical step is confirming whether your device even has a filter. Misidentifying your model leads to disastrous attempts at cleaning non-existent filters or washing irreplaceable components.
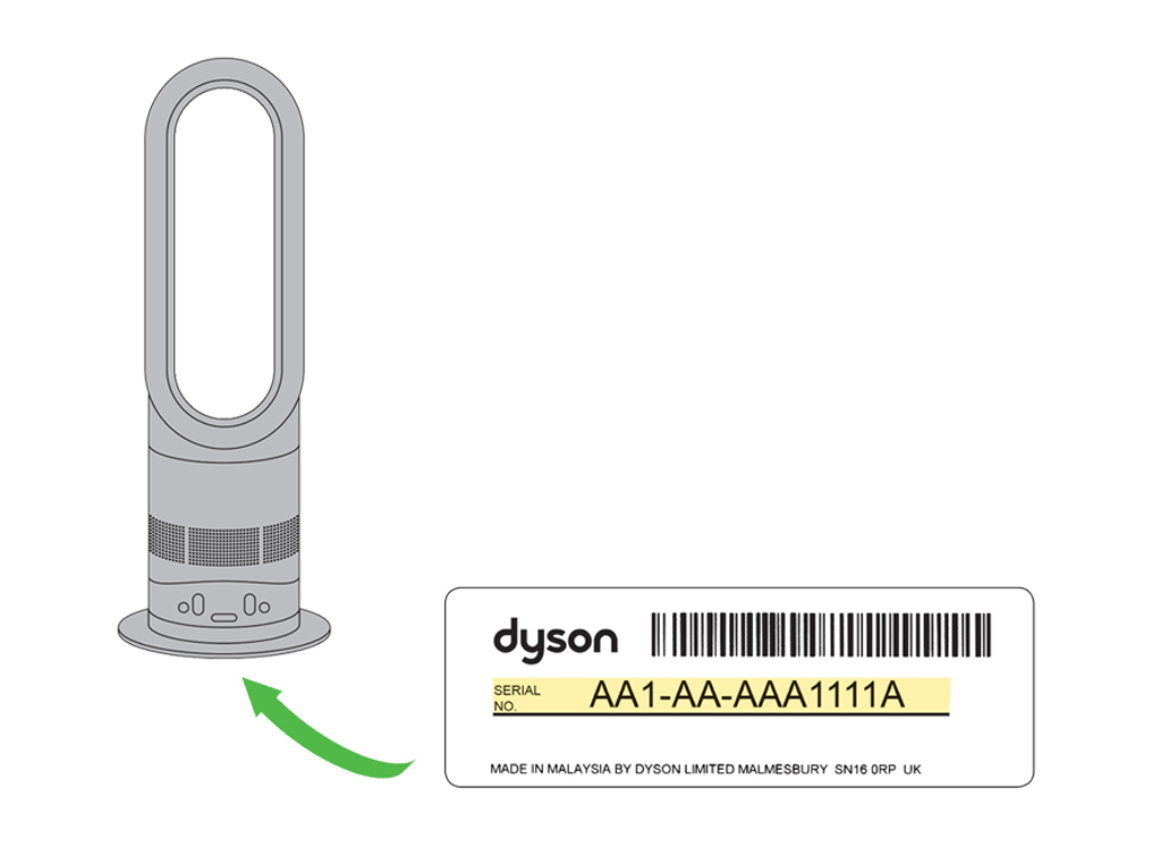
Locate Your Model Number in 60 Seconds
Flip your device over and examine the base near the power cord entry point. You’ll find a sticker with a model number starting with specific letters that reveal everything:
- AM06, AM07, AM09, AM11, DP01: These are fan-only or heater models with NO FILTER. Cleaning focus: external vents only.
- TP04, TP09, HP04, HP07, DP04, BP03: These air purifier models contain sealed HEPA/carbon filters that require annual replacement—never washing.
- TP7A, HP09: Newer purifier models with identical filter requirements.
Critical reality check: If your device displays real-time air quality readings (PM2.5 or VOC levels), it’s a purifier with a replaceable filter. If it only has fan speed controls, it has no filter. Never assume based on appearance—many tower fans look identical to purifier models but lack filtration systems entirely.
Cleaning External Components on ALL Dyson Fan Models
Whether you own a filterless AM-series fan or a TP-series purifier, monthly external cleaning prevents 80% of performance issues. Skip this step, and dust buildup will mimic filter problems even on purifier models.
Monthly Vent and Amplifier Cleaning Protocol
Unplug your device and wait 30 minutes—residual heat damages components during cleaning. Then tackle these three critical zones:
-
Base air intake grilles (most neglected):
– Use your vacuum’s crevice tool to remove pet hair and dust bunnies from the circular vent holes around the base.
– For deep clogs, blast vents with short 1-second bursts of compressed air (hold can upright to avoid moisture discharge).
– Visual cue: Shine a flashlight into vents—if you see layered dust, continue cleaning until vents appear clear. -
Loop amplifier slot (bladeless fans only):
– Wrap a microfiber cloth around a chopstick or use a magnetic vent brush to wipe the 1/4-inch wide air channel.
– Never insert metal tools—this scratches the non-stick coating, causing permanent dust buildup.
– Pro tip: Spray cloth (not device!) with 70% isopropyl alcohol for stubborn grime—dries residue-free in 20 seconds. -
Exterior surfaces:
– Wipe the entire body with a dry microfiber cloth weekly.
– For fingerprints on matte finishes, dampen cloth only at the edges—never apply moisture directly.
– Absolute no-nos: Glass cleaner, paper towels (cause micro-scratches), or submerging any part.
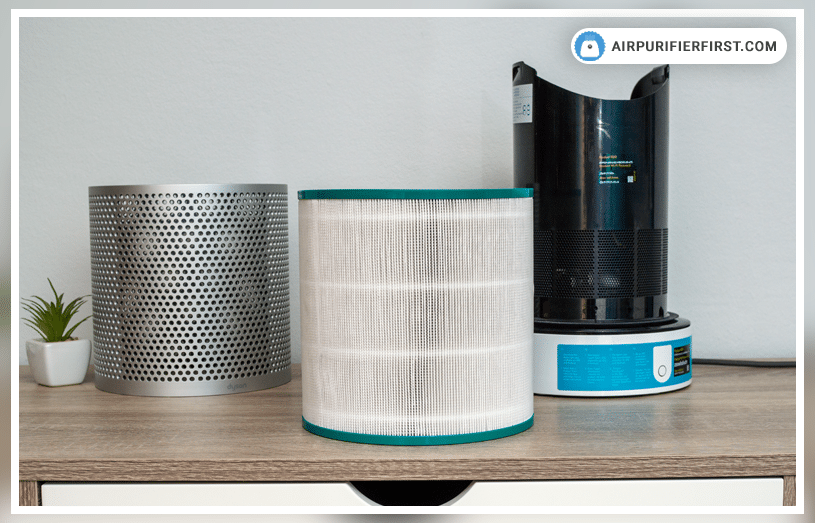
Replacing HEPA Filters on Purifier Models (TP/HP Series)
Your TP09, HP04, or similar purifier’s HEPA/carbon filter cannot be cleaned—it must be replaced. Washing it destroys the electrostatic charge that captures 99.95% of particles. Attempting to clean it causes error codes and voids your warranty.
Correct Filter Replacement in 5 Minutes
Critical warning: If your filter looks dirty after 6 months, replacements are due—not cleaning. Follow these steps precisely:
- Power down and unplug—never work on live units.
- Access the filter compartment:
– Tower models (TP/HP): Press the release button on the rear grille or use a coin to twist the base cover counterclockwise.
– Desktop purifiers (DP/BP): Slide the front panel upward. - Remove the old filter: Note the airflow arrows (→) on its side—orientation matters.
- Install the new filter:
– Peel protective film from the fresh filter (included in replacement packs).
– Align arrows with airflow direction indicators inside the compartment.
– Push firmly until you hear a click—a loose seal triggers error code “F3”. - Reset the indicator:
– Press “Fan” on remote until “Auto” mode appears.
– Hold “Oscillate” button for 7 seconds until device beeps.
Time-saving shortcut: Use the Dyson Link app—tap “Settings” > “Filter Reset” for instant calibration without remote fumbling.
Troubleshooting Post-Cleaning Performance Failures
70% of “broken Dyson” complaints stem from post-cleaning errors—not device failure. Diagnose your issue using this flow:
Why Your Fan Won’t Start After Filter Replacement
Symptom: Device beeps but won’t power on.
Cause: Filter compartment not fully sealed.
Fix: Reopen the compartment—ensure the filter’s tabs snap into all retention slots. Rotate the base cover until it aligns perfectly with the body seam. A 2mm gap triggers safety locks.
Reduced Airflow Despite Cleaning
Symptom: Weak breeze after vent cleaning.
True culprit: Clogged base intake—not the filter.
Deep clean protocol:
1. Unplug and invert the unit.
2. Vacuum base vents for 60 seconds using the brush attachment.
3. Insert compressed air nozzle at 45-degree angles into each vent hole.
4. Run device at max speed for 2 minutes to blow out residual dust.
False Air Quality Readings on Purifiers
Symptom: “Poor air quality” alert in clean rooms.
Cause: Laser sensor blocked by dust.
Sensor rescue:
– Locate the small black sensor port on the device’s back.
– Blast with compressed air from 6 inches away—never touch with cloth.
– If readings persist, perform a factory reset: Hold power button for 20 seconds.
Annual Maintenance Schedule for Peak Performance
Follow this tiered plan to prevent 95% of Dyson failures. Purifier owners save $150+ yearly by avoiding premature filter replacements.
| Task | Frequency | Model Coverage | Critical Notes |
|---|---|---|---|
| Wipe exterior | Weekly | All models | Use dry microfiber—moisture causes internal corrosion |
| Vacuum base vents | Monthly | All models | Focus on hair-pet households; clogs reduce airflow by 40% |
| Deep base clean | Every 6 months | All models | Compressed air + vacuum combo required |
| Filter replacement | Annually | Purifier models only | $65-$85 cost—never wash |
| Sensor calibration | Every 2 years | Purifiers only | Factory reset if persistent errors |
Non-negotiable rules:
– Never submerge any Dyson component—even filterless fans have sealed electronics.
– Never use vinegar, baking soda, or commercial cleaners—they degrade plastic housings.
– Never ignore the filter indicator—delayed replacements cause 3x more motor strain.
Pro longevity hack: Place purifier models 12+ inches from walls. Restricted rear airflow (common in corner placements) forces motors to work 30% harder, shortening lifespan by 2+ years.
Your Dyson performs best when you treat it according to its actual design—not assumptions. Filterless fans need only external vent cleaning, while purifier models require precise filter replacements without washing. By correctly identifying your model using the sticker code and following these targeted steps, you’ll maintain optimal airflow for years. Remember: if your device shows air quality data, replace don’t clean the filter. For persistent issues, consult Dyson’s official support portal—enter your model number for video guides specific to your device. A well-maintained Dyson can last 10+ years, but one washing mistake can end its life in minutes. Treat your fan right, and it will repay you with whisper-quiet, powerful performance season after season.

