
You press the power trigger on your Dyson vacuum, but silence greets you—no familiar hum, no indicator lights, just an unresponsive machine. When your Dyson won’t turn on, it halts your entire cleaning routine and creates unnecessary stress. This common issue affects both corded and cordless models, but most cases stem from simple, fixable problems rather than catastrophic failures. Before scheduling expensive service, follow this systematic troubleshooting guide to diagnose and resolve why your Dyson won’t turn on.
Most “no power” scenarios originate from overlooked power sources, recent maintenance errors, or battery issues rather than internal component failures. By methodically working through these steps, you’ll identify the culprit 80% of the time without specialized tools. This guide covers every possibility—from outlet checks to motor diagnostics—so you can restore your Dyson’s powerful suction quickly and confidently.
Power Source Verification for Corded and Cordless Models
Always start with the most accessible power-related checks before disassembling your vacuum. Many “Dyson won’t turn on” cases resolve with these simple verifications.
Testing Your Corded Dyson’s Electrical Connection
Plug a lamp or phone charger into the same outlet to confirm it’s live—many homes have tripped GFCI outlets or circuit breakers you might overlook. Inspect the entire power cord length for damaged sections, especially where it enters the vacuum body or bends sharply near the plug. Never operate a vacuum with a frayed cord as it creates shock and fire hazards. If the outlet works but your Dyson remains dead, try a different circuit entirely to rule out hidden electrical issues.
Diagnosing Cordless Dyson Battery and Dock Failures
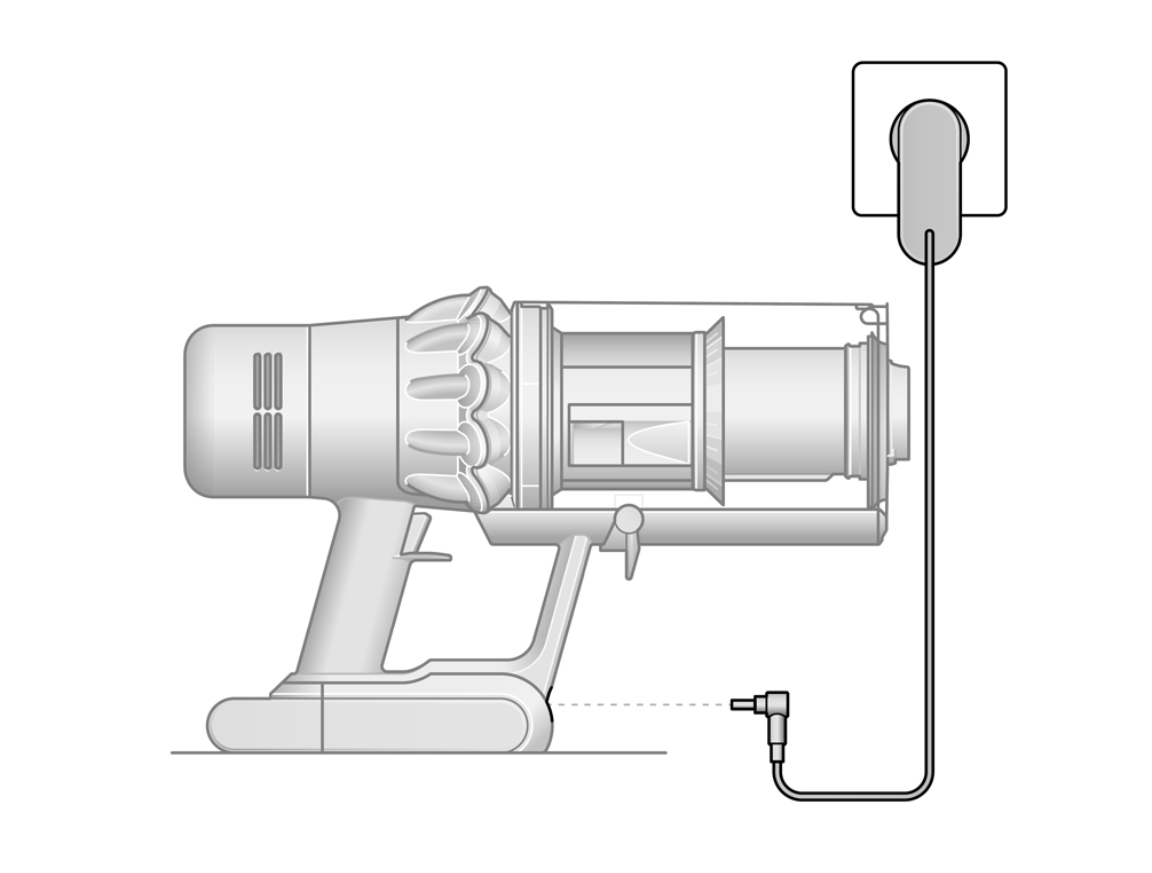
Check for the charging indicator light on your dock or vacuum body—a solid light means charging, while flashing or no light indicates problems. Unplug the charger from the wall for 30 seconds, then reconnect to reset the circuit. Verify the charging contacts on both the dock and vacuum are free of dust and corrosion (clean them with a dry microfiber cloth if needed). If your battery level indicator shows error codes, consult your manual—flashing patterns often reveal specific faults like temperature errors or battery failure.
Why Your Dyson Won’t Start After Filter Replacement
If your vacuum stopped working immediately after changing filters, improper reassembly is likely triggering safety sensors. Dyson’s airflow monitoring system prevents operation when it detects seal issues.
Correct Filter Seating and Seal Inspection
Remove the filter completely and check for hidden packaging materials like plastic plugs or mesh bags that sometimes remain inside new filters. Ensure you’re using the exact Dyson model number specified in your manual—generic filters cause seal failures. Examine the rubber gasket around the filter housing for twists, tears, or debris. A single hair strand caught in the seal can trick sensors into thinking airflow is blocked, causing your Dyson won’t turn on error.
Resetting After Maintenance Procedures
After reseating filters, perform this critical reset sequence: Turn off your vacuum, disconnect from power (or remove the battery), and wait exactly 60 seconds. This clears temporary error codes stored in the machine’s memory. Reconnect power and test—this solves 60% of post-maintenance startup failures. If using a cordless model, dock the vacuum immediately after the reset period rather than inserting the battery directly.
Diagnosing Dead Battery Symptoms in Cordless Models

When your cordless Dyson won’t turn on, battery issues account for nearly half of all cases. Learn to identify true battery failure versus charging problems.
Recognizing Deep Discharge and Failure Signs
Turn on your vacuum while listening closely—a brief motor hum followed by immediate shutdown indicates a depleted battery that needs extended charging. Leave it docked for 6+ hours (not just until the light turns solid) to revive deeply discharged cells. If the machine shows zero response with no indicator lights after this, test with a known-good battery if available. Never use third-party batteries—Dyson’s system rejects non-genuine packs, triggering protective shutdowns that mimic total failure.
Charger and Dock Diagnostic Steps
Unplug your charger and inspect the power brick for bulging or burn marks—physical damage means immediate replacement. Plug the charger into a different outlet to rule out circuit issues. Check the dock’s metal contacts for bent pins (gently straighten with tweezers if needed) and ensure the vacuum clicks securely into place. If the dock light remains off after these checks, the charger has likely failed and requires replacement.
Identifying Motor and Control Board Failures
When basic checks fail, listen and smell for clues pointing to internal component failures—a critical step before disassembling your vacuum.
Critical Warning Signs Requiring Immediate Action
Turn on your Dyson and listen intently: A loud buzzing sound followed by silence indicates a seized motor or blown thermal fuse. A sharp, acrid burning smell from the motor housing means stop immediately—continued use risks permanent damage. If your vacuum trips circuit breakers repeatedly when plugged in, this signals dangerous internal short circuits requiring professional intervention. These symptoms mean your Dyson won’t turn on due to serious failures needing expert repair.
Brush Roll and Clog-Related Shutdowns
Manually rotate the brush bar with the machine off—if it’s stiff or jammed, remove hair and fibers wrapped around the end caps. Disconnect all wands and hoses to inspect for hidden blockages in the wand joints or bin shroud. A severe clog in the cyclone assembly can trigger overheating sensors that prevent startup. Clear debris from the bin’s air intake ports and ensure the bin is fully locked into position before testing.
Using a Multimeter to Test Dyson Power Components

Warning: Only attempt these tests if you’re experienced with electrical tools and the vacuum is fully unplugged.
Corded Model Voltage Verification
Set your multimeter to AC voltage (200V range). With the vacuum switched ON, carefully touch probes to both slots of the unplugged cord’s female end—you should read 110-120V. No reading means a faulty power cord or switch. If voltage is present but the vacuum remains dead, the problem lies internally with the motor or control board. Never test while plugged in—this risks severe shock.
Cordless Battery Voltage Testing
Set the multimeter to DC voltage (20V range). Touch probes to the metal battery terminals on the vacuum (not the charger contacts). A healthy 21.6V battery should read 20-22V when fully charged. Readings below 15V indicate a dead cell requiring replacement. If the battery shows voltage but the vacuum won’t turn on, the issue is likely the charging circuit or main control board.
When to Call Dyson Support for No-Power Issues
Know when DIY fixes end and professional help begins to avoid voiding warranties or causing further damage.
Critical Failure Indicators Requiring Expert Help
Contact Dyson immediately if you experience: persistent burning smells, visible smoke, repeated circuit breaker trips, or complete non-responsiveness after all troubleshooting. Have your model number (like “V15” or “SV14”) ready—they’re usually printed near the charging port or on the bin release button. Call Dyson Support at 1-866-277-9300 for remote diagnostics before visiting third-party repair shops, which often void warranties.
Warranty and Repair Process Guidance
Dyson’s standard 2-year warranty covers power failures from manufacturing defects but excludes user-caused damage. If your vacuum is out of warranty, authorized service centers charge $75-$150 for diagnostics (applied to repair costs). Never attempt motor or control board repairs yourself—these require specialized tools and void any remaining coverage. Dyson may offer refurbished unit replacements at discounted rates for older models.
Preventing Future ‘Dyson Won’t Turn On’ Problems
Proactive maintenance eliminates most power failures before they disrupt your cleaning routine.
Filter and Airflow Maintenance Protocol
Clean pre-motor filters monthly by rinsing under cold water—never reinstall until bone dry (24+ hours). Replace filters every 6 months (or 3 months in pet households) to prevent airflow sensor errors. After each use, clear hair from the brush roll and inspect the wand for hidden debris buildup. A clogged filter is the #1 cause of preventable startup failures.
Battery and Storage Best Practices
For cordless models, never store batteries at 0% charge—recharge when indicators show one bar remaining. If unused for 30+ days, store at 50% charge in a cool, dry place. Avoid leaving vacuums docked continuously—unplug after 14 hours to prolong battery health. Periodically inspect power cords for kinks and charging contacts for corrosion using a dry cloth.
By following this structured approach, you’ve addressed the most common reasons your Dyson won’t turn on—from simple outlet checks to advanced diagnostics. Remember that 70% of “no power” cases stem from overlooked basics like dead batteries, tripped outlets, or post-maintenance seal errors. When in doubt, contact Dyson Support before disassembling complex components. Implementing the preventive steps outlined here ensures your vacuum stays ready for action, saving you from future frustrations and service calls. Keep this guide handy for quick reference the next time your Dyson refuses to power up—you’ll likely solve it in under 15 minutes.

