Your Dyson V10 motorhead not working while the main suction still functions is one of the most common vacuum frustrations. You’re cleaning carpets when suddenly the brush roller stops spinning, leaving debris untouched despite strong airflow from the main unit. This isn’t random bad luck—it’s almost always a fixable mechanical or electrical issue.
Most Dyson V10 motorhead not working scenarios stem from hair tangles, broken connections, or simple electrical faults—not complete motor failure. By following this targeted diagnostic process, you’ll pinpoint the problem in under 15 minutes. Stop guessing whether to replace parts or call a technician; this guide gives you the exact steps Dyson service centers use to revive non-spinning cleaner heads.
Why Your Dyson V10 Motorhead Stops Spinning While Suction Works
When your Dyson V10 motorhead not working occurs but main suction remains strong, the problem isolates to the power delivery path for the brush roller. This happens because the V10 uses separate motors: one for suction (still working) and a smaller DC motor exclusively for the brush bar. Common triggers include physical obstructions overwhelming the motor or broken electrical connections cutting power.
Immediate Checks Before Disassembly
Don’t skip these critical first steps:
– Check filter status – A clogged pre-motor or post-motor filter can cause overheating that triggers safety cut-offs. Remove and tap filters over a trash can, then rinse under cool water if heavily soiled.
– Inspect for airway blockages – Run a cleaning rod through the wand and main body. Even partial obstructions reduce airflow enough to mimic motorhead failure.
– Verify battery charge – Low voltage (<50%) can prevent the brush motor from engaging. Fully charge the battery before proceeding.
Time estimate: 3 minutes. If these checks resolve the issue, you’ve avoided unnecessary disassembly.
Isolate the Fault: Wand, Motorhead, or Main Vacuum Body
This critical test determines where to focus your efforts. Never assume the motorhead is dead—faults often lie elsewhere in the power chain.
Direct Connection Test for Pinpoint Accuracy
- Remove the wand completely
- Attach the motorhead directly to the main vacuum body (no wand)
- Turn on the vacuum and observe:
- Motorhead spins? → Fault is in the wand’s electrical contacts
- Motorhead still dead? → Problem is either the motorhead itself or main body
Visual cue: Examine the wand’s metal contacts for corrosion or bent pins. Wipe with isopropyl alcohol if dirty.
Cross-Test with Another Motorhead
Borrow a compatible Dyson motorhead (V8/V10/V11 models share compatibility). Attach it directly to your main body:
– New head works → Your original motorhead is faulty
– New head also dead → Main vacuum body has failed
Pro tip: If borrowing isn’t possible, check if your crevice tool attachment has electrical contacts (some models do). Test it as a makeshift powerhead—no spin confirms main body failure.
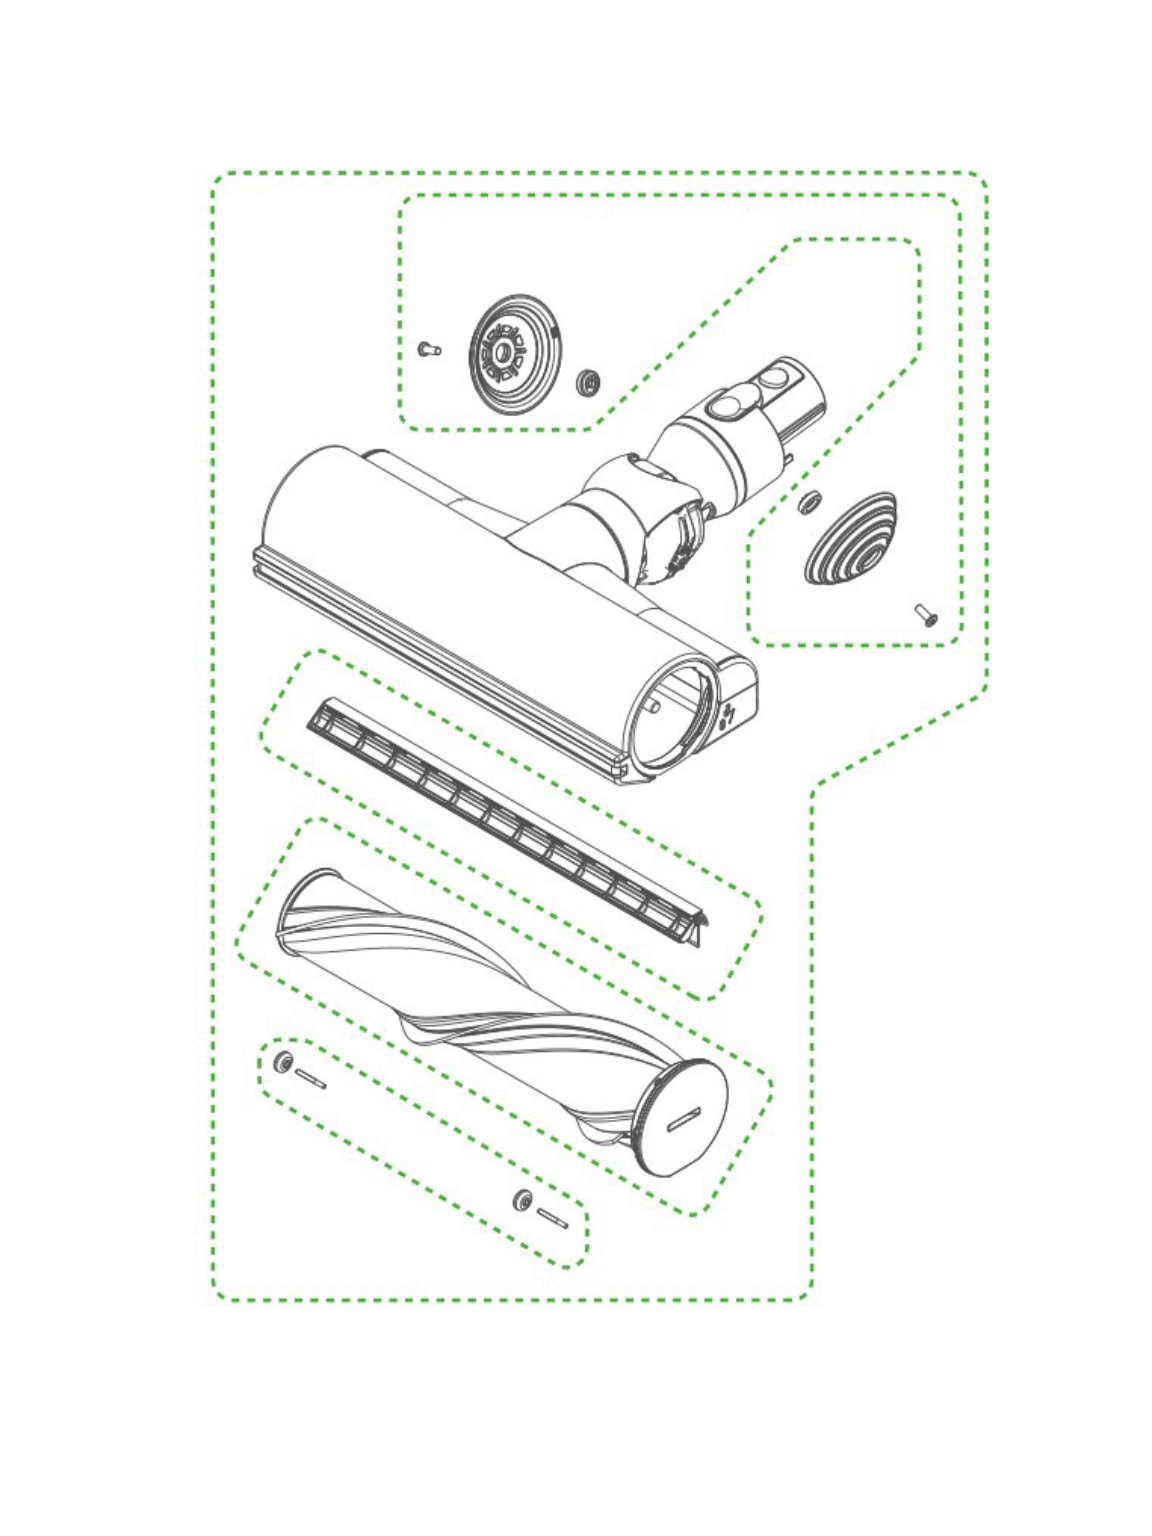
Diagnose a Jammed Brush Bar in 3 Minutes
Hair and thread jams cause 70% of Dyson V10 motorhead not working cases. This isn’t just surface debris—it’s hair tightly wound around the brush bar ends where bearings rotate.
Step-by-Step Jam Removal Process
- Flip vacuum head face down and locate two red clips under soleplate
- Press clips inward while lifting soleplate off (no tools needed)
- Critical inspection point: Manually spin brush bar. If resistance feels gritty or stiff, debris is present
- Use seam ripper to cut hair strands wrapped around bar ends (focus on bearing areas)
- Remove brush bar completely by pulling ends straight out
- Clean central driveshaft housing with stiff brush—remove all lint buildup
Warning: Never force the brush bar. If stuck, apply rubbing alcohol to dissolve hair glue before cutting.
Time estimate: 5 minutes. Success confirmed when brush bar spins freely by hand with zero resistance.
Repairing Broken Wiring in the Motorhead’s Pivot Neck
Intermittent operation (spins at certain angles but not others) signals broken wires in the neck pivot—a known V10 weakness from repeated flexing.
Identifying Neck Wiring Failure
- Symptom pattern: Head works when fully extended but dies when bent downward
- Visual inspection: Shine light into neck joint while flexing head. Look for frayed wires near pivot point
- Critical test: With vacuum running, gently wiggle the neck. If brush motor stutters, wiring is compromised
Pro tip: Before disassembly, wrap electrical tape around the neck joint. If operation stabilizes, you’ve confirmed the fault.
Soldering Repair Steps
- Remove screws securing neck housing (usually 4 Torx T8 screws)
- Carefully separate housing halves to expose wiring
- Locate broken wire(s) near pivot point (often the thinner wire)
- Strip 2mm insulation from both ends and tin with solder
- Solder connection and insulate with heat-shrink tubing
- Reassemble housing with fresh screws
Difficulty indicator: Advanced DIY skill required. Allow 45 minutes. If uncomfortable with soldering, skip to replacement.
Testing and Cleaning Faulty Electrical Pins on the Vacuum Body

Stuck or dirty contacts on the main body prevent power delivery to any motorhead. This causes identical symptoms to a dead motorhead.
Pin Inspection Protocol
- Locate gold-plated spring pins inside main body’s wandless port
- Press each pin gently with non-conductive tool (toothpick works):
- ✅ Healthy pin: Springs back immediately with audible click
- ❌ Faulty pin: Sticks inward, feels mushy, or sits lower than partner pin
- Critical test: Clean pins with isopropyl-soaked cotton swab while pressing repeatedly
Warning: Never use metal tools—bending pins causes permanent damage. If a pin feels loose or doesn’t spring back, internal contact is broken.
Voltage Verification with Multimeter
- Set multimeter to DC 20V range
- Insert probes into main body port (one in each pin hole)
- Turn vacuum on to max power
- Reading: Should show 22-24V DC
- 0V = Main PCB failure
- Intermittent voltage = Dirty pins
- Full voltage = Motorhead fault
Time estimate: 2 minutes. This test eliminates guesswork about main body functionality.
When the Main Vacuum PCB Has Failed: Repair vs. Replace
If a known-good motorhead fails on your main body and pins show full voltage, the main PCB has likely failed—a rare but serious issue.
Confirming PCB Failure
- Suction motor works normally
- Battery charges and displays correct level
- No response from any motorized attachments
- Multimeter shows correct voltage at pins (ruling out contact issues)
Expert note: Failed MOSFET transistors (Q1/Q2 components) commonly cause this. Visible burn marks on the PCB confirm failure.
Cost-Benefit Analysis
| Repair Option | Cost | Success Rate |
|---|---|---|
| DIY PCB component replacement | $15 (parts) | 40% (requires microsoldering) |
| Dyson authorized repair | $120+ | 85% |
| New main body unit | $200 | 100% |
| Refurbished V10 | $150 | 95% |
Decision rule: For units over 2 years old, replacement usually beats repair costs. Keep your old battery and cleaner heads with a refurbished unit.
Dyson V10 Motorhead Replacement Cost Analysis: DIY vs. Professional
Replacing the motorhead is often smarter than complex repairs—but only if you’ve confirmed the fault.
When Replacement Makes Sense
- Brush bar bearings are cracked or melted
- Internal motor shows no hum/vibration when tested
- Neck wiring damage is extensive
- Unit is out of warranty (Dyson covers 2 years)
Price check: Genuine Dyson Motorhead retails for $89. Third-party alternatives cost $35-$55 but may lack suction power.
Professional Repair Red Flags
Avoid paying for these “repairs” that should be DIY:
– “Cleaning service” for $75 – You can do this in 10 minutes
– “Motor recalibration” – V10 brush motors aren’t user-calibratable
– “Software reset” – The motorhead has no firmware
Pro tip: Search eBay for “Dyson V10 Motorhead used” – functional units often sell for $25 with shipping. Test immediately upon arrival.
Preventing Future Motorhead Failures: Maintenance Routine
Stop recurring Dyson V10 motorhead not working issues with these weekly habits:
60-Second Preventive Maintenance
- After each use: Flip head and blow compressed air through brush bar openings
- Weekly: Remove soleplate and check for hair buildup at bearing points
- Monthly: Apply 1 drop of sewing machine oil to brush bar ends
- Never vacuum long hair without pre-picking debris
Critical habit: Clean the brush bar before it jams. If you hear grinding noises during use, stop immediately and clear debris. Waiting until it seizes often burns out the motor.
Storage Best Practices
- Store with head detached from main body
- Keep neck in neutral (straight) position
- Never wrap cord tightly around head
- Store in dry area below 80°F (27°C)
When your Dyson V10 motorhead not working strikes, remember: 9 of 10 cases are simple jams or connection issues solvable in under 15 minutes. Start with the brush bar inspection—this resolves most problems without tools. If wiring or PCB issues persist, weigh replacement costs against your unit’s age. For ongoing reliability, implement the 60-second weekly maintenance to prevent 95% of failures. Keep this guide handy for your next motorhead malfunction—you’ll likely fix it faster than calling customer support.

